Instrument Panel Fuse Holder, Removing and Installing
Fuse Panel B -SB- with Left Instrument Panel Fuse Panel, Removing and Installing
Removing
- Remove the driver side instrument panel cover. Refer to → Body Interior; Rep. Gr.68; Storage Compartments and Covers; Driver Side Instrument Panel Cover, Removing and Installing.
- Open the retaining clip in direction of -arrow A- and remove fuse panel B -item 2- on the instrument panel central tube -1- in direction of -arrow B-.
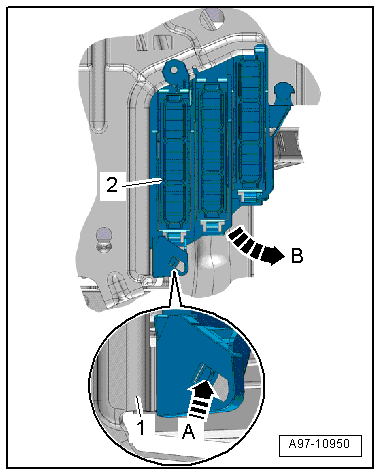
- Release the retaining clip -1--arrow- and remove the fuse carriers -2, 3 and 4- from fuse panel B.
- Remove fuse panel B.
Installing
Install in reverse order of removal.

Left Instrument Panel Fuse Carrier, Removing and Installing
Removing
- With the ignition switched off, disconnect the ground cable from the battery. Refer to → Chapter "Battery, Disconnecting and Connecting".
- Remove the driver side instrument panel cover. Refer to → Body Interior; Rep. Gr.68; Storage Compartments and Covers; Driver Side Instrument Panel Cover, Removing and Installing.
- Release the retaining clip -1- in direction of -arrow- and remove the fuse carriers -2, 3 and 4- from fuse panel B.
- Unlock the release and remove it from the fuse carrier.
- Remove the fuses from the fuse carrier.
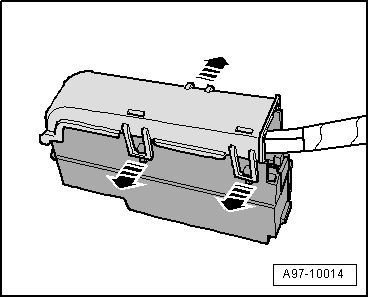
- Open the clips in direction of -arrows- and remove the fuse carrier cover.
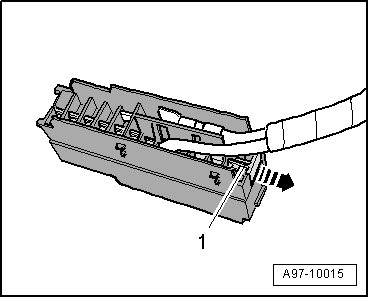
- Pull off retaining strip -1- for the connectors in direction of -arrow- and remove the connectors from the plug-in socket
 Note
Check the exact connector assignment in the current wiring diagram → Wiring diagrams, Troubleshooting & Component locations.
Installing
Install in reverse order of removal. Note the following:
- Connect the battery. Required steps: vehicles without high voltage system. Refer to vehicles with high voltage system.
Fuse Panel C -SC- with Right Instrument Panel Fuse Panel, Removing and Installing
Removing
- Remove the instrument panel side cover. Refer to → Body Interior; Rep. Gr.70; Instrument Panel; Instrument Panel Side Cover, Removing and Installing.
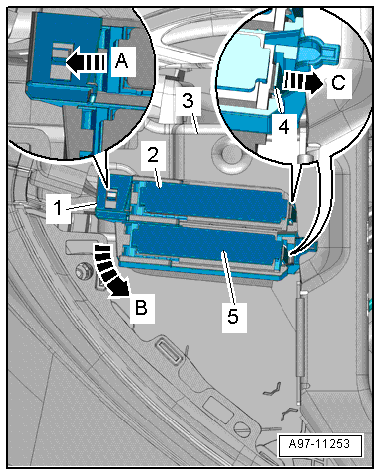
- Open the tab -4- in direction of -arrow- and remove the fuse carriers -2 and 5- out of fuse panel C.
- Open the retaining clips in direction of -arrow A- and remove fuse panel C -item 1- in direction of -arrow B- on the central tube -3- for the instrument panel.
- Remove fuse panel C.
Installing
Install in reverse order of removal.
Right Instrument Panel Fuse Carrier, Removing and Installing
Removing
- With the ignition switched off, disconnect the ground cable from the battery. Refer to → Chapter "Battery, Disconnecting and Connecting".
- Remove fuse panel C. Refer to → Chapter "Fuse Panel C -SC- with Right Instrument Panel Fuse Panel, Removing and Installing".
- Unlock the release and remove it from the fuse carrier.
- Remove the fuses from the fuse carrier.
- Open the clips in direction of -arrows- and remove the fuse carrier cover.
- Pull off retaining strip -1- for the connectors -arrow- and remove the connectors from the plug-in socket
Note
Check the exact connector assignment in the current wiring diagram → Wiring diagrams, Troubleshooting & Component locations.
Installing
Install in reverse order of removal. Note the following:
- Connect the battery. Required steps: vehicles without high voltage system. Refer to vehicles with high voltage system.