Rearview Camera -R189-, Removing and Installing
Rearview Camera -R189-, Removing and Installing, Sedan
The Rearview Camera -R189- is inside the rear lid handle button. It permanently attached to the button.
If the Rearview Camera -R189- must be replaced, then the handle button must also be replaced.
- Turn off the ignition and all electrical consumers and remove the ignition key.
Removing
The Rearview Camera -R189- has a trailing cable. The vehicle wiring harness couplings are located in the rear lid.
- Remove the rear lid trim panel. Refer to → Body Interior; Rep. Gr.70; Luggage Compartment Trim Panels; Lower Rear Lid Trim Panel, Removing and Installing.
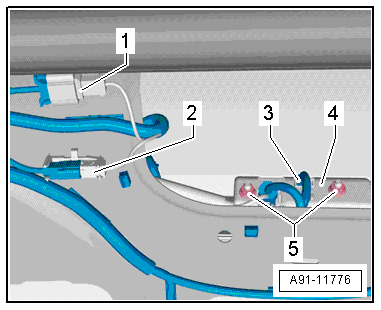
- Release and disconnect the connectors -1-, -2- and -3- in the rear lid.
The Rearview Camera -R189- is firmly attached to the handle button.
 Note
Depending on the market, it may be necessary to remove the license plate or the license plate bracket.
- Remove the nuts -5-.
- Pull the handle button -4- with the Rearview Camera -R189- out of the retainer in the rear lid.
Installing
- Install in reverse order of removal.
- Close the rear lid.
- Perform a calibration. Refer to → Chapter "Rearview Camera System, Aligning and Calibrating".
Rearview Camera System, Aligning and Calibrating
Calibration Tool -VAS6350-, Installing and Aligning
Special tools and workshop equipment required
- Calibration Tool -VAS6350-
- Vehicle Diagnostic Tester
After performing service work on the vehicle, it may be necessary to calibrate the rearview camera system. In detail, this is the case after:
- Rearview Camera -R189- Removal and Installation
- Replacing Rearview Camera System Control Module -J772-
- Collision repairs on rear lid
- Changes to the axle alignment on the rear axle
Calibration Requirements
- The camera lens must be clean. Cleaning
- The vehicle must be standing on a firm and level surface.
- There must be enough clearance around the vehicle (at least 2 meters).
- The parking brake must be set.
- The steering wheel must be in the 0 position and the wheels must be straight.
- All doors and the rear lid must be closed.
- No one should be in the vehicle.
- The vehicle must not be loaded (curb weight).
- Connect the battery charger.
- Ignition switched on.
The Calibration Tool -VAS6350- consists of the following parts:
- Calibration Tool - Wheel Center Mountings -VAS6350/1-
- Calibration Tool - Spacing Laser -VAS6350/2-
- Calibration Tool - Linear Laser -VAS6350/3-
Installed Calibration Tool -VAS6350- Overview
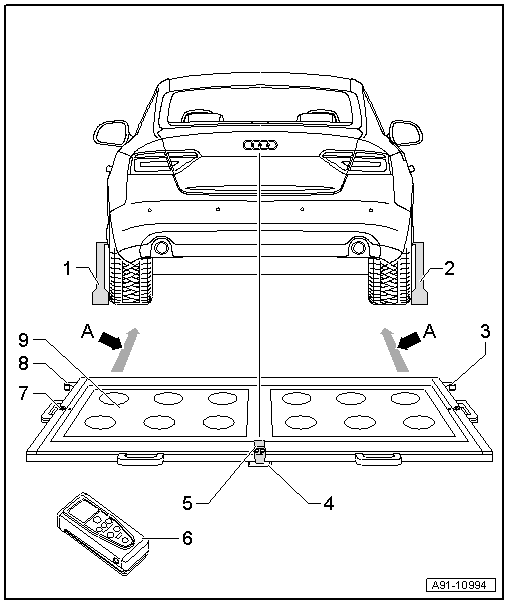
1 - Calibration Tool - Wheel Center Mountings -VAS6350/1-
2 - Calibration Tool - Wheel Center Mountings -VAS6350/1-
3 - Right Angle Bracket
- Calibration Tool - Spacing Laser -VAS6350/2- mount
4 - Plastic Foot
- Three on underside of calibration platform
- Adjustable for aligning horizontal position of calibration platform
5 - Calibration Tool - Linear Laser -VAS6350/3-
- On the calibration board
- Switching on and off. Refer to Operating Instructions.
6 - Calibration Tool - Spacing Laser -VAS6350/2-
- On the calibration board
- Notes on operation. Refer to Operating Instructions.
7 - Level
- On the calibration board
- for checking the horizontal position
8 - Left Angle Bracket
- Calibration Tool - Spacing Laser -VAS6350/2- mount
9 - Calibration Board
- Between the mounts on the calibration board and the Calibration Tool - Wheel Center Mountings -VAS6350/1--dimension A- 1.47 m through 1.90 m
Calibration board alignment
- Position the calibration platform behind the vehicle at a distance of 1.47 m to 1.90 m to the rear wheels, see -dimension A- in the illustration.
- Bring the Calibration Tool -VAS6350- into a horizontal position.
- To do so, twist plastic feet under calibration device so that air bubble in level is located exactly in the center of the indicator -arrow-.
 WARNING
Make sure light does not reflect off the calibration platform.
Reflections affect the Rearview Camera -R189- and may make it impossible to perform the calibration.

- Switch on the Calibration Tool - Linear Laser -VAS6350/3--1- on the calibration board and adjust the entire Calibration Tool -VAS6350- so that the laser beam hits the center of vehicle rear above the Audi rings.
- Make sure the Audi rings are centered on the rear. Correct the laser beam accordingly.
Continue calibrating the Rearview Camera -R189-. Refer to → Chapter "Rearview Camera -R189-, Calibrating".

Rearview Camera -R189-, Calibrating
- Setup requirements.
- Connect the Vehicle Diagnostic Tester.
Calibration Tool - Wheel Center Mountings -VAS6350/1- installing:
- Check the dimension of the holes.
- Equip the Calibration Tool - Wheel Center Mountings -VAS6350/1- appropriately. Use spacer pieces.
- To do so, secure three wheel bolt adapters in the hole circle to each Calibration Tool - Wheel Center Mountings -VAS6350/1-.
- Place the paddle on both Calibration Tool - Wheel Center Mountings -VAS6350/1- and secure them using a clamping screw.
- Place the Calibration Tool - Wheel Center Mountings -VAS6350/1- onto the wheel bolts on the rear wheels.
The Calibration Tool - Wheel Center Mountings -VAS6350/1- are positioned by the "O rings" in the adapters and held in place.
Note
Attach the Calibration Tool - Wheel Center Mountings -VAS6350/1- onto the wheels so that any installed "anti-theft" wheel mounting bolts are not connected to the Calibration Tool - Wheel Center Mountings -VAS6350/1-.
- Adjust the paddle with aid of lock bolts so that they move freely just above the floor. Make sure that the paddle is easily accessible.
- Install and align the Calibration Tool -VAS6350-. Refer to → Chapter "Calibration Tool -VAS6350-, Installing and Aligning".
Distance measurement:
- Switch on the Calibration Tool - Spacing Laser -VAS6350/2-.

The following display appears:

The display shows how to stop the Calibration Tool - Spacing Laser -VAS6350/2-. Press the corresponding button.
1 - Attach with front edge
2 - Attach with rear edge

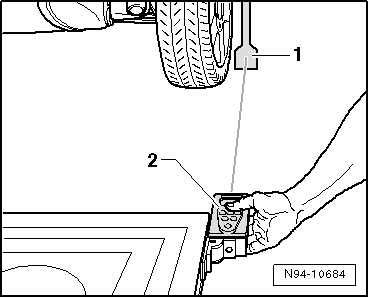
- Hold the Calibration Tool - Spacing Laser -VAS6350/2--2- flush in the bracket on one side of the calibration board (attach with rear edge). The Calibration Tool - Spacing Laser -VAS6350/2--2- must sit securely on the bracket.
- Press the measuring button briefly.
The laser turns on.
- Make sure that laser beam from Calibration Tool - Spacing Laser -VAS6350/2--2- hits lower, enlarged part of paddle -1-.
If this is not the case, paddles must be corrected accordingly via clamping screws on the Calibration Tool - Wheel Center Mountings -VAS6350/1-.
- Use one hand to secure the Calibration Tool - Spacing Laser -VAS6350/2- in the bracket on the Calibration Tool -VAS6350- while the laser beam is visible on the paddle.
- Then press the measuring button for distance measurement briefly.
- Write down the value.
- Repeat this measurement on the other side of the Calibration Tool -VAS6350- in the same way for the rear wheel.
The distance value must be the same on both sides.
If values are not identical:
- Align the Calibration Tool -VAS6350- long enough so that both sides are identical.
Pay attention when aligning the Calibration Tool -VAS6350-, that the Calibration Tool - Linear Laser -VAS6350/3- from the Calibration Tool -VAS6350- strikes the center of the Audi rings and the indicator of the level remains centered. Adjust if necessary.
Dimension measurement -H-:
- Measure the height of the Calibration Tool -VAS6350-, dimension -H- (top edge platform - floor).
Make sure the Calibration Tool - Spacing Laser -VAS6350/2- is adjusted correctly (attach with front edge).

The display shows how to stop the Calibration Tool - Spacing Laser -VAS6350/2-. Press the corresponding button.
1 - Attach with front edge
2 - Attach with rear edge
Enter the height and distance dimensions into the Vehicle Diagnostic Tester in "millimeters".
Performing calibration
Vehicle Diagnostic Tester is attached.
- Select the Diagnostic mode and start the diagnostics.
- Select the tab test plan.
- Select select individual tests and choose the following sequence.
- Body
- Electrical Equipment
- 01 - OBD-capable systems
- 6C - rearview camera system/J772
- 6C - rearview camera system control module, functions
- 6C - Calibration, (Repair Group 91)
From here the Vehicle Diagnostic Tester advances the calibration procedure forward.
WARNING
Make sure light does not reflect off the calibration platform.
Reflections affect the Rearview Camera -R189- and may make it impossible to perform the calibration.
Rearview Camera System Control Module -J772-, Removing and Installing
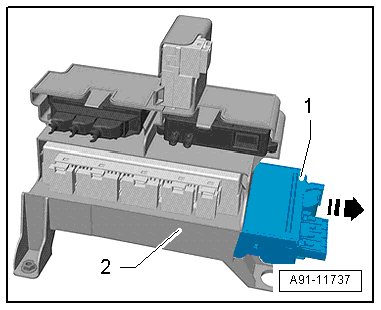
The Rearview Camera System Control Module -J772--1- is located behind the right luggage compartment trim panel.
Note
If replacing the control module, select the "Replace Control Module" function on the Vehicle Diagnostic Tester.
Removing
- Turn off the ignition and all electrical consumers and remove the ignition key.
- Remove the right luggage compartment side trim panel. Refer to → Body Interior; Rep. Gr.70; Luggage Compartment Trim Panels; Luggage Compartment Side Trim Panel, Removing and Installing.
The bracket must be removed first in order to be able to remove the Rearview Camera System Control Module -J772-. It is attached with screws to the relay and fuse panel F inside the luggage compartment on the right side. The relay and fuse panel F in the luggage compartment on the right side must first be removed. Refer to → Electrical Equipment; Rep. Gr.97; Relay Carriers, Fuse Panels and E-Boxes; Overview - Relay Carriers, Fuse Panels and E-Boxes.
Removing the bracket
- Unlock and disconnect all of the connectors from the control modules.

- Remove the nuts -arrows- and remove the bracket -1- along with the control modules from the luggage compartment recess.

The Rearview Camera System Control Module -J772--1- is only clipped into the bracket -2-.
- Release and disconnect the connectors from the Rearview Camera System Control Module -J772--1-.
- Press the retainer downward and remove the Rearview Camera System Control Module -J772--1- from the bracket -2-.
Installing
- Install in reverse order of removal.
- Perform a calibration. Refer to → Chapter "Rearview Camera System, Aligning and Calibrating".
Rearview Camera System Control Module -J772- Connectors
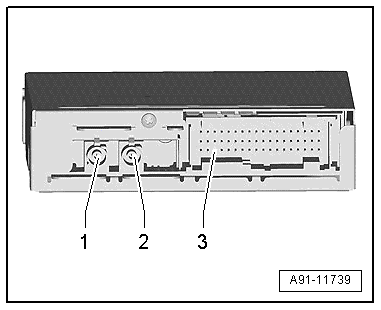
Rearview Camera System Control Module -J772- Connectors, through MY 2014
Rearview Camera System Control Module -J772-
1 - CVBS input from the Rearview Camera -R189-
2 - CVBS output to the Information Electronics Control Module 1 -J794-
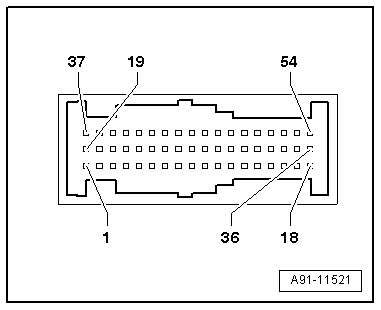
3 - 54-Pin Connector -T54a-
Note
Unlisted connector terminals are not assigned.
3 - 54-Pin Connector -T54a-
39 - Convenience CAN Bus low
40 - Convenience CAN Bus high
43 - Terminal 30
44 - Terminal 31
47 - Terminal 31 to the Rearview Camera -R189-
48 - Rearview Camera -R189- power supply