Seat Position Sensor
Overview - Seat Position Sensor
 Note
The seat position sensor is the same in all seat versions.

1 - Lower Seat Frame
2 - Driver Seat Position Sensor -G553-
- Front passenger side: Front Passenger Seat Position Sensor -G554-
- Versions with Passenger Occupant Detection System for Seat Belt Latch Detection, Removing and installing. Refer to → Chapter "Seat Position Sensor, Removing and Installing".
3 - Bolt
- 1,2 N·m
Seat Position Sensor, Removing and Installing
The seat position sensor is provided as a replacement part with the wiring harness and the black 10-pin harness connector. The following wires with connectors are contained in the wiring harness:
- Wire with seat belt latch coupling connector (driver seat).
- Wire with seat belt latch coupling connector (passenger seat).
- Wire with Front Passenger Occupant Detection Sensor -G128- coupling connector.
- Market-specific: wire with Passenger Occupant Detection System Control Module -J706- coupling connector with Passenger Occupant Detection System Pressure Sensor -G452-.
Removing
 WARNING
- Follow all Safety Precautions when working with pyrotechnic components. Refer to → Chapter "Pyrotechnic Components Safety Precautions".
- Before handling pyrotechnic components (for example, disconnecting the connector), the person handling it must "discharge static electricity". This can be done by touching the door striker, for example.
- Remove the front seat. Refer to → Chapter "Front Seat, Removing and Installing".
- Fasten the front seat on the Engine/Transmission Holder - Seat Repair Fixture -VAS6136-. Refer to → Chapter "Front Seat, Mounting on Fixture for Seat Repair".
- Remove the bolt -3-.
- Disengage the hook -arrow- of the seat position sensor -2- from the seat pan lower frame -1-.
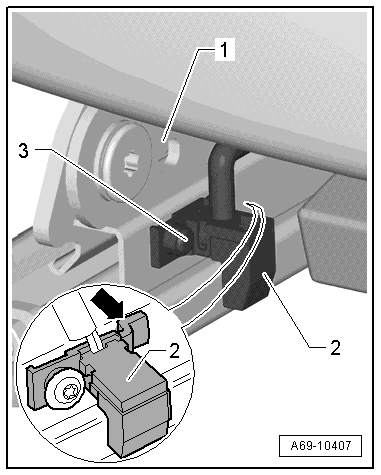
Driver Seat
- Open corrugated tube -3- and remove electrical wire with 10-pin belt latch connector:
- For the connector station harness connectors
- For modular wiring with corrugated tube on front seat. Refer to → Chapter "Front Seat Wire Routing".
- Open the cable tie or clips -2- as far as the connector.
- Disconnect the connector -4-.
1 - Wire to the seat belt latch
2 - Wire for the 10-pin connector (black) and Driver Seat Position Sensor -G553-
Note
The connector -1- together with the wire and wire clip remain on the upper seat frame.
- Remove the seat position sensor together with the electrical wires from the seat pan lower frame.

Front Passenger Seat
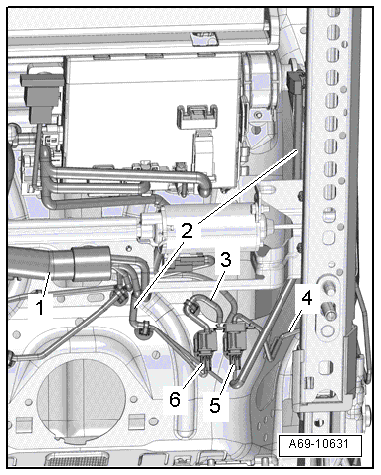
- Open the corrugated tube -1- and remove the wire with the 10-pin connector for the seat belt latch:
- For the connector station harness connectors
- For modular wiring with corrugated tube on front seat. Refer to → Chapter "Front Seat Wire Routing".
- Open the cable tie or clips -2- as far as the connectors.
- Disconnect the connectors -5 and 6-.
2 - Wire for the 10-pin connector (black) and Front Passenger Seat Position Sensor -G554-
3 - Wire to Front Passenger Occupant Detection Sensor -G128-
4 - Wire to the seat belt latch
Note
The connectors and wires -3 and 4- and clips remain on the upper seat frame.
- Remove the seat position sensor together with the electrical wires from the seat pan lower frame.
Installing
WARNING
- Follow all Safety Precautions when working with pyrotechnic components. Refer to → Chapter "Pyrotechnic Components Safety Precautions".
- Before handling pyrotechnic components (for example, connecting the connector), the person handling it must "discharge static electricity". This can be done by touching the door striker, for example.
- Observe all measures when installing the front seat. Refer to → Chapter "Front Seat, Removing and Installing".
Install in reverse order of removal. Note the following:
Installation notes, for example tightening specifications, replacing components. Refer to → Chapter "Overview - Seat Position Sensor".
Belt Fastening Detection
Front Passenger Occupant Detection Sensor -G128-, Removing and Installing
Note
The passenger occupant detection sensor is only installed in the front passenger seat.
Special tools and workshop equipment required
- Wiring Harness Repair Set - Hot Air Blower -VAS1978/14A- Only for front seats with heating element.
Removing
WARNING
- Follow all Safety Precautions when working with pyrotechnic components. Refer to → Chapter "Pyrotechnic Components Safety Precautions".
- Before handling pyrotechnic components (for example, disconnecting the connector), the person handling it must "discharge static electricity". This can be done by touching the door striker, for example.
- Disconnect the battery Ground (GND) cable with the ignition turned on. Refer to → Electrical Equipment; Rep. Gr.27; Battery; Battery, Disconnecting and Connecting.
- Remove the front passenger seat. Refer to → Chapter "Front Seat, Removing and Installing".
- Fasten the front seat on the Engine/Transmission Holder - Seat Repair Fixture -VAS6136-. Refer to → Chapter "Front Seat, Mounting on Fixture for Seat Repair".
- Remove the padding from the rear part of the seat cover until the passenger occupant detection sensor is freed up (seat pan). Refer to → Chapter "Seat Pan Cover and Cushion, Separating".
- Disconnect the connector for the passenger occupant detection system sensor.
Manual or Power Standard Seat/Sport Seat/Super Sport Seat
- If equipped, carefully warm the seat-heating element using the Wiring Harness Repair Set - Hot Air Blower -VAS1978/14A-.
- Remove the seat heating element just far enough until the passenger occupant detection system sensor is free.
- Carefully detach the passenger occupant detection sensor -3- with the circuit board -2- from the seat cushion -1-.
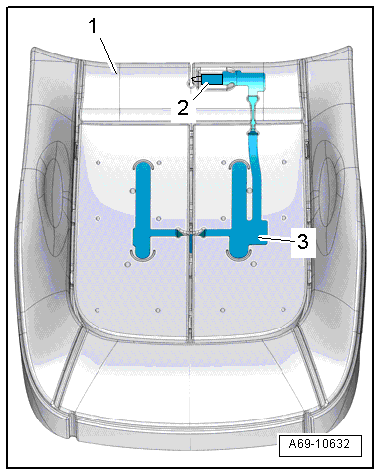
Multi-Contour Seat
- Carefully detach the passenger occupant detection system sensor -1- with circuit board -2- from the seat cushion -3-.
Installing
WARNING
- Follow all Safety Precautions when working with pyrotechnic components. Refer to → Chapter "Pyrotechnic Components Safety Precautions".
- Before handling pyrotechnic components (for example, connecting the connector), the person handling it must "discharge static electricity". This can be done by touching the door striker, for example.

Manual or Power Standard Seat/Sport Seat/Super Sport Seat
- Position the circuit board -2- for the passenger occupant detection sensor -3- in the opening in the seat cushion -1-.
- Align the passenger occupant detection system sensor according to the marks on the seat cushion.
 Caution
The new passenger occupant detection sensor should be installed in the same location on the seat padding as the old sensor.
- Remove the protective film and adhere the passenger occupant detection system sensor to the seat cushion.
Multi-Contour Seat
- Position the circuit board -2- for the passenger occupant detection system sensor -1- in the opening in the seat cushion -3-.
- Align the passenger occupant detection system sensor according to the marks on the seat cushion.
Caution
The new passenger occupant detection sensor should be installed in the same location on the seat padding as the old sensor.
- Remove the protective film and adhere the passenger occupant detection system sensor to the seat cushion.
Procedure for All Seat Versions
Installation is performed in reverse order of removal, while noting the following:
Note
- Make sure the passenger occupant detection system is not covered by the seat heater element heating coils.
- Make sure the connectors are installed correctly and are secure.
WARNING
Ignition must be on when connecting battery. If pyrotechnic components (for example, airbag, belt tensioner) are not repaired correctly, they may deploy unintentionally after connecting battery. There must not be anyone inside the vehicle when connecting the battery.
DANGER!
When working on vehicles with the ignition already switched on or that are ready to drive there is a danger of the engine starting unexpectedly and of being poisoned by gas in enclosed areas. Risk of body parts and/or clothing being clamped or pulled.
Perform the following before switching on the ignition:
- Move the selector lever into P.
- Activate the parking brake
- Turn off the ignition.
- Open the hood
- Connect the charger, such as the Battery Charger -VAS5095A- to the jump start of the 12V vehicle electrical system.
- Turn on the ignition.
- Connect the battery GND cable with the ignition turned on. Refer to → Electrical Equipment; Rep. Gr.27; Battery; Battery, Disconnecting and Connecting.
Note
If the Airbag Indicator Lamp -K75- signals a fault after installing, check the Diagnostic Trouble Code (DTC) memory, erase it and check it again. Refer to Vehicle Diagnostic Tester.