Use of jumper cables
Make sure to connect the jumper coble clomps in exactly the order described below!
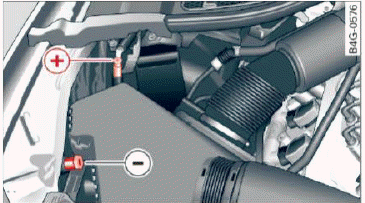
Fig. 208 Engine compartment: connectors for jump start cables and charger
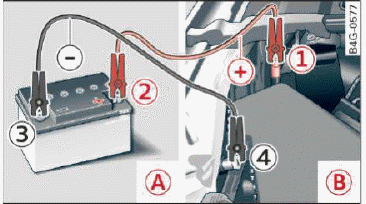
Fig. 209 Jump starting with the battery of another vehicle: A - booster battery, B - discharged vehicle battery
The procedure described below for connecting jumper cables is intended to provide a jump start for your vehicle.
Vehicle with discharged battery:
- Turn off lights and accessories, move lever of automatic transmission to N (Neutral) or P (Park) and set parking brake.
Connect POSITIVE (+) to POSITIVE (+) (red)
- Open the red cover on the positive terminal
 fig. 208.
1. Connect one end of the red positive cable on the jump start bolt fig. 209 1 (bolt under the red cover = "positive") of the vehicle to be started B.
2. Connect the other end to the positive terminal 2 of the booster battery A.
Connect NEGATIVE (-) to NEGATIVE (-) (black)
3. Connect one end of the black negative cable to the negative terminal 3 of the booster battery A.
4. Connect the other end to the jump start pin 4 (bolts with hex head bolt = " negative") of the vehicle to be started B.
Starting the engine
- Start the engine of the vehicle with the booster battery A. Run the engine at a moderate speed.
- Start engine with discharged vehicle battery B in the usual manner.
- If the engine fails to start, do not keep the starter cranking for longer than 10 seconds.
Wait for about 30 seconds and then try again.
- With engine running, remove jumper cables from both vehicles in the exact reverse order.
- Close the red cover on the positive terminal.
The battery is vented to the outside to prevent gases from entering the vehicle interior. Make sure that the jumper clamps are well connected with their metal parts in full contact with the battery terminals.
WARNING
To avoid serious personal injury and damage to the vehicle, heed all warnings and instructions of the jumper cable manufacturer. If in doubt, call for road service.
- Jumper cables must be long enough so that the vehicles do not touch.
- When connecting jumper cables, make sure that they cannot get caught in any moving parts in the engine compartment.
- Before you check anything in the engine compartment, always read and heed all WARNINGS.
Note
Improper hook-up of jumper cables can ruin the generator.
- Always connect POSITIVE (+) to POSITIVE (+), and NEGATIVE (-) to NEGATIVE (-) ground post of the battery manager control unit.
- Check that all screw plugs on the battery cells are screwed in firmly. If not, tighten plugs prior to connecting clamp on negative battery terminal.
- Please note that the procedure for connecting a jumper cable as described above applies specifically to the case of your vehicle being jump started. When you are giving a jump start to another vehicle, do not connect the negative (-) cable to the negative (-) terminal on the discharged battery (4) fig. 209. Instead, securely connect the negative (-) cable to either a solid metal component that is firmly bolted to the engine block or to the engine block itself. If the battery that is being charged does not vent to the outside, escaping battery gas could ignite and explode!