Front Side Door Trim Replacement
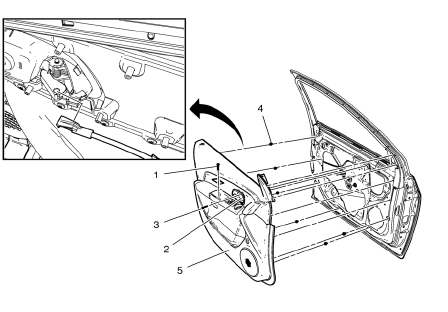
- Front Side Door Pull Handle Bolt
Caution: Refer to Fastener Caution in the Preface section.
Tighten 2 N·m
- Front Side Door Inside Handle Bolt Finish Cap
Tip Pull handle back to remove cap. Use suitable tool to unsnap.
- Front Side Door Inside Handle Bolt
Tighten 2,5 N·m
- Front Side Door Trim Clip (Qty: 10)
- Front Side Door Trim Assembly
Procedure
- Pull upwards on the door lock retainer cable to disengage.
- Disconnect the electrical connectors.
Front Side Door Water Deflector Replacement
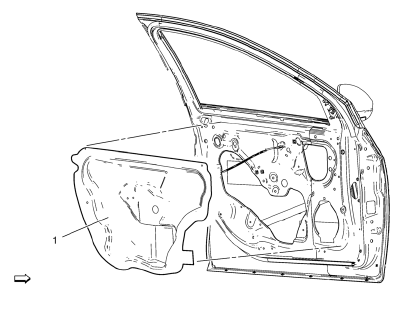
Preliminary Procedure
Remove the front side door trim. Refer to Front Side Door Trim Replacement.
- Front Side Door Water Deflector
Procedure
Pull the water deflector from the door. Guide electrical connectors through the water deflector while removing it from the door.
Rear Side Door Water Deflector Replacement
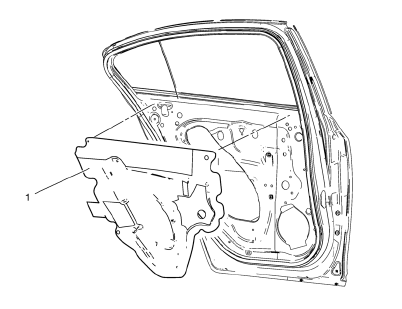
Preliminary Procedure
Remove the rear side door trim. Refer to Rear Side Door Trim Replacement.
Rear Side Door Water Deflector
Procedure
- Pull the water deflector from the door. Guide electrical connectors through the water deflector while removing it from the door.
Rear Side Door Window Garnish Molding Replacement
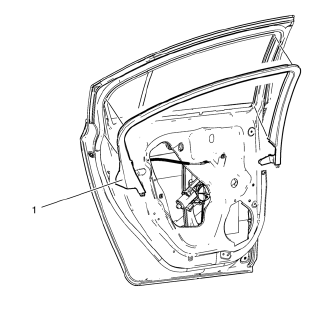
Preliminary Procedure
Remove the rear side door trim. Refer to Rear Side Door Trim Replacement.
- Rear Side Door Window Garnish Molding Assembly.
Front Side Door Window Garnish Molding Replacement
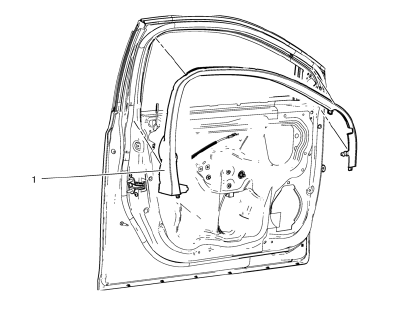
Preliminary Procedure
Remove the front side door trim. Refer to Front Side Door Trim Replacement.
- Front Side Door Window Garnish Molding Assembly.
Front Side Door Sill Trim Plate Replacement
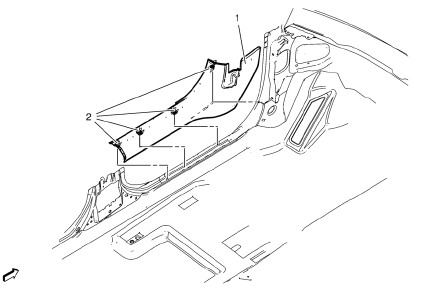
- Front Side Door Sill Trim Plate Assembly.
- Front Side Door Sill Trim Plate Assembly Clip (Qty: 5).
Rear Side Door Sill Trim Plate Replacement
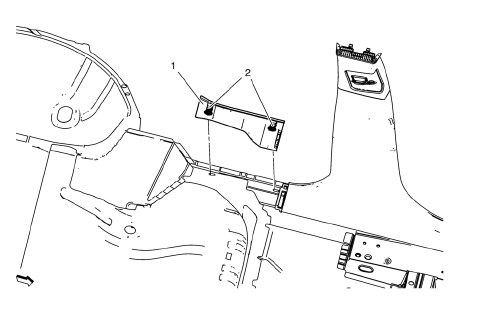
- Rear Side Door Sill Trim Plate Replacement Assembly.
- Rear Side Door Sill Trim Plate Replacement Assembly Clip (Qty: 2).
Front and Rear Side Door Sill Trim Plate Replacement
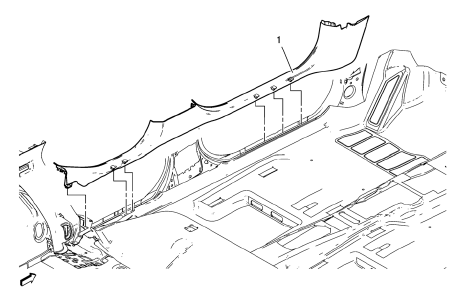
- Front and Rear Side Door Sill Trim Plate
Assist Handle Replacement
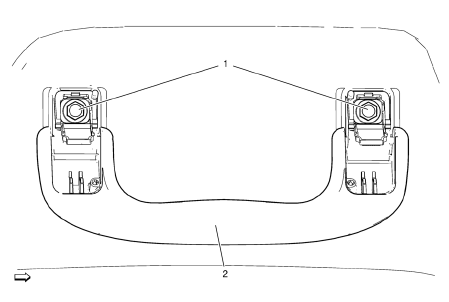
- Assist Handle Screw (Qty: 2)
Caution: Refer to Fastener Caution in the Preface section.
Procedure
- Fold the assist handle downward and hold.
- Use a small flat-bladed tool to open the assist handle covers to access the screws.
Tighten 6 N·m
- Assist Handle Assembly
Sunshade Replacement
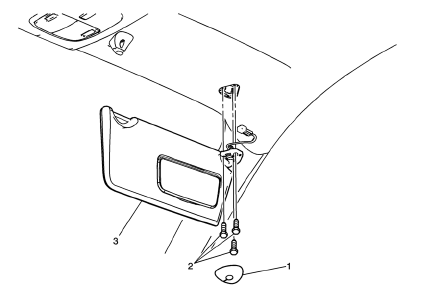
Preliminary Procedure
Lower the front of the headliner to access the sunshade electrical connector, if necessary. Refer to Headlining Trim Panel Replacement.
- Sunshade Support Bolt Cover
- Sunshade Screws (Qty: 3)
Caution: Refer to Fastener Caution in the Preface section.
Tighten 3 N·m
- Sunshade Assembly
Sunshade Support Replacement
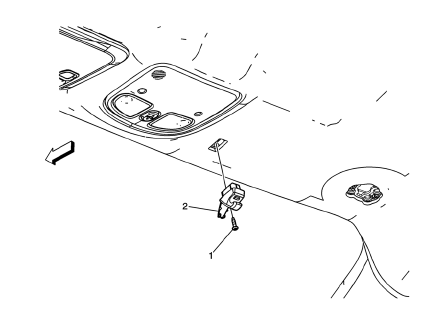
Preliminary Procedure
Remove sunshade assembly. Refer to Sunshade Replacement.
- Sunshade Support Screw.
Caution: Refer to Fastener Caution in the Preface section.
Tighten 3 N·m.
Test yourself
A quick Chevrolet Cruze quiz: every answer comes with an explanation and a link to the manual page.