Steering column adjuster - dismantling and reassembly
Note: A new adjuster locknut and washer must be used on reassembly.
Dismantling
1 To dismantle the adjuster assembly, proceed as follows.
2 Remove the locknut and washer securing the adjuster through-bolt (see illustration).
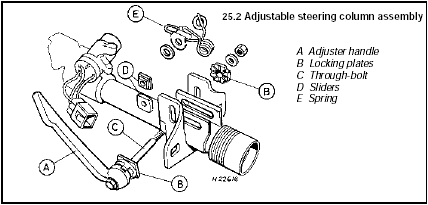
25.2 Adjustable steering column assembly
A Adjuster handle B Locking plates
C Through-bolt
D Sliders
E Spring
3 Remove the through-bolt, adjuster handle, locking plates, sliders and washers, then unclip the spring assembly.
Reassembly
4 Reassemble the components as follows.
5 Refit the spring to the adjuster assembly bracket.
6 Align the washers, sliders and locking plates, ensuring that the handle locking plate is fitted so that the cut-out and Ford logo are positioned as shown (see illustration).
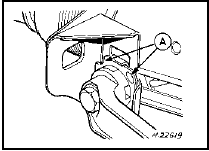
25.6 Cut-out and Ford logo (A) must be positioned as shown when reassembling adjustable steering column
7 Coat the through-bolt threads with a suitable thread-locking compound, then refit the through-bolt and the adjuster handle, ensuring that all components are engaged.
8 Position the handle in the locked position, and secure the through-bolt with a new locknut and washer.
Test yourself
A quick Ford Sierra quiz: every answer comes with an explanation and a link to the manual page.