Rear Seat Entertainment (RSE) System
The vehicle may have a DVD Rear Seat Entertainment (RSE) system.
The RSE system works with the vehicle's audio system. The DVD player is part of the front radio. The RSE system includes a radio with a DVD player, a video display screen, audio/video jacks, two wireless headphones, and a remote control.
See CD/DVD Player on page 7‑22 for more information on the vehicle's CD/DVD player.
Before Driving
The RSE is designed for rear seat passengers only. The driver cannot safely view the video screen while driving and should not try to do so.
In severe or extreme weather conditions, the RSE system might not work until the temperature is within the operating range. The operating range for the RSE system is above −20 °C or below 60 °C. If the temperature of the vehicle is outside this range, heat or cool the vehicle until the temperature is within the operating range of the RSE system.
Parental Control
The RSE system may have a Parental Control feature, depending on which radio the vehicle has. To start Parental Control, press and hold the radio power button for more than two seconds to stop all system features such as: radio, video screen, Rear Seat Audio (RSA), DVD, and/or CD. While Parental Control is on, a padlock icon displays.
The radio can be turned back on with a single press of the power button, but the RSE system will remain under Parental Control.
To turn Parental Control off, press and hold the radio power button for more than two seconds. The RSE returns from where it was previously left and the padlock icon disappears from the radio display.
Parental Control can also be turned off by inserting or ejecting any disc, pressing the play icon on the radio DVD display menu, or changing an ignition position.
Headphones
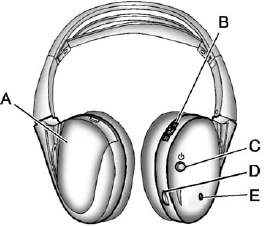
The RSE includes two 2-channel wireless headphones that are dedicated to this system. Channel 1 is dedicated to the video screen, while Channel 2 is dedicated to Rear Seat Audio (RSA) selections.
These headphones can be used to listen to the radio, CDs, DVDs, MP3s, DVD-As, or any auxiliary source connected to A/V jacks or the auxiliary input jack, if the vehicle has this feature. The wireless headphones have a power button, channel 1 or 2 switch, and a volume control.
Push the power button to turn on the headphones. An indicator light located on the headphones comes on. If the light comes on, but there is intermittent sound and/or static on the headphones, or if the indicator light does not come on, the batteries might need to be replaced. See “Battery Replacement” later in this section for more information. Switch the headphones to Off when not in use.
Infrared transmitters are located at the rear of the overhead console.
The headphones shut off automatically to save the battery power if the RSE system and RSA are shut off, or if the headphones are out of range of the transmitters for more than three minutes. If you move too far forward or step out of the vehicle, the headphones lose the audio signal.
To adjust the volume on the headphones, use the volume control located on the right side.
For optimal audio performance, the headphones must be worn correctly.
Headphones should be worn with the headband over the top of the head for best audio reception. The symbol L (Left) appears on the outside bottom edge of the ear cup and should be positioned on the left ear. The symbol R (Right) appears on the outside bottom edge of the ear cup and should be positioned on the right ear.
Notice: Do not store the headphones in heat or direct sunlight. This could damage the headphones and repairs will not be covered by the warranty.
Storage in extreme cold can weaken the batteries. Keep the headphones stored in a cool, dry place.
If the foam ear pads attached to the headphones become worn or damaged, the pads can be replaced separately from the headphone set.
To purchase replacement ear pads, call 1-888-293-3332, then prompt zero (0), or contact your dealer.
Battery Replacement
To change the batteries on the headphones:
1. Turn the screw to loosen the battery door located on the left side of the headphones. Slide the battery door open.
2. Replace the two batteries in the compartment. Make sure that they are installed correctly, using the diagram on the inside of the battery compartment.
3. Replace the battery door and tighten the door screw.
If the headphones are to be stored for a long period of time, remove the batteries and keep them in a cool, dry place.
Audio/Video (A/V) Jacks
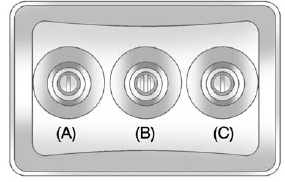 A. Yellow: Video Input
The A/V jacks are color coded to match typical home entertainment system equipment.
The A/V jacks, located on the rear of the floor console, allow audio or video signals to be connected from an auxiliary device such as a camcorder or a video game unit to the RSE system. Adapter connectors or cables (not included) may be required to connect the auxiliary device to the A/V jacks.
Refer to the manufacturer’s instructions for proper usage.
Power for auxiliary devices is not supplied by the radio system.
To use the auxiliary inputs of the RSE system, connect an external auxiliary device to the color-coded A/V jacks and turn both the auxiliary device and the video screen power on. If the video screen is in the DVD player mode, pressing the AUX (auxiliary) button on the remote control switches the video screen from the DVD player mode to the auxiliary device. The audio of the connected source can be listened to over the speakers by sourcing the radio to the auxiliary device or by sourcing the RSA to the Rear Aux and listening with the wireless headphones on Channel 2 or with the wired headphones. See “Using the Auxiliary Input Jack” under Auxiliary Devices on page 7‑33 for more information about changing the source.
Changing the RSE Video Screen Settings
The screen display mode (normal, full, and zoom), screen brightness, and setup menu language can be changed from the on screen setup menu. To change any feature:
1. Press the  (display menu) button on the remote control.
Check the batteries to make sure they are not dead or installed incorrectly.
Check the auxiliary input connections at both devices.
DVD Display Error Messages
The DVD display error message depends on the radio that is in the vehicle. The video screen can display one of the following:
Disc Load/Eject Error: This message displays when there are disc load or eject problems.
Disc Format Error: This message displays if the disc is inserted with the disc label wrong side up, or if the disc is damaged.
Disc Region Error: This message displays if the disc is not from a correct region.
No Disc Inserted: This message displays if no disc is present when EJECT or DVD AUX is pressed on the radio.
DVD Distortion
Video distortion can occur when operating cellular phones, scanners, CB radios, Global Position Systems (GPS)*, two-way radios, mobile fax machines, or walkie talkies.
It might be necessary to turn off the DVD player when operating one of these devices in or near the vehicle.
*Excludes the OnStar® System.
Cleaning the RSE Overhead Console
When cleaning the RSE overhead console surface, use only a clean cloth dampened with clean water.
Cleaning the Video Screen
When cleaning the video screen, use only a clean cloth dampened with clean water. Use care when directly touching or cleaning the screen, as damage could result.
Test yourself
A quick GMC Sierra quiz: every answer comes with an explanation and a link to the manual page.