Powertrain
Crankshaft Pilot Bushing Replacement (R18Z1 M/T)
Tightening torque found on this page

Removal
- Pressure Plate
 |
|
1. |
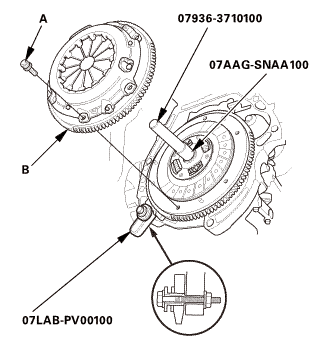
Install the ring gear holder. |
|
2. |
Install the clutch alignment shaft and the remover handle. |
|
3. |
To prevent warping, loosen the pressure plate mounting bolts (A) in a crisscross pattern in several steps. |
|
4. |
Remove the pressure plate (B). |
|
- Clutch Disc
 |
|
1. |
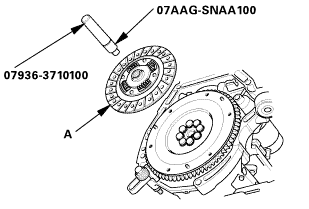
Remove the clutch disc (A), the clutch alignment shaft, and the remover handle. |
|
- Crankshaft Pilot Bushing
 |
|
1. |
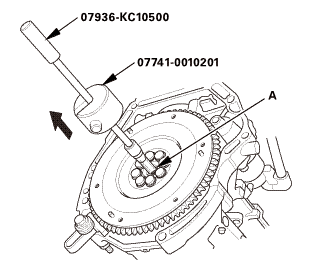
Remove the crankshaft pilot bushing (A) using the 15 mm bearing remover shaft set and the remover weight. |
|

Installation
- Crankshaft Pilot Bushing
 |
|
1. |
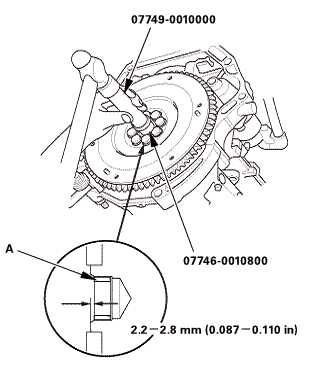
Install the crankshaft pilot bushing (A) into the crankshaft using the 15 x 135L driver handle and the 22 x 24 mm bearing driver attachment. |
|
- Clutch Disc
 (pm
|
|
1. |
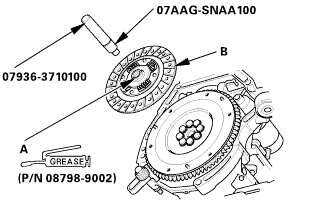
Temporarily install the clutch disc onto the splines of the transmission mainshaft. Make sure the clutch disc slides freely on the mainshaft. |
|
2. |
Apply super high temp urea grease (P/N 08798-9002) to the splines (A) of the clutch disc (B). |
|
NOTE: Wipe off any excess grease. |
|
3. |
Install the clutch disc using the clutch alignment shaft and the remover handle. |
|
- Pressure Plate
 |
|
1. |
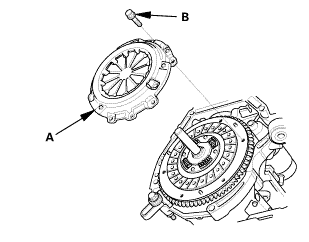
Install the pressure plate (A) and the mounting bolts (B) finger-tight. |
|
 a7aag-suaa1aa
|
|
2. |
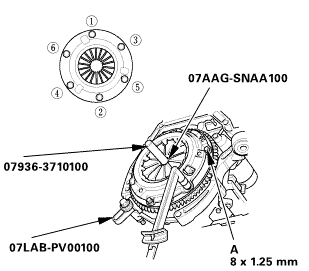
Torque the pressure plate mounting bolts (A) in a crisscross pattern. |
|
NOTE: |
|
 |
Tighten the bolts in several steps to prevent warping the diaphragm spring. |
|
|
|
Make sure that there is no clearance between the pressure plate and the flywheel. |
|
|
|
|
|
3. |
Remove the ring gear holder. |
|
4. |
Remove the clutch alignment shaft and the remover handle. |
|
5. |
Make sure the diaphragm spring fingers are all the same height. |
|
?
Test yourself
A quick Honda Civic quiz: every answer comes with an explanation and a link to the manual page.
Was this page helpful?