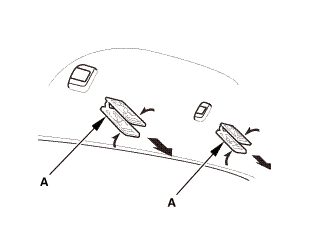
Moonroof/Sunroof
Moonroof Drain Tube Removal and Installation (4-door)

Removal
- Battery Terminal (SRS) - Disconnection
 |
|
1. |
Make sure the ignition switch is in LOCK (0). |
|
2. |
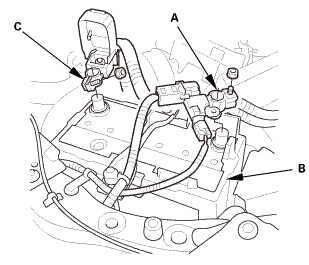
Disconnect and isolate the negative cable and battery sensor (A) from the battery (B). |
|
NOTE: Always disconnect the negative side first. |
|
3. |
Disconnect the positive cable (C) from the battery. |
|
4. |
Wait at least 3 minutes before starting work. |
|
- A-Pillar Trim Both
 |
|
1. |
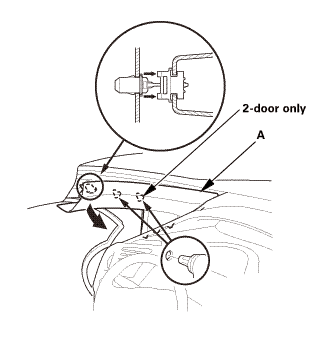
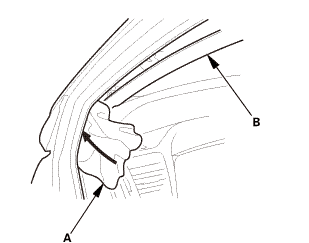
Pull out the A-pillar trim (A) to release the clips. |
|
 |
|
2. |
Put a shop towel (A) in the opening between the A-pillar trim (B) and the dashboard to prevent dropping the A-pillar clips. |
|
 |
|
3. |
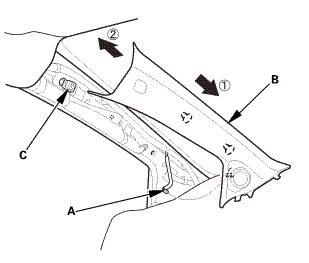
Disconnect the connector (A), then remove the A-pillar trim (B). |
|
NOTE: The upper clip (C) will stay in the body. |
|
 |
|
4. |
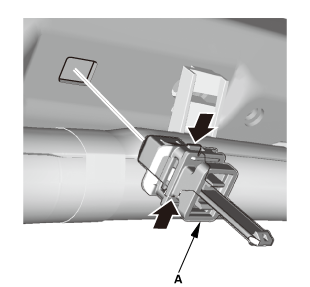
Remove the upper clip (A) from the body. |
|
5. |
Repeat on the opposite side. |
|
- Front Door Opening Seal As Needed Both
 |
|
1. |
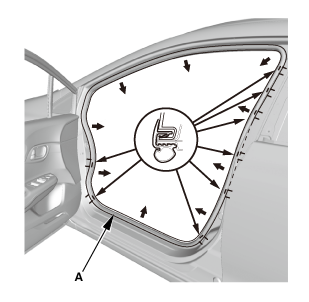
Remove front door opening seal (A) as needed. |
|
2. |
Repeat on the opposite side. |
|
- Ceiling Light
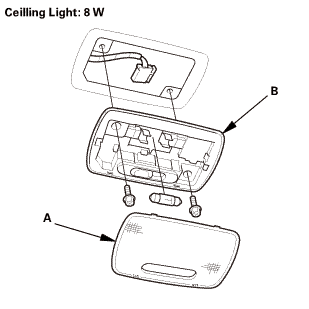 llghr
|
|
1. |
Turn the ceiling light switch OFF. |
|
2. |
Carefully pry off the lens (A). |
|
3. |
Remove the ceiling light (B). |
|
4. |
Disconnect the connector. |
|
- Both Front Door Sill Trims
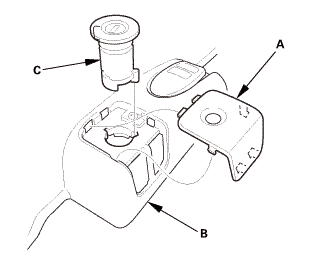 |
|
1. |
Driver's side: Remove the cap (A) from the front door sill trim (B). |
|
2. |
Driver's side: Remove the opener lock cylinder (C). |
|
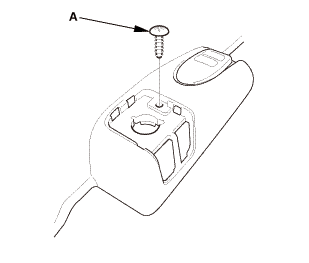 |
|
3. |
Driver's side: Remove the screw (A). |
|
Driver's side
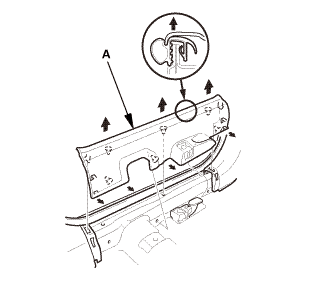
Passenger's side
 |
|
4. |
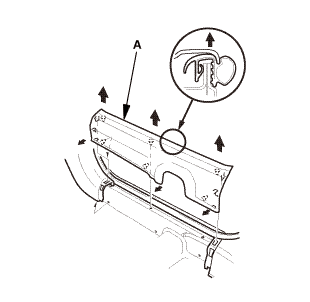
Remove both front door sill trims (A). |
|
- Both Rear Door Sill Trims
 |
|
1. |
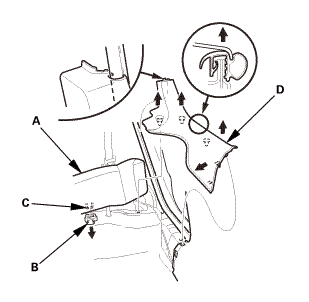
While pushing down on the rear seat cushion (A), pull the seat hook handle (B) to release the hook (C). |
|
2. |
While pulling up the seat cushion, remove the rear door sill trim (D). |
|
3. |
The left side is shown; repeat on the right side. |
|
- Both Rear Door Opening Seals as Needed
 |
|
1. |
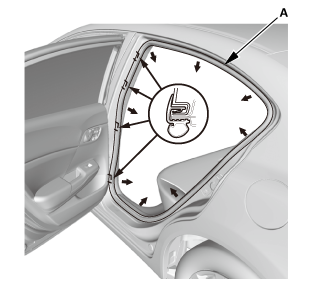
Remove the rear door opening seal (A) as needed. |
|
2. |
The left side is shown; repeat on the right side. |
|
- Both B-Pillar Lower Trims
 |
|
1. |
Slide the front seat forward fully. |
|
2. |
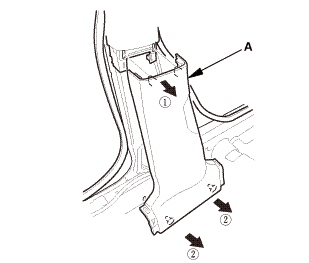
Remove the B-pillar lower trim (A). |
|
3. |
The left side is shown; repeat on the right side. |
|
- Both Front Seat Belt Lower Anchor Bolts
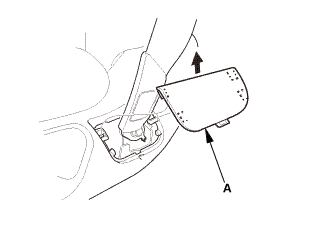 |
|
1. |
Remove the anchor cover (A). |
|
2. |
The driver's seat is shown; repeat on the passenger's seat. |
|
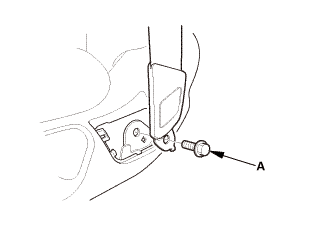 |
|
3. |
Remove the lower anchor bolt (A). |
|
4. |
The driver's seat is shown; repeat on the passenger's seat. |
|
- Both B-Pillar Upper Trims
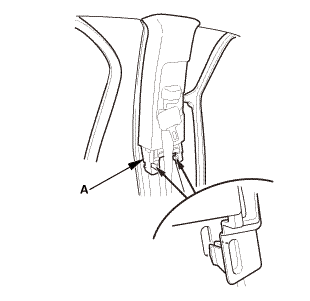 |
|
1. |
Remove the bottom area of the B-pillar upper trim (A). |
|
2. |
The left side is shown; repeat on the right side. |
|
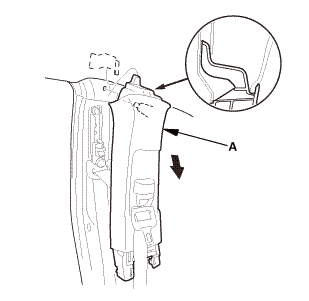 |
|
3. |
Remove the upper area of the B-pillar upper trim (A). |
|
4. |
The left side is shown; repeat on the right side. |
|
 |
|
5. |
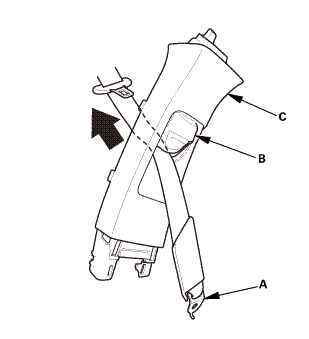
Pass the front seat belt lower anchor (A) out through the hole in the slider (B), then remove the B-pillar upper trim (C). |
|
6. |
The left side is shown; repeat on the right side. |
|
- Rear Seat Cushion
 |
|
1. |
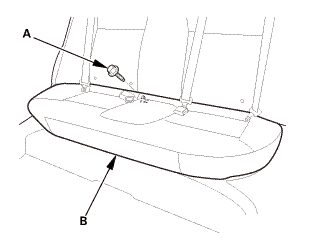
Remove the bolt (A) securing the rear seat cushion (B). |
|
 |
|
2. |
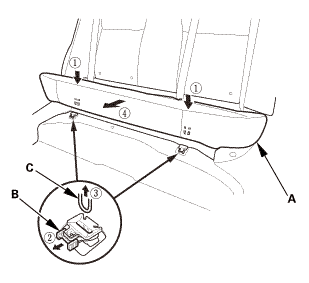
While pushing down the rear seat cushion (A), pull the seat hook handles (B) to release the hooks (C). |
|
3. |
Remove the rear seat cushion. |
|
- Both Rear Seat Side Bolsters
 |
|
1. |
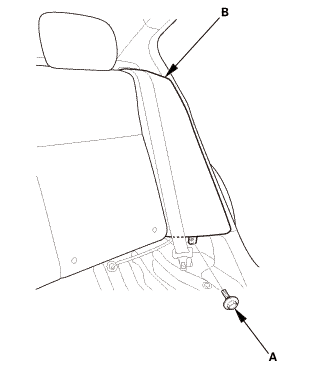
Remove the bolt (A) securing the rear seat side bolster (B). |
|
2. |
The left side is shown; repeat on the right side. |
|
 |
|
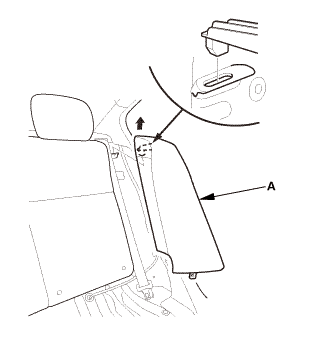
3. |
Remove the rear seat side bolster (A). |
|
4. |
The left side is shown; repeat on the right side. |
|
- Both C-Pillar Trims
 |
|
1. |
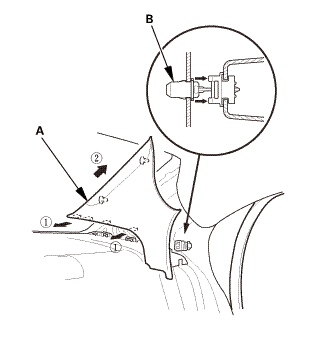
Pull out the C-pillar trim (A) to release the clips. |
|
2. |
Remove the C-pillar trim. |
|
NOTE: The front clip (B) will stay in the body. |
|
3. |
The left side is shown; repeat on the right side. |
|
 |
|
4. |
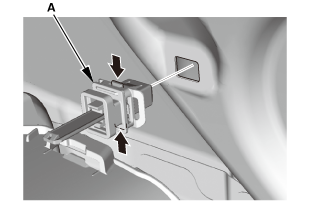
Remove the front clip (A). |
|
5. |
The left side is shown; repeat on the right side. |
|
- Grab Handles for One Vehicle
 |
|
1. |
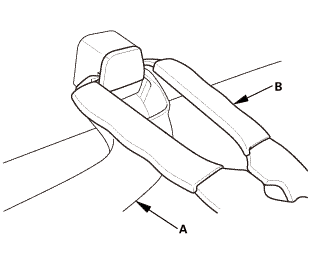
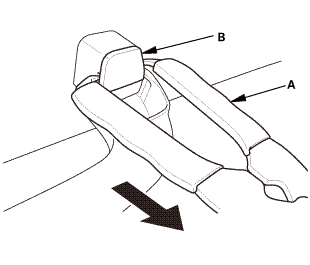
Lower the grab handle (A). |
|
2. |
Insert the tips of the push pin/grab rail cap pliers (B) into the notch. |
|
 |
|
3. |
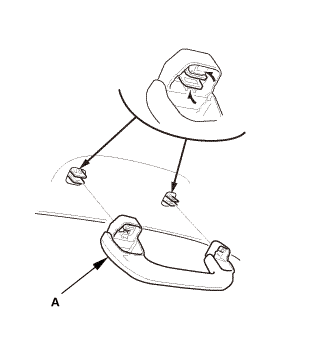
Gently squeeze the handles of the push pin/grab rail cap pliers (A), and pull the cap (B) straight out. |
|
 |
|
4. |
Remove the grab handle (A). |
|
- Both Kick Panels
Driver's side
Passenger's side
 |
|
1. |
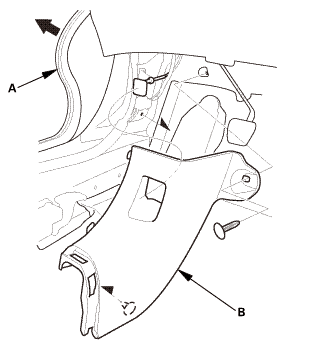
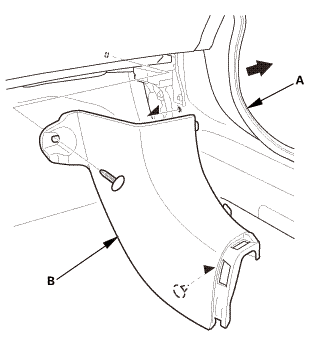
Pull out both front door opening seals (A) as needed. |
|
2. |
Remove both kick panels (B). |
|
- Both Sunvisors
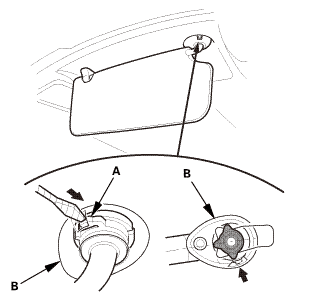 |
|
1. |
Push the hook (A) with a flat-tip screwdriver through the hole in the front side of the bracket cover (B). |
|
NOTE: Make sure the hook is unlocked. |
|
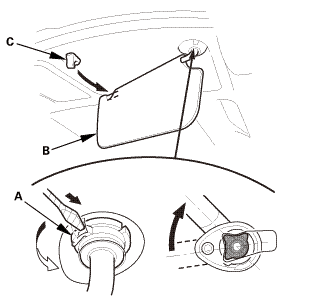 |
|
2. |
While pushing in the hook (A) with a flat-tip screwdriver, release the sunvisor (B) from the holder (C), and rotate the sunvisor backward 45 °. |
|
NOTE: Make sure the hook slides into the bracket cover as you rotate the sunvisor. |
|
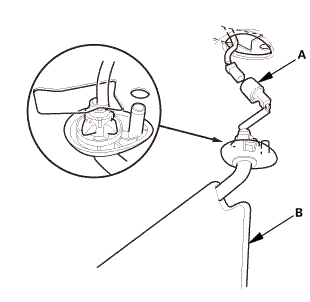 |
|
3. |
Disconnect the connector (A), then remove the sunvisor (B). |
|
NOTE: If the sunvisor cannot be removed, the hook has not rotated into the bracket cover. Repeat step 2 to rotate the hook. |
|
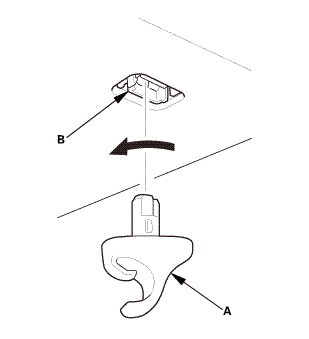 |
|
4. |
If necessary, turn the sunvisor holder (A) 45 ° counterclockwise, then remove it from the holder grommet (B). |
|
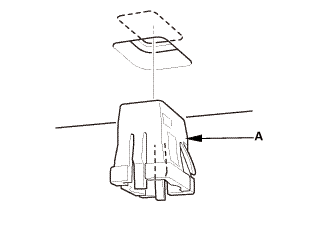 |
|
5. |
If necessary, remove the holder grommet (A). |
|
- Front Individual Map Light (without moonroof)
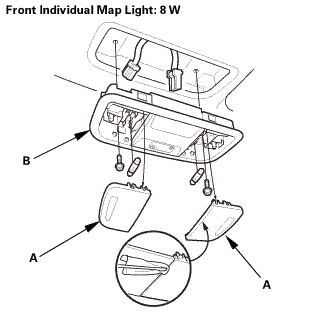 |
|
1. |
Turn the front individual map light switch OFF. |
|
2. |
Carefully pry off the lenses (A) with a flat-tip screwdriver. |
|
3. |
Disconnect the connector. |
|
4. |
Remove the front individual map light (B). |
|
- M/T Shift Lever Knob
Except K24Z7 engine
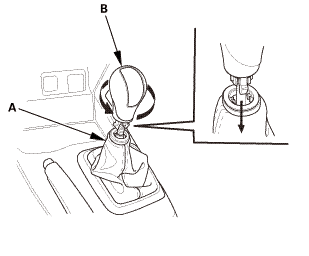 |
|
1. |
Except K24Z7 engine: Lower the shift lever boot (A) to release the hooks from the boot. |
|
2. |
Except K24Z7 engine: Remove the shift lever knob (B). |
|
K24Z7 engine
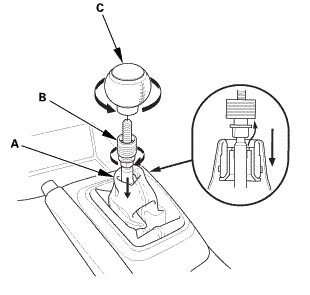 |
|
3. |
K24Z7 engine: Lower the shift lever boot (A) to release the hooks from the boot. |
|
4. |
K24Z7 engine: Loosen the shift lever boot ring (B). |
|
5. |
K24Z7 engine: Remove the shift lever knob (C). |
|
6. |
K24Z7 engine: Remove the shift lever boot ring. |
|
- Center Console Panel Assembly (M/T)
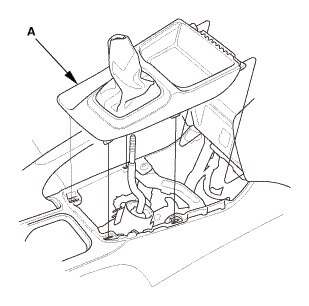 |
|
1. |
Remove the center console panel (A). |
|
- Center Console Panel Assembly (A/T)
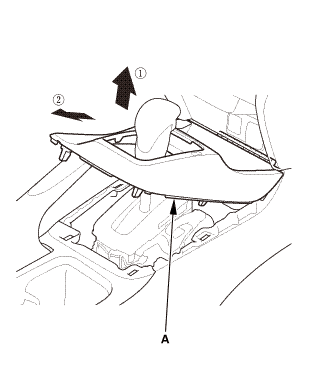 |
|
2. |
Remove the center console panel (A). |
|
- Cup Holder Panel Assembly
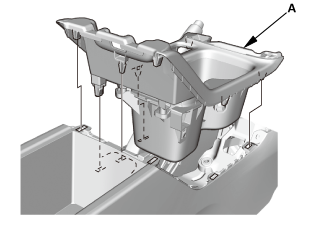 |
|
1. |
Remove the cup holder panel assembly (A). |
|
- Center Console
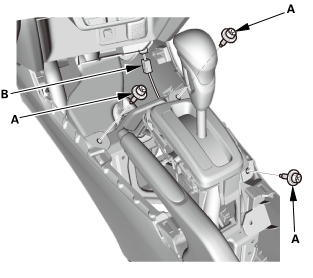 |
|
2. |
Disconnect the connector (B). |
|
 |
|
3. |
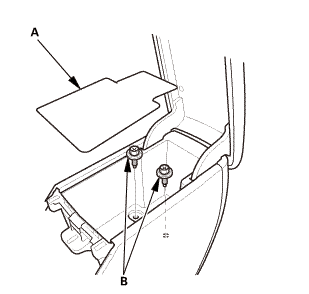
Remove the console box mat (A). |
|
 |
|
5. |
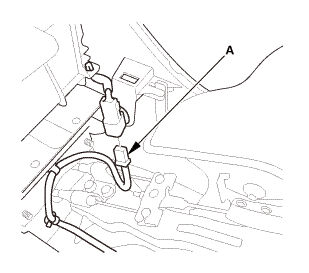
Disconnect the connector (A). |
|
 |
|
6. |
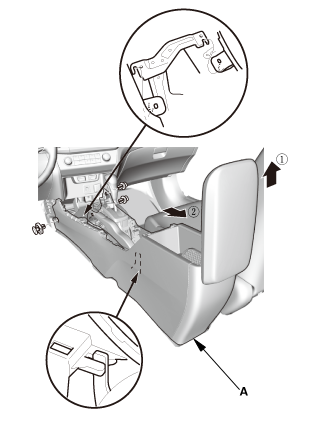
Remove the center console (A). |
|
- Center Console Bracket (M/T)
 |
|
1. |
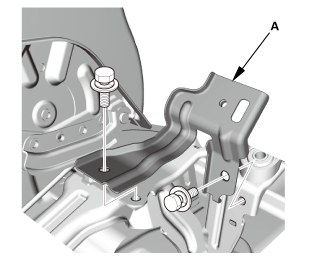
M/T: Remove the center console bracket (A). |
|
- Headliner - 4-Door
 |
|
1. |
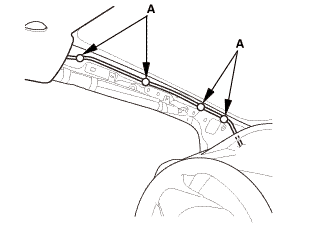
Without moonroof: From the driver's A-pillar, detach the harness clips (A). |
|
 |
|
2. |
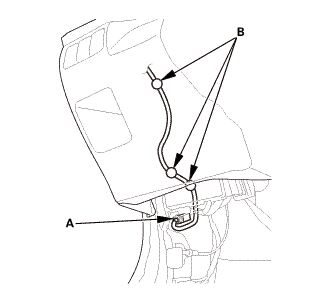
Without moonroof: From under the driver's dash, disconnect the connector (A), and detach the harness clips (B). |
|
 |
|
3. |
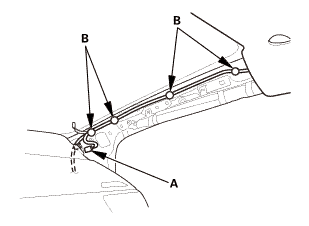
From the passenger's A-pillar, disconnect the connector (A), and detach the harness clips (B). |
|
 |
|
4. |
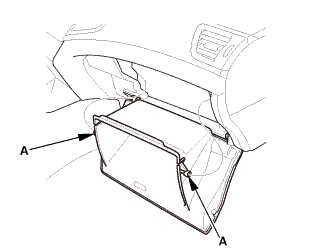
For some models: Release the glove box stops (A) on each side of the dashboard. |
|
 |
|
5. |
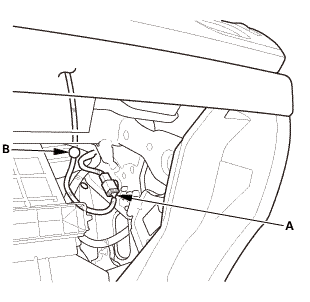
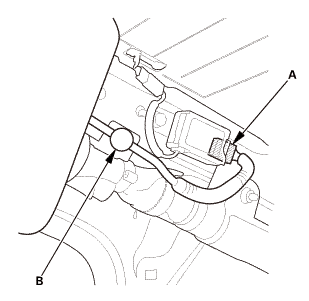
For some models: From the glove box opening, disconnect the connector (A), and detach the harness clip (B). |
|
 |
|
6. |
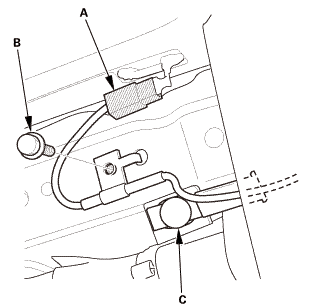
From the right C-pillar, disconnect the connector (A), and detach the harness clip (B). |
|
 |
|
7. |
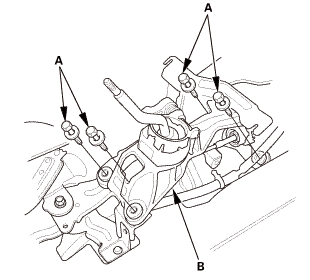
From the left C-pillar, disconnect the terminal (A), and remove the bolt (B), then detach the harness clip (C). |
|
M/T
A/T
 |
|
8. |
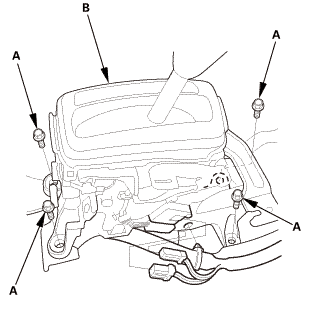
Remove the bolts (A) securing the shift lever assembly (B). |
|
9. |
Lay the shift lever assembly down as needed. |
|
Without moonroof
With moonroof
 |
|
10. |
Slide the front seat all the way back, and recline the seat-back fully. |
|
11. |
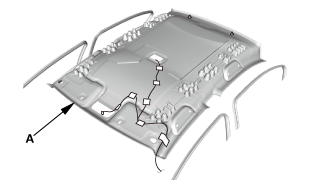
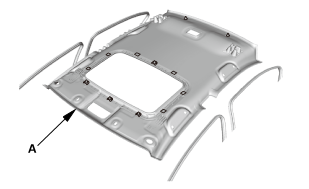
With the help of an assistant, lower the headliner (A). |
|
 |
|
12. |
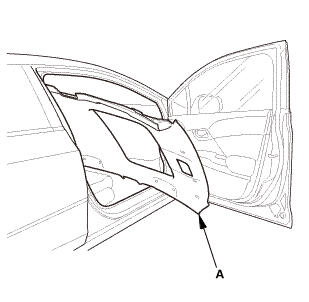
With the help of an assistant, remove the headliner (A) through the passenger's front door opening. |
|
NOTE: Do not bend the headliner. Bending the headliner will crease and damage it. |
|
- Moonroof Front Drain Tube Both
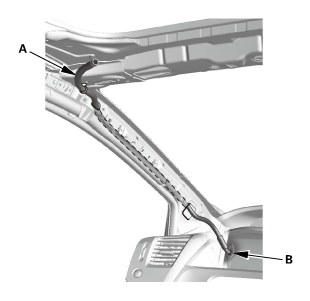 |
|
1. |
Disconnect the moonroof front drain tube (A). |
|
2. |
Pull out the moonroof front drain valve (B). |
|
3. |
Tie a string to the top end of the moonroof front drain tube, then pull down the drain tube out of the A-pillar. |
|
4. |
Leave the string in the pillar to use when reinstalling the moonroof front drain tube. |
|
5. |
Repeat on the opposite side. |
|
- Trunk Floor Cover
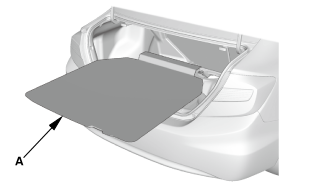 |
|
1. |
Remove the trunk floor cover (A). |
|
- Trunk Lid Weatherstrip As Needed
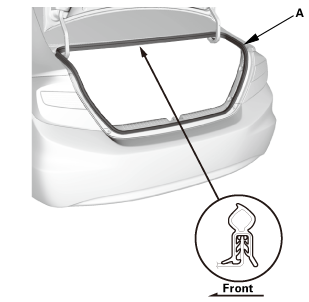 |
|
1. |
Remove the trunk lid weatherstrip (A) as needed. |
|
- Trunk Rear Trim Panel
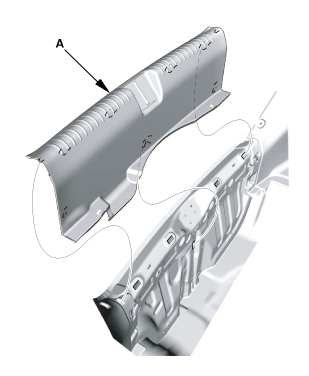 |
|
1. |
Remove the trunk rear trim panel (A). |
|
- Trunk Side Trim Panel Both
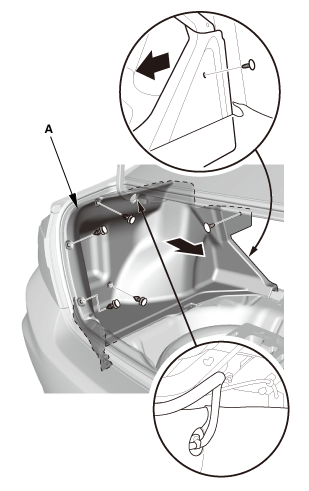 |
|
1. |
Remove the trunk side trim panel (A). |
|
2. |
Repeat on the opposite side. |
|
- Moonroof Rear Drain Tube Both
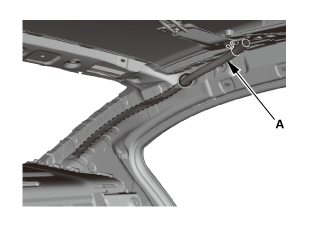
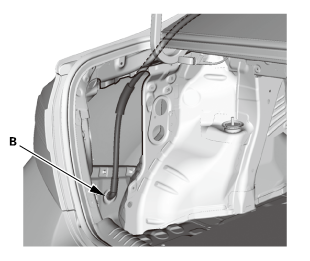 |
|
1. |
Disconnect the moonroof rear drain tube (A). |
|
2. |
Pull out the moonroof rear drain valve (B). |
|
3. |
Tie a string to the top end of the moonroof rear drain tube, then pull down the drain tube out of the pillar. |
|
4. |
Leave the string in the pillar to use when reinstalling the moonroof rear drain tube. |
|
5. |
Repeat on the opposite side. |
|

Installation
- Moonroof Rear Drain Tube Both
|
|
|
1. |
Tie the string that was left in the pillar to the top end of the new moonroof rear drain tube (A) and pull it up into the roof. |
|
2. |
Connect the moonroof rear drain tube. |
|
3. |
Install the moonroof rear drain valve (B). |
|
4. |
Repeat on the opposite side. |
|
- Trunk Side Trim Panel Both
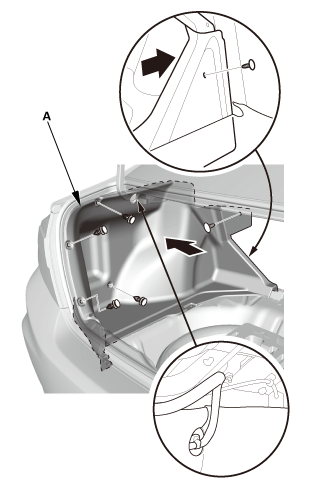 |
|
1. |
Install the trunk side trim panel (A). |
|
2. |
Repeat on the opposite side. |
|
- Trunk Rear Trim Panel
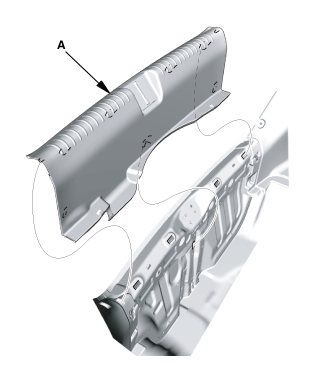 |
|
1. |
Install the trunk rear trim panel (A). |
|
- Trunk Lid Weatherstrip as Needed
|
|
1. |
Install the trunk lid weatherstrip (A). |
|
- Trunk Floor Cover
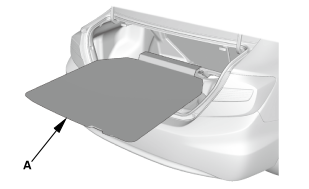 |
|
1. |
Install the trunk floor cover (A). |
|
- Moonroof Front Drain Tube Both
|
|
1. |
Tie the string that was left in the A-pillar to the top end of the new moonroof front drain tube (A) and pull it up into the roof. |
|
2. |
Connect the moonroof front drain tube. |
|
3. |
Install the moonroof front drain valve (B). |
|
4. |
Repeat on the opposite side. |
|
- Headliner - 4-Door
|
|
1. |
With the help of an assistant, take the headliner (A) in through the passenger's front door opening. |
|
NOTE: Do not bend the headliner. Bending the headliner will crease and damage it. |
|
Without moonroof
With moonroof
|
|
2. |
With the help of an assistant, install the headliner (A). |
|
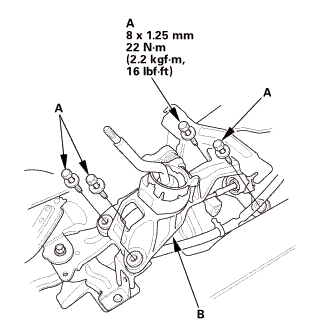
M/T
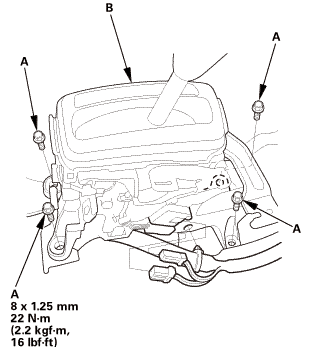
A/T
 |
|
3. |
Install the bolts (A) securing the shift lever assembly (B). |
|
 |
|
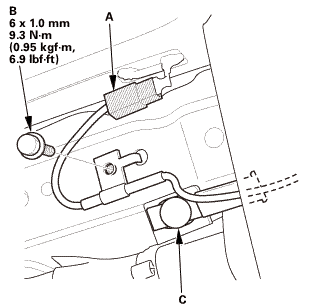
4. |
At the left C-pillar, connect the terminal (A), and install the bolt (B), then install the harness clip (C). |
|
|
|
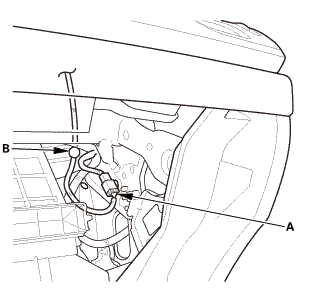
5. |
At the right C-pillar, connect the connector (A), and install the harness clip (B). |
|
 |
|
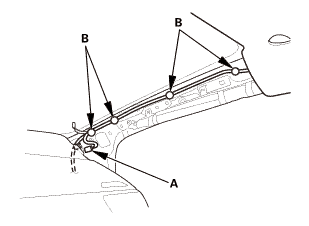
6. |
For some models: At the glove box opening, connect the connector (A), and install the harness clip (B). |
|
 |
|
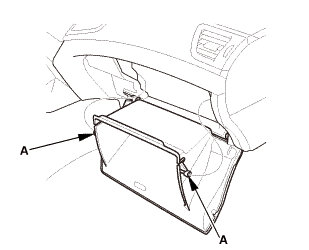
7. |
For some models: Install the glove box stops (A) on each side of the dashboard. |
|
 |
|
8. |
At the passenger's A-pillar, connect the connector (A), and install the harness clips (B). |
|
 |
|
9. |
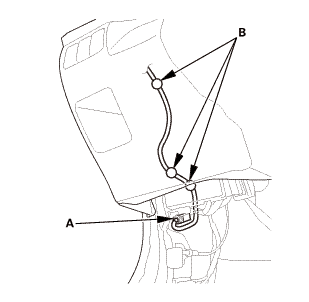
Without moonroof: Under the driver's dash, connect the connector (A), and install the harness clips (B). |
|
 |
|
10. |
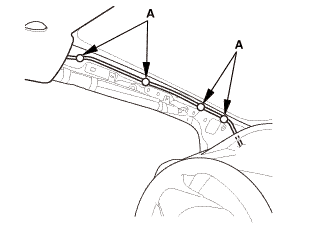
Without moonroof: At the driver's A-pillar, install the harness clips (A). |
|
- Center Console Bracket (M/T)
 |
|
1. |
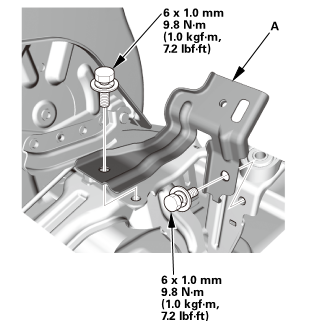
M/T: Install the center console bracket (A). |
|
- Center Console
 |
|
1. |
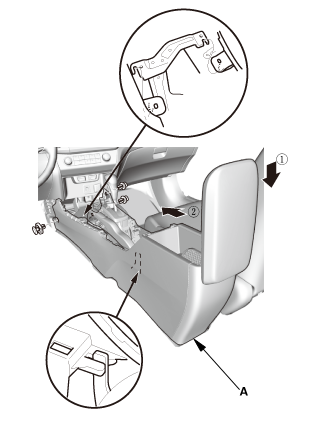
Install the center console (A). |
|
|
|
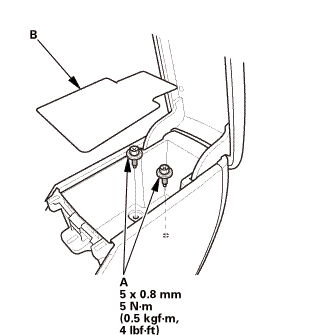
2. |
Connect the connector (A). |
|
 |
|
3. |
Install the bolts (A). |
|
4. |
Install the console box mat (B). |
|
 |
|
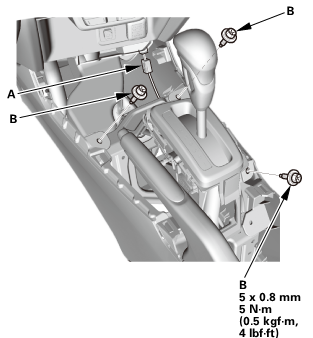
5. |
Connect the connector (A). |
|
6. |
Install the bolts (B). |
|
- Cup Holder Panel Assembly
|
|
1. |
Install the cup holder panel assembly (A). |
|
- Center Console Panel Assembly (A/T)
 |
|
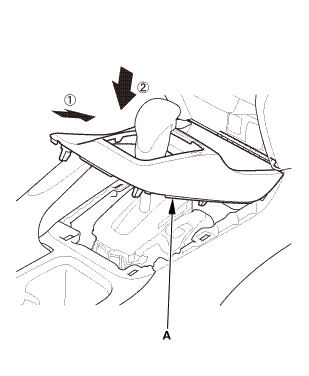
1. |
Install the center console panel (A). |
|
 |
|
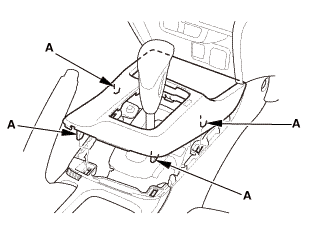
2. |
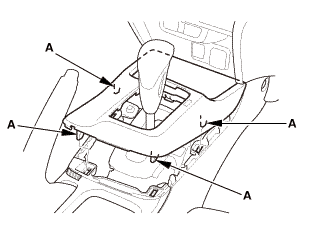
Install the clips (A). |
|
- Center Console Panel Assembly (M/T)
|
|
1. |
Install the center console panel (A). |
|
- M/T Shift Lever Knob
Except K24Z7 engine
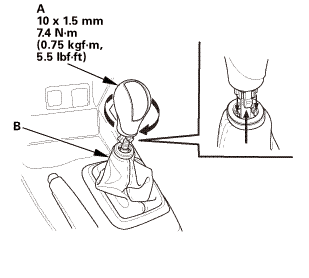 |
|
1. |
Except K24Z7 engine: Install the shift lever knob (A). |
|
NOTE: Tighten the shift lever knob until the shift pattern is properly aligned. |
|
2. |
Except K24Z7 engine: Connect the shift lever boot (B). |
|
K24Z7 engine
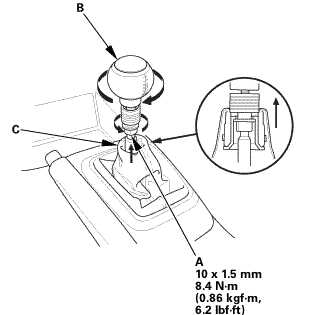 |
|
3. |
K24Z7 engine: Install and turn the shift lever boot ring (A) until it reaches the bottom of the threads on the shift lever. |
|
4. |
K24Z7 engine: Turn the shift lever knob (B) until the shift lever knob contacts the shift lever boot ring. |
|
5. |
K24Z7 engine: Tighten the shift lever boot ring and the shift lever knob together with the shift pattern properly aligned. |
|
6. |
K24Z7 engine: Connect the shift lever boot (C). |
|
- Front Individual Map Light (without moonroof)
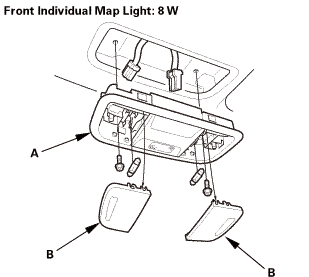 |
|
1. |
Connect the connector. |
|
2. |
Install the front individual map light (A). |
|
3. |
Carefully install the lenses (B). |
|
- Both Sunvisors
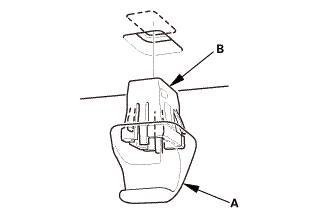 |
|
1. |
Install the holder (A) into the holder grommet (B) by turning it 45 ° clockwise. |
|
2. |
Install the holder and holder grommet as an assembly into the body by pushing it until the hooks snap into place securely. |
|
|
|
3. |
Connect the connector (A), and install the sunvisor (B). |
|
 |
|
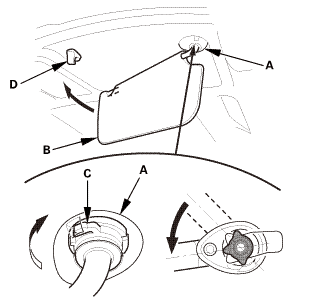
4. |
While holding the bracket cover (A), rotate the sunvisor (B) forward until the hook (C) snaps into place. |
|
5. |
Gently pull down on the sunvisor to make sure it is properly secured in the body. |
|
6. |
Rotate the sunvisor into the holder (D). |
|
- Both Kick Panels
Driver's side
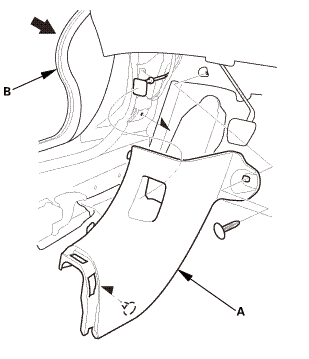
Passenger's side
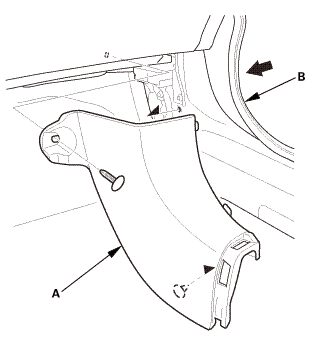 |
|
1. |
Install both kick panels (A). |
|
2. |
Install both front door opening seals (B) as needed. |
|
- Grab Handles for One Vehicle
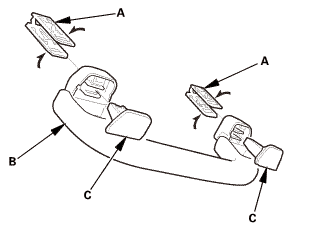 |
|
1. |
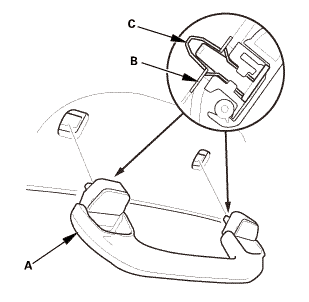
Install the clips (A) on the grab handle (B). |
|
2. |
Install the caps (C) fully into the clips. |
|
 |
|
3. |
Position the grab handle (A) on the grab handle bracket (B). |
|
4. |
Push on the grab handle until the clips (C) snap into place securely. |
|
- Both C-Pillar Trims
 |
|
1. |
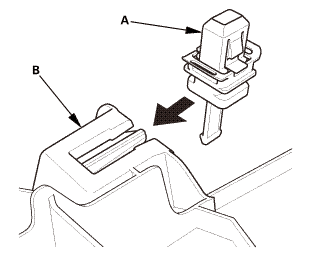
Install the new front clip (A) to the C-pillar trim (B). |
|
 |
|
2. |
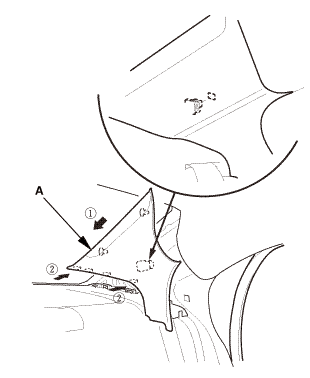
Install the C-pillar trim (A). |
|
NOTE: |
|
 |
Make sure the side curtain airbag is not tucked under the clips or the ribs. |
|
|
|
Do not push too hard on the C-pillar trim. If you push too hard, the clip will be damaged, and it will not hold the trim properly. |
|
|
|
Gently tug on the C-pillar trim to verify that all clips are securely fastened. |
|
|
|
3. |
The left side is shown; repeat on the right side. |
|
- Both Rear Seat Side Bolsters
 |
|
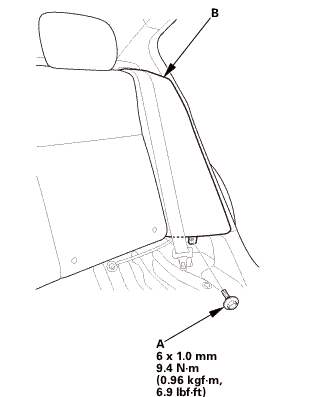
1. |
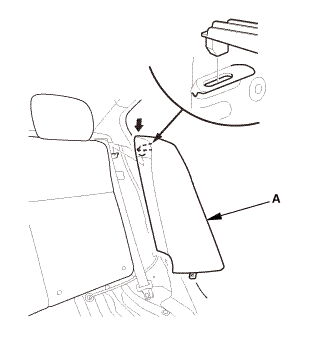
Install the rear seat side bolster (A). |
|
2. |
The left side is shown; repeat on the right side. |
|
 mmmmlnss
|
|
3. |
Install the bolt (A) securing the rear seat side bolster (B). |
|
4. |
The left side is shown; repeat on the right side. |
|
- Rear Seat Cushion
 |
|
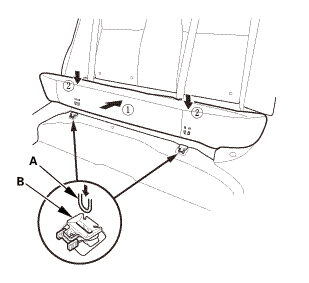
1. |
Install the hooks (A) to the rear seat cushion clips (B). |
|
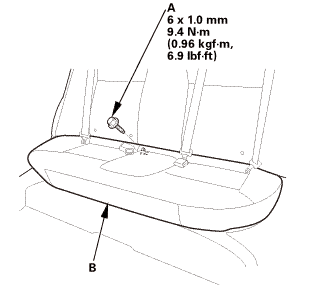 |
|
2. |
Install the bolt (A) securing the rear seat cushion (B). |
|
- Both B-Pillar Upper Trims
 |
|
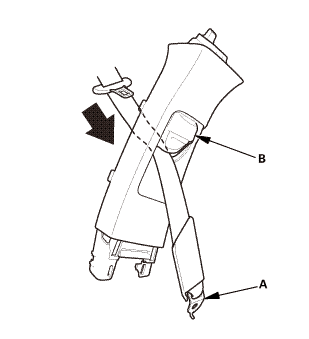
1. |
Pass the front seat belt lower anchor (A) in through the hole in the slider (B). |
|
2. |
The left side is shown; repeat on the right side. |
|
 |
|
3. |
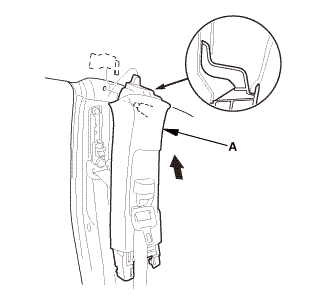
Install the upper area of the B-pillar upper trim (A). |
|
4. |
The left side is shown; repeat on the right side. |
|
|
|
5. |
Install the bottom area of the B-pillar upper trim (A). |
|
6. |
The left side is shown; repeat on the right side. |
|
- Both Front Seat Belt Lower Anchor Bolts
 inmm
|
|
1. |
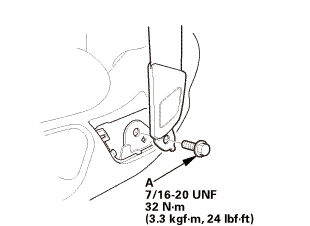
Install the lower anchor bolt (A). |
|
2. |
The driver's seat is shown; repeat on the passenger's seat. |
|
 |
|
3. |
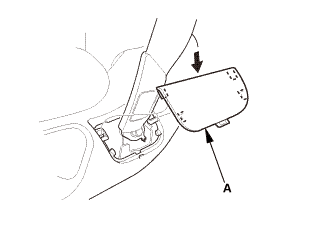
Install the anchor cover (A). |
|
4. |
The driver's seat is shown; repeat on the passenger's seat. |
|
- Both B-Pillar Lower Trims
 |
|
1. |
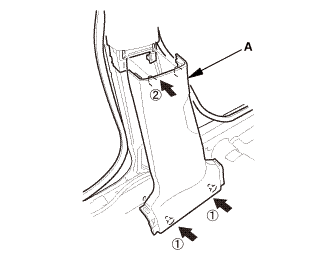
Install the B-pillar lower trim (A). |
|
2. |
The left side is shown; repeat on the right side. |
|
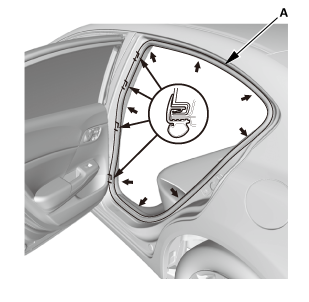
- Both Rear Door Opening Seals as Needed
 |
|
1. |
Install the rear door opening seal (A). |
|
2. |
The left side is shown; repeat on the right side. |
|
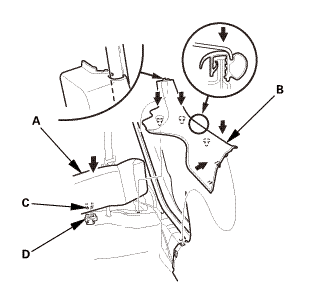
- Both Rear Door Sill Trims
 |
|
1. |
While pulling up the rear seat cushion (A), install the rear door sill trim (B). |
|
2. |
Push down the seat cushion, then install the hook (C) to the rear seat cushion clip (D). |
|
3. |
The left side is shown; repeat on the right side. |
|
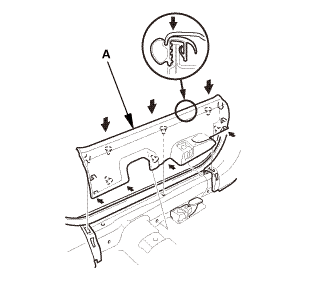
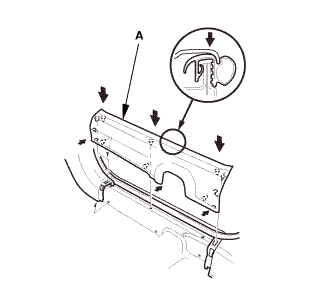
- Both Front Door Sill Trims
Driver's side
Passenger's side
 |
|
1. |
Install both front door sill trims (A). |
|
 |
|
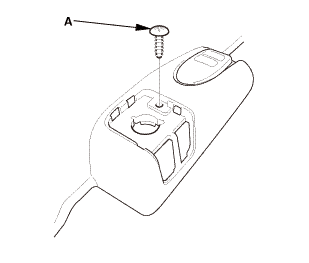
2. |
Driver's side: Install the screw (A). |
|
 |
|
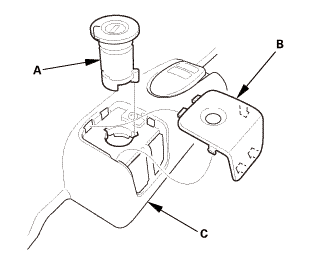
3. |
Driver's side: Install the opener lock cylinder (A). |
|
4. |
Driver's side: Install the cap (B) to the front door sill trim (C). |
|
- Ceiling Light
 cullingllghr
|
|
1. |
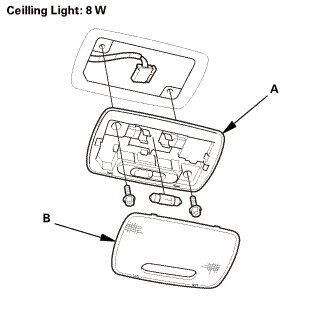
Connect the connector. |
|
2. |
Install the ceiling light (A). |
|
3. |
Carefully install the lens (B). |
|
- Front Door Opening Seal as Needed Both
 |
|
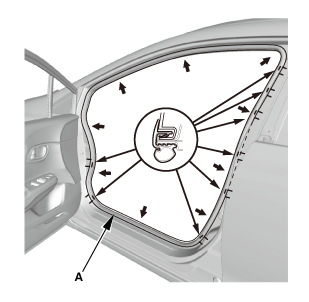
1. |
Install front door opening seal (A). |
|
2. |
Repeat on the opposite side. |
|
- A-Pillar Trim Both
 |
|
1. |
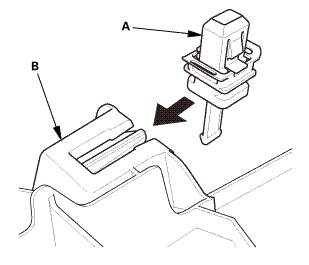
Carefully install the new upper clip (A) to the A-pillar trim (B). |
|
 |
|
2. |
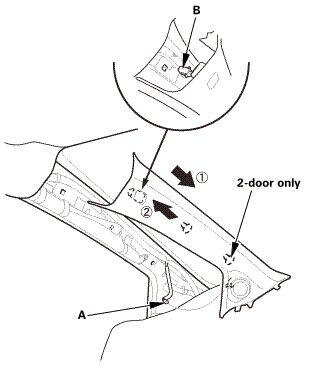
Connect the connector (A). |
|
3. |
Fit the clips into the holes in the A-pillar. |
|
4. |
Lightly push the A-pillar trim (B) into place, then install the trim. |
|
NOTE: |
|
|
Make sure the side curtain airbag is not tucked under the clips or the trim ribs. |
|
|
|
Do not push too hard on the A-pillar trim. If you push too hard, the clip will be damaged, and it will not hold the trim properly. |
|
|
|
Gently tug on the A-pillar trim to verify that all clips are securely fastened. |
|
|
|
5. |
Repeat on the opposite side. |
|
- Battery Terminal (SRS) - Reconnection
 (o.2ao.sam.
|
NOTE: If the battery performs abnormally, test the battery.
|
1. |
Clean the battery terminals. |
|
2. |
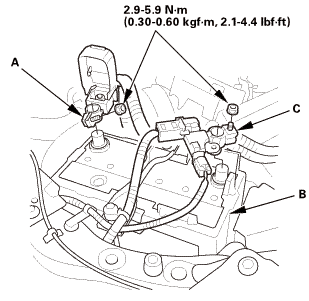
Connect the positive cable (A) to the battery (B). |
|
NOTE: Always connect the positive side first. |
|
3. |
Connect the negative cable and battery sensor (C) to the battery. |
|
4. |
Apply multipurpose grease to the terminals to prevent corrosion. |
|
?
Test yourself
A quick Honda Civic quiz: every answer comes with an explanation and a link to the manual page.
Was this page helpful?