Maintenance and adjustment
Brake Light Switches
In this manual: Maintenance and adjustment
~1min read
When either the front or rear brake is applied, the brake light goes on. The front brake light switch requires no adjustment, but the rear brake light switch should be adjusted in accordance with the Periodic Maintenance Chart.
Inspection
- Turn the ignition key to “ON”.
- The brake light should go on when the front brake is applied.
- If it does not, ask an authorized Kawasaki dealer to inspect the front brake light switch.
- Check the operation of the rear brake light switch by depressing the brake pedal. The brake light should go on after the proper pedal travel.
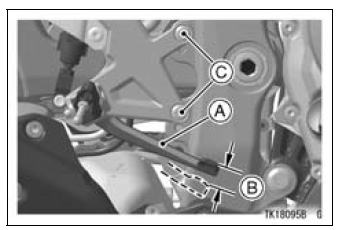
A. Brake Pedal
B. 10 mm (0.4 in.)
C. Bolts
- If it does not, adjust the rear brake light switch.
Brake Pedal Travel 
Adjustment
- Remove the right front footpeg bracket bolts.
- Pull the front footpeg bracket a little bit outward.
- To adjust the rear brake light switch, move the switch up or down by turning the adjusting nut.
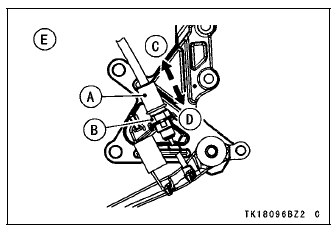
A. Rear Brake Light Switch
B. Adjusting Nut
C. Lights sooner
D. Lights later
E. Viewed from behind the bracket
NOTICE
To avoid damaging the electrical connections inside the switch, be sure that the switch body does not turn during adjustment.
NOTE
Install the front footpegs with same height on both sides. Refer to the Front Footpeg Position in General Information chapter.
Test yourself
A quick Kawasaki Ninja ZX-10R quiz: every answer comes with an explanation and a link to the manual page.
Was this page helpful?