Troubleshooting
Basic Troubleshooting
Basic Troubleshooting Guide

Customer Problem Analysis Sheet
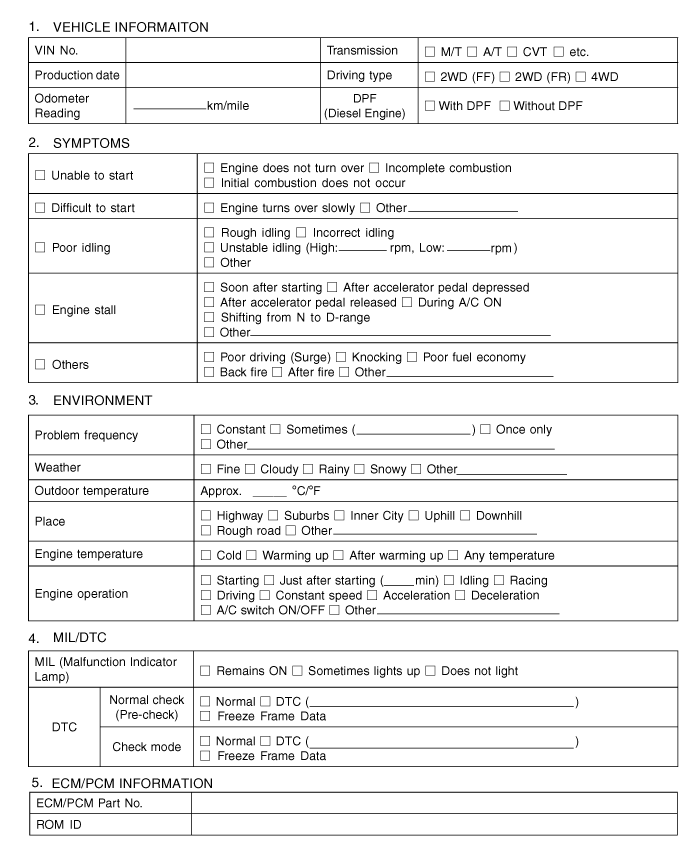
Basic Inspection Procedure
Measuring Condition of Electronic Parts' Resistance
The measured resistance at high temperature after vehicle running may be high or low. So all resistance must be measured at ambient temperature (20 °C, 68°F), unless stated otherwise.
Intermittent Problem Inspection Procedure
Sometimes the most difficult case in troubleshooting is when a problem symptom occurs but does not reoccur during test. An example would be if a problem appears only when the vehicle is cold but has not appeared when warm. In this case, the technician should thoroughly make out a "Customer Problem Analysis Sheet" and recreate (simulate) the environment and condition in which the vehicle was having the issue.
Clear Diagnostic Trouble Code (DTC).
Inspect all connections, check terminal for poor connections, loose wires, bent, broken or corroded pins, and then verify that the connectors are securely fastened at all times.
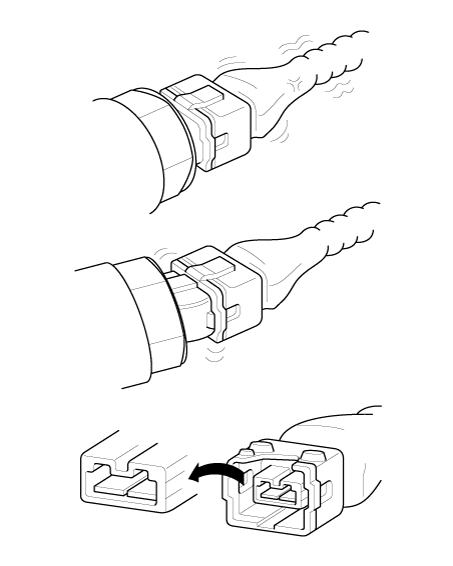
Lightly shake the connector and wiring harness vertically and horizontally.
Repair or replace the component with a problem.
Perform road test to verify that the problem has disappeared.
● Simulating Vibration
| a. | Sensors and Actuators : Lightly shake sensors, actuators or relays by finger. |
| b. | Connectors and Harness : Lightly shake the connector and wiring harness vertically and then horizontally. |
● Simulating Heat
| a. | Heat components suspected of causing the malfunction with a hair dryer or other heat source. |
● Simulating Water Sprinkling
| a. | Sprinkle water onto vehicle to simulate a rainy day or a high humidity condition. |
● Simulating Electrical Load
| a. | Turn on all electrical systems to simulate an excessive electrical load (Radios, fans, lights, rear window defogger, etc.). |
Connector Inspection Procedure
Handling of Connector
a. Never pull on the wiring harness when disconnecting connectors.
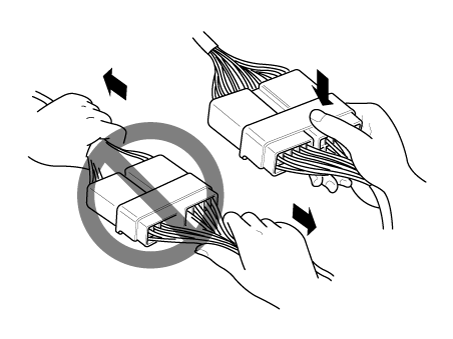
b. When removing the connector with a latch, press or pull locking lever.
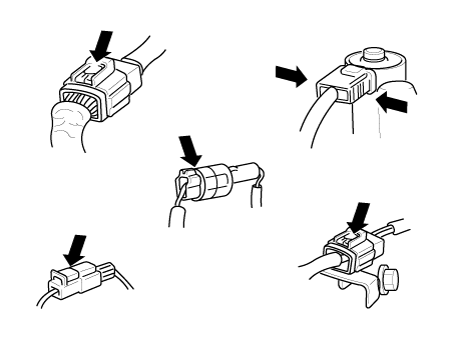
c. Listen for a click when locking connectors. This sound indicates that they are securely locked.

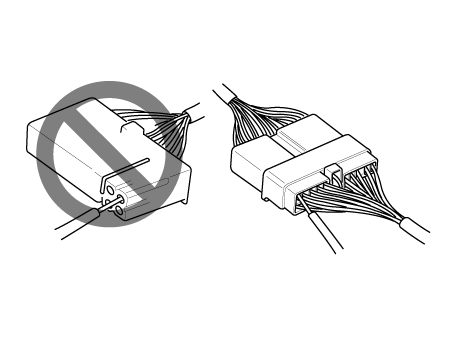
d. When a tester is used to check for continuity, or to measure voltage, always insert tester probe from wire harness side.
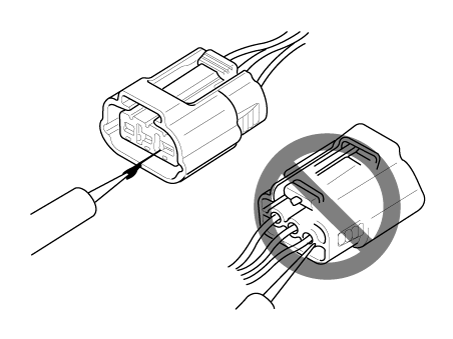
e. Check waterproof connector terminals from the connector side. Waterproof connectors cannot be accessed from harness side.
Checking Point for Connector
a. While the connector is connected:
Hold the connector, and check connecting condition and locking efficiency.
b. When the connector is disconnected:
Check for missing terminal, crimped terminal or broken core wire by lightly pulling the wire harness.
Visually check for rust, contamination, deformation and bending.
c. Check terminal tightening condition:
Insert a spare male terminal into a female terminal, and then check terminal tightening conditions.
d. Pull lightly on individual wires to ensure that each wire is secured in the terminal.

Connector Terminal Repairing Method
a. Clean the contact points using air gun and/or shop rag.
b. In case of abnormal contact pressure, replace the female terminal.
Wire Harness Inspection Procedure
Before removing the wire harness, check the wire harness position and crimping in order to restore it correctly.
Check for twisted, pulled or loose wire harness.
Check if the temperature of the wire harness is abnormally high.
Check for rotating, moving or vibrating wire harness against the sharp edge of a part.
Check the connection between the wire harness and any installed part.
If the covering of wire harness is damaged; secure, repair or replace the harness.
Electrical Circuit Inspection Procedure
● Open Circuit Test
Procedures for Open Circuit
Continuity Check
Voltage Check
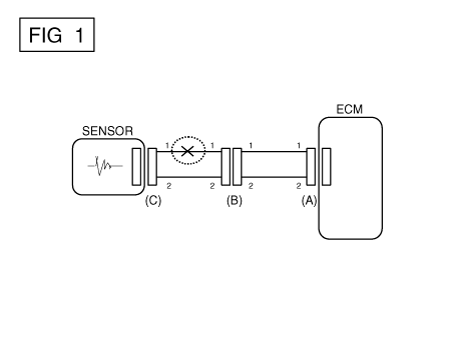
If an open circuit occurs (as seen in [FIG. 1]), it can be found by performing Step 2 (Continuity Check Method) or Step 3 (Voltage Check Method) as shown below.
Continuity Check Method
Specification (Resistance)
1Ω or less → Normal Circuit
1MΩ or Higher → Open Circuit
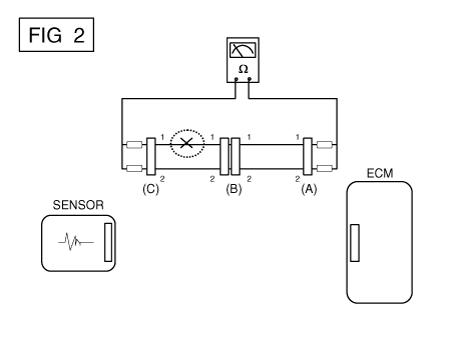
a. Disconnect connectors (A) and (C), and measure resistance between connectors (A) and (C) as shown in [FIG. 2].
In [FIG. 2], if the measured resistances in lines 1 and 2 are "over 1 MΩ" and "below 1 Ω" respectively, line 1 has an open circuit. (Line 2 is normal.) To find the exact broken point, check the sub line of line 1 as described in the next step.
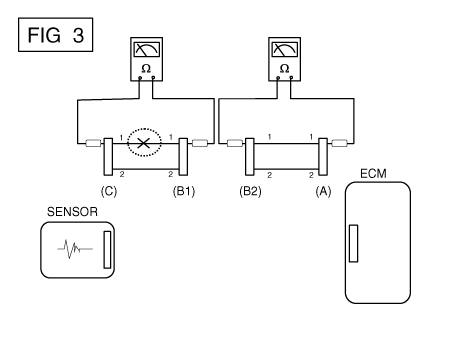
b. Disconnect connector (B), and measure the resistances between connectors (C) and (B1), and between (B2) and (A) as shown in [FIG. 3].
In this case, the measured resistance between connectors (C) and (B1) is higher than 1 MΩ and the open circuit is between terminal 1 of connector (C) and terminal 1 of connector (B1).
Voltage Check Method
a. With each connector still connected, measure the voltage between the chassis ground and terminal 1 of each of connectors (A), (B) and (C) as shown in [FIG. 4].
The measured voltages of connectors are 5V, 5V and 0V respectively. So the open circuit is between connectors (C) and (B).

● Short Circuit Test
Test Method for Short to Ground Circuit
Continuity Check with Chassis Ground
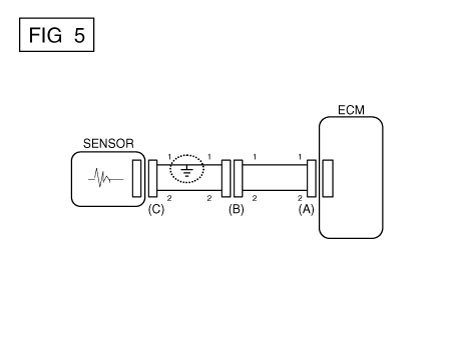
If short to ground circuit occurs as shown in [FIG. 5], the broken point can be found by performing Step 2 (Continuity Check Method with Chassis Ground) as shown below.
Continuity Check Method (with Chassis Ground)
Specification (Resistance)
1Ω or less → Short to Ground Circuit
1MΩ or Higher → Normal Circuit
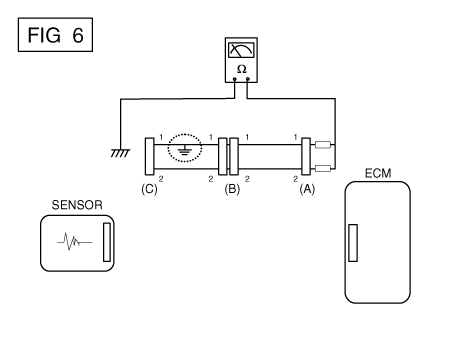
a. Disconnect connectors (A) and (C), and measure the resistance between connector (A) and Chassis Ground as shown in [FIG. 6].
If the measured resistances in lines 1 and 2 are "below 1 Ω" and "over 1 MΩ" respectively, line 1 has an open circuit. (Line 2 is normal.) To find the exact broken point, check the sub line of line 1 as described in the next step.
b. Disconnect connector (B), and measure the resistances between connector (A) and chassis ground, and between (B1) and chassis ground as shown in [FIG. 7].
The measured resistance between connector (B1) and chassis ground is 1Ω or less. The short to ground circuit is between terminal 1 of connector (C) and terminal 1 of connector (B1).

● Voltage Drop Test
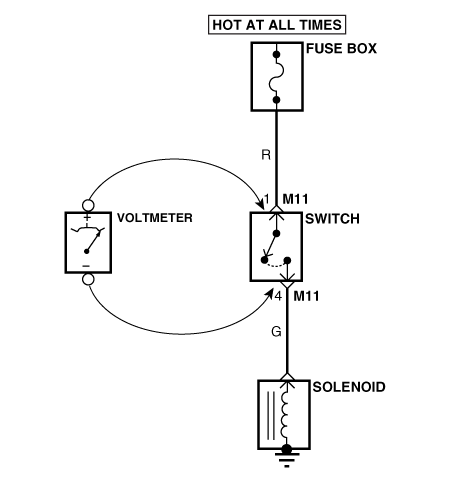
This test checks for voltage drop along a wire, or through a connection or a switch.
| A. | Connect the positive lead of a voltmeter to the end of the wire (or to the side of the connector or switch) closest to the battery. |
| B. | Connect the negative lead to the other end of the wire (or the other side of the connector or switch). |
| C. | Operate the circuit. |
| D. | The voltmeter will show the difference in voltage between the two points. A difference, or drop of more than 0.1 volts (50mV in 5V circuits), may indicate a problem. Check the circuit for loose or dirty connections. |
Symptom Troubleshooting Guide Chart
| Main symptom | Diagnostic procedure | Also check for |
| Unable to start (Engine does not turn over) |
|
|
| Unable to start (Incomplete combustion) |
|
|
| Difficult to start |
|
|
| Poor idling (Rough, unstable or incorrect idle) |
|
|
| Engine stalling |
|
|
| Poor driving (Surge) |
|
|
| Knocking |
|
|
| Poor fuel economy |
|
|
| Hard to refuel (Overflow during refueling) |
|
|