Diagnosis system (audio unit)
Models with usb connection function
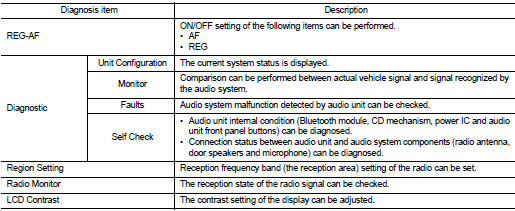
MODELS WITH USB CONNECTION FUNCTION : On Board Diagnosis FunctionSelf-diagnosis mode can check the following items.
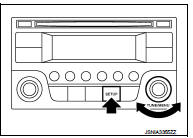
METHOD OF STARTING
1. Start the engine. 2. Turn OFF audio.3. While pressing the “SET UP” switch, turn the MENU dial counterclockwise 3 clicks or more first, then clockwise and counterclockwise 3 clicks or more, respectively. (After the diagnosis mode starts, the initial screen of the diagnosis mode appears.)
Finishing Self-diagnosis Mode Self-diagnosis mode is canceled when turning the ignition switch OFF.
REG-AF
ON/OFF setting of the following items can be performed.
• AF
• REG
Diagnostic
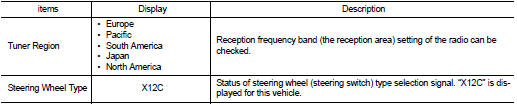
Unit Configuration
The current system status is displayed.
Check item list

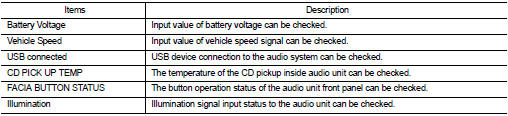
Monitor
A comparison check can be made of each actual vehicle signal and the signals recognized by the system.
Check item list
Faults
Audio system malfunction detected by audio unit can be checked.
Error item list
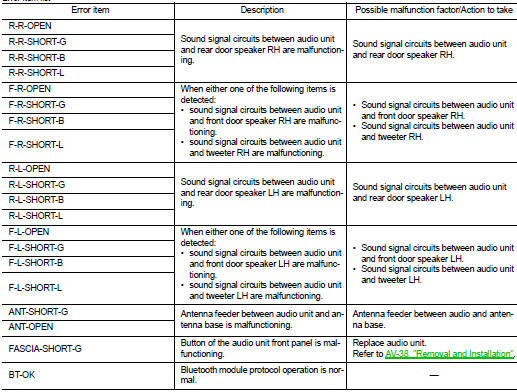
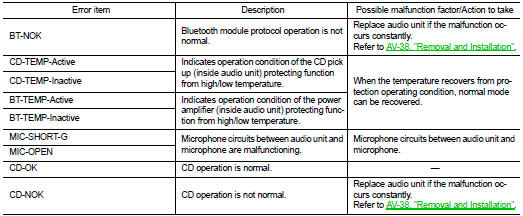
NOTE
:
• OPEN: Open road
• SHORT-G: Short to ground • SHORT-B: Short to battery • SHORT-L: Short between the wiring
• Audio unit internal condition (Bluetooth module, CD mechanism, power IC and audio unit front panel buttons) can be diagnosed.
• Connection status between audio unit and audio system components (radio antenna, door speakers and microphone) can be diagnosed.
REGION SETTING
Reception frequency band (the reception area) setting of the radio can be set.
RADIO MONITOR
The reception state of the radio signal can be checked.
LCD CONTRAST
The contrast setting of the display can be adjusted.
Models without usb connection function
MODELS WITHOUT USB CONNECTION FUNCTION : Diagnosis DescriptionSelf-diagnosis mode can check the following items.
• Display all icons and segments • Display LCD• Audio unit hardware/software/E2P versions • Serial No.
• Model code
METHOD OF STARTING
1. Turn ignition switch to the ON position. 2. Turn the audio unit OFF. 3. With both “1” button and “5” button pressed, turn ON the audio system.4. Audio unit display shows “SERVICE MODE”.
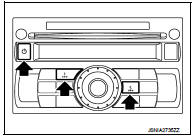
Icons, Segments and LCD Check 1. All display icons and segments will be illuminated for 2 seconds.
2. Press the “ENTER” switch to display LCD check segments pattern.
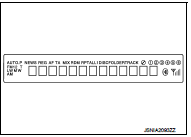
Version Check
1. Press the “ENTER” switch to enter version diagnostics. “Soft” (audio software version) is displayed.
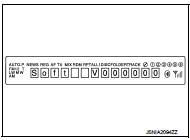
2. Press the “ENTER” switch again to display the “Hard” (audio hardware version).
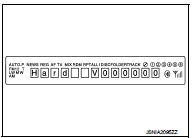
3. Press the “ENTER” switch again to display the “E2P” (audio unit EEPROM version).

Serial No. Check
1. Press the “ENTER” switch again to display the audio unit serial No.
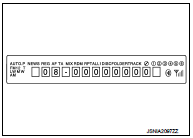
Model Code Check
1. Press the “ENTER” switch again to display the audio unit model code (vehicle EQ profile selection).
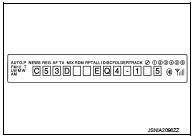
Finishing Self-diagnosis Mode Self-diagnosis mode is canceled when turning the ignition switch OFF.