Engine Lubrication System MR16DDT

Engine oil

In this manual: Engine Lubrication System MR16DDT
Foreword — 1General information — 45Engine Mechanical MR16DDT — 61Engine Mechanical HR16DE — 52Engine Mechanical K9K — 46Engine Lubrication System MR16DDT — 18Engine Lubrication System HR16DE — 14Engine Lubrication System K9K — 11Engine Cooling System MR16DDT — 28Engine Cooling System HR16DE — 29Engine Cooling System K9K — 24Engine Control System MR16DDT — 163Engine Control System HR16DE — 115Engine Control System K9K — 129Fuel System MR16DDT — 13Fuel system HR16DE — 11Fuel system K9K — 12Exhaust system MR16DDT — 7Exhaust system HR16DE — 10Exhaust system K9K — 7Starting system — 24Accelerator control system — 6Clutch — 25Driveline transfer: TY21B — 77Driveline rear propeller Shaft: 3Fφ16-ETJ75 — 12Driveline rear final drive: RTVS — 31Transaxle & transmission 5MT: RS5F92R — 31Transaxle & transmission 6MT: RS6F94R — 30Transaxle & transmission CVT: RE0F10B — 93Transaxle & transmissioN CVT: RE0F11A — 103Front Axle MR16DDT — 18Front Axle HR16DE — 17Front Axle K9K — 17Rear Axle 2WD — 6Rear Axle 4WD — 13Front Suspension — 21Rear Suspension 2WD — 13Rear Suspension 4WD — 17Road Wheels & Tires — 6Brake System LHD — 24Brake System RHD — 24Parking Brake System — 8Brake Control System without ESP — 44Brake Control System with ESP — 63Steering System — 14Steering Control System — 27Seat Belt — 8SRS Airbag — 24SRS Airbag Control System — 93Ventilation System — 11Heater & Air Conditioning System HR16DE — 28Heater & Air Conditioning System MR16DDT — 28Heater & Air Conditioning Control System Type 1 — 49Heater & Air Conditioning Control System Type 2 — 51Heater & Air Conditioning Control System Type 3 — 32Heater & Air Conditioning Control System Type 4 — 40Heater & Air Conditioning Control System Type 5 — 21Interior — 16Instrument Panel — 10Seat — 18Door & Lock Type 1 — 83Door & Lock type 2 — 80Door & Lock type 3 — 65Door & Lock type 4 — 60Security Control System with intelligent key system — 82Security Control System without intelligent key system — 41Glass & Window System — 15Power Window Control System — 28Body Repair — 13Exterior — 20Mirrors — 26Exterior Lighting System Halogen type — 51Interior Lighting System — 24Wiper & Washer — 45Defogger — 31Horn — 4Power Outlet — 4Body Control System With intelligent key system — 21Body Control System Without intelligent key system — 23LAN system can fundamental — 6LAN system can — 31LAN System can system (type 1) — 1LAN System can system (type 2) — 1LAN System can system (type 3) — 1LAN System can system (type 4) — 1LAN System can system (type 5) — 1LAN System can system (type 6) — 1LAN System can system (type 7) — 2LAN System can system (type 8) — 1LAN System can system (type 9) — 1LAN System can system (type 10) — 1LAN System can system (type 11) — 1Power Control System IPDM E/R (with I-key) — 14Power Control System IPDM E/R (without I-key) — 14Power Control System Power distribution system — 25Charging System — 22Power Supply, Ground & Circuit Elements — 20Meter, Warning Lamp & Indicator — 33Warning Chime System — 22Audio, Visual & Navigation System Audio without navigation — 30Audio, Visual & Navigation System Audio with navigation — 33Audio, Visual & Navigation System NISSAN dynamic control system — 22Cruise Control System — 1Drive Mode System — 10Maintenance — 14
~4min read

Inspection

ENGINE OIL LEVEL

NOTE

:
Before starting engine, put vehicle horizontally and check the engine oil level. If engine is already started, stop it and allow 10 minutes before checking.

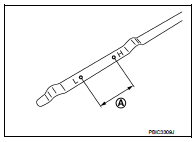
1. Pull out oil level gauge and wipe it clean. 2. Insert oil level gauge and check that the engine oil level is within the range (A) shown in the figure.

3. If it is out of range, adjust it.

ENGINE OIL APPEARANCE

ENGINE OIL APPEARANCE

• Check engine oil for white turbidity or heavy contamination.

• If engine oil becomes turbid and white, it is highly probable that it is contaminated with engine coolant.

Repair or replace damaged parts.

ENGINE OIL LEAKAGE

Check for engine oil leakage around the following area.

• Oil pan (upper and lower) • Oil pan drain plug
• Oil pressure switch
• Oil filter
• Valve timing control cover • Front cover
• Mating surface between cylinder head and camshaft bracket • Mating surface between cylinder block and cylinder head • Mating surface between cylinder head and rocker cover • Crankshaft oil seals (front and rear)

OIL PRESSURE CHECK

WARNING:
• Be careful not to get burned, as engine oil may be hot.

• When checking engine oil pressure, shift position should be “Parking position”, and apply parking brake securely.

1. Check engine oil level. Refer to LU-8, "Inspection".

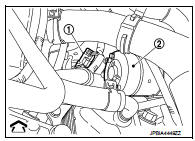
2. Disconnect harness connector at oil pressure sensor (1), and remove oil pressure switch using a deep socket (commercial service tool).

2 : Starter motor
CAUTION:: Engine front


CAUTION:
Never drop or shock oil pressure switch.
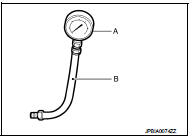
3. Install oil pressure gauge [SST: ST25051001 (J-25695-1)] (A)

3. Install oil pressure gauge [SST: ST25051001 (J-25695-1)] (A) and hose [SST: ST25052000 (J-25695-2)] (B).
4. Start engine and warm it up to normal operating temperature.

4. Start engine and warm it up to normal operating temperature.

5. Check oil pressure with engine running under no-load. NOTE

:
When engine oil temperature is low, engine oil pressure becomes high.

Engine oil pressure : Refer to LU-18, "Engine Oil Pressure".

If difference is extreme, check oil passage and oil pump for oil leakage.

6. After the inspections, install oil pressure switch as follows: a. Remove old liquid gasket adhering to oil pressure switch and engine.

b. Apply liquid gasket and tighten oil pressure switch to specification.

Use Genuine RTV Silicon Sealant or equivalent.

Tightening torque : Refer to EM-103, "Exploded View".

c. Check engine oil level. Refer to LU-8, "Inspection".

d. After warming up engine, check that there is no leakage of engine oil with running engine.

Draining

WARNING:
• Be careful not to get burned, as engine oil may be hot.

• Prolonged and repeated contact with used engine oil may cause skin cancer. Try to avoid direct skin contact with used engine oil. If skin contact is made, wash thoroughly with soap or hand cleaner as soon as possible

.

1. Warm up the engine, and check for engine oil leakage from engine components. Refer to LU-8, "Inspection". 2. Stop the engine and wait for 10 minutes. 3. Loosen oil filler cap.

4. Remove drain plug and then drain engine oil.

Refilling

1. Install drain plug with new drain plug washer. Refer to EM-40, "Exploded View".

CAUTION:
Be sure to clean drain plug and install with new drain plug washer.

Tightening torque : Refer to EM-40, "Exploded View".

2. Refill with new engine oil.

Engine oil specification and viscosity: Refer to MA-13, "Fluids and Lubricants".

Engine oil capacity : Refer to LU-18, "Periodical Maintenance Specification".

CAUTION:
• The refill capacity depends on the engine oil temperature and drain time. Use these specifications for reference only.

•Always use oil level gauge to determine the proper amount of engine oil in the engine.

3. Warm up engine and check area around drain plug and oil filter for engine oil leakage. 4. Stop engine and wait for 10 minutes.

5. Check the engine oil level. Refer to LU-8, "Inspection".