Fuel system K9K

Fuel filter

In this manual: Fuel system K9K
Foreword — 1General information — 45Engine Mechanical MR16DDT — 61Engine Mechanical HR16DE — 52Engine Mechanical K9K — 46Engine Lubrication System MR16DDT — 18Engine Lubrication System HR16DE — 14Engine Lubrication System K9K — 11Engine Cooling System MR16DDT — 28Engine Cooling System HR16DE — 29Engine Cooling System K9K — 24Engine Control System MR16DDT — 163Engine Control System HR16DE — 115Engine Control System K9K — 129Fuel System MR16DDT — 13Fuel system HR16DE — 11Fuel system K9K — 12Exhaust system MR16DDT — 7Exhaust system HR16DE — 10Exhaust system K9K — 7Starting system — 24Accelerator control system — 6Clutch — 25Driveline transfer: TY21B — 77Driveline rear propeller Shaft: 3Fφ16-ETJ75 — 12Driveline rear final drive: RTVS — 31Transaxle & transmission 5MT: RS5F92R — 31Transaxle & transmission 6MT: RS6F94R — 30Transaxle & transmission CVT: RE0F10B — 93Transaxle & transmissioN CVT: RE0F11A — 103Front Axle MR16DDT — 18Front Axle HR16DE — 17Front Axle K9K — 17Rear Axle 2WD — 6Rear Axle 4WD — 13Front Suspension — 21Rear Suspension 2WD — 13Rear Suspension 4WD — 17Road Wheels & Tires — 6Brake System LHD — 24Brake System RHD — 24Parking Brake System — 8Brake Control System without ESP — 44Brake Control System with ESP — 63Steering System — 14Steering Control System — 27Seat Belt — 8SRS Airbag — 24SRS Airbag Control System — 93Ventilation System — 11Heater & Air Conditioning System HR16DE — 28Heater & Air Conditioning System MR16DDT — 28Heater & Air Conditioning Control System Type 1 — 49Heater & Air Conditioning Control System Type 2 — 51Heater & Air Conditioning Control System Type 3 — 32Heater & Air Conditioning Control System Type 4 — 40Heater & Air Conditioning Control System Type 5 — 21Interior — 16Instrument Panel — 10Seat — 18Door & Lock Type 1 — 83Door & Lock type 2 — 80Door & Lock type 3 — 65Door & Lock type 4 — 60Security Control System with intelligent key system — 82Security Control System without intelligent key system — 41Glass & Window System — 15Power Window Control System — 28Body Repair — 13Exterior — 20Mirrors — 26Exterior Lighting System Halogen type — 51Interior Lighting System — 24Wiper & Washer — 45Defogger — 31Horn — 4Power Outlet — 4Body Control System With intelligent key system — 21Body Control System Without intelligent key system — 23LAN system can fundamental — 6LAN system can — 31LAN System can system (type 1) — 1LAN System can system (type 2) — 1LAN System can system (type 3) — 1LAN System can system (type 4) — 1LAN System can system (type 5) — 1LAN System can system (type 6) — 1LAN System can system (type 7) — 2LAN System can system (type 8) — 1LAN System can system (type 9) — 1LAN System can system (type 10) — 1LAN System can system (type 11) — 1Power Control System IPDM E/R (with I-key) — 14Power Control System IPDM E/R (without I-key) — 14Power Control System Power distribution system — 25Charging System — 22Power Supply, Ground & Circuit Elements — 20Meter, Warning Lamp & Indicator — 33Warning Chime System — 22Audio, Visual & Navigation System Audio without navigation — 30Audio, Visual & Navigation System Audio with navigation — 33Audio, Visual & Navigation System NISSAN dynamic control system — 22Cruise Control System — 1Drive Mode System — 10Maintenance — 14
~2min read

Exploded View


Removal and Installation

Removal and Installation

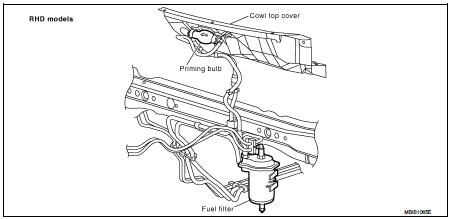
REMOVAL (RHD)

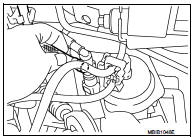
1. Remove quick connectors in the following procedures.

• Pinch quick connector square-parts with your fingers, and pull out the quick connector by hand.

• If quick connector and tube on vehicle are stuck, push and pull several times until they move, and pull out.
2. Remove fuel filter from fuel filter bracket.

2. Remove fuel filter from fuel filter bracket.

CAUTION:
Never spill the fuel during removal. If the fuel is spill, immediately wipe it off. Be especially careful to prevent the fuel from adhering to the insulators of the engine mounts.
REMOVAL (LHD)

REMOVAL (LHD)

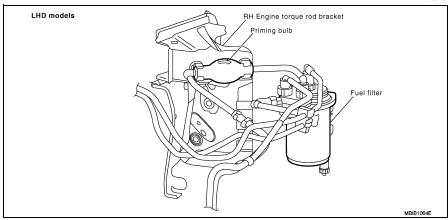
1. Remove priming bulb from priming bulb bracket. 2. Remove fuel filter from fuel filter bracket.

3. Remove quick connectors as above.

CAUTION:
Put a shop cloth under the drain valve, to avoid the water and fuel spill on ABS actuator. Be especially careful to prevent any damage.

INSTALLATION

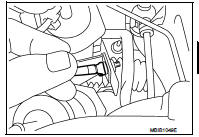
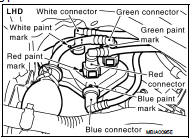
Install in the reverse order of removal, paying attention to the following points: • To install fuel filter connectors, respect paint marks on fuel filter as shown.

• After installation, operate the priming bulb vertically, if it is possible, to perform air bleeding.

Refer to FL-50, "Air Bleeding".

CAUTION:
Never bend or twist the tube during installation and removal.
Water Draining

Water Draining

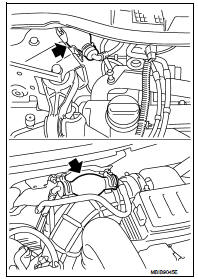
DRAINING WATER (RHD)

Open drain valve at the bottom of fuel filter.
DRAINING WATER (LHD)

DRAINING WATER (LHD)

1. Remove fender protector RH. Refer to EXT-22, "Exploded View". 2. Remove foam insulator.

3. Open drain valve at the bottom of fuel filter.

CAUTION:
Put a shop cloth under the drain valve, to avoid the water and fuel spill on ABS actuator

.

FUEL FILTER CHECK

Check fuel filter for fuel leakage, damage and other abnormal signs.

Air Bleeding

1. Prime the circuit using the priming bulb.

2. Perform engine cranking with repeating several times until engine starting.
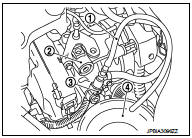
3. If the engine does not start, perform the following procedure.

3. If the engine does not start, perform the following procedure.

2 : High pressure supply pump

a. Remove high pressure pump protector. Refer to EM-298, "Exploded View". b. Remove quick connector (black tab). c. Connect drain hose (suitable hose) (1) to the end of quick connector (supply pipe side) (3). d. Place a tray (4) at the drain hose open end.

e. Operate the priming bulb to completely bleed air from the circuit.

4. When air bleeding is completed, install quick connector, and check absence of leakage.
Removal and installation