Fuel system K9K

Fuel level sensor unit

In this manual: Fuel system K9K
Foreword — 1General information — 45Engine Mechanical MR16DDT — 61Engine Mechanical HR16DE — 52Engine Mechanical K9K — 46Engine Lubrication System MR16DDT — 18Engine Lubrication System HR16DE — 14Engine Lubrication System K9K — 11Engine Cooling System MR16DDT — 28Engine Cooling System HR16DE — 29Engine Cooling System K9K — 24Engine Control System MR16DDT — 163Engine Control System HR16DE — 115Engine Control System K9K — 129Fuel System MR16DDT — 13Fuel system HR16DE — 11Fuel system K9K — 12Exhaust system MR16DDT — 7Exhaust system HR16DE — 10Exhaust system K9K — 7Starting system — 24Accelerator control system — 6Clutch — 25Driveline transfer: TY21B — 77Driveline rear propeller Shaft: 3Fφ16-ETJ75 — 12Driveline rear final drive: RTVS — 31Transaxle & transmission 5MT: RS5F92R — 31Transaxle & transmission 6MT: RS6F94R — 30Transaxle & transmission CVT: RE0F10B — 93Transaxle & transmissioN CVT: RE0F11A — 103Front Axle MR16DDT — 18Front Axle HR16DE — 17Front Axle K9K — 17Rear Axle 2WD — 6Rear Axle 4WD — 13Front Suspension — 21Rear Suspension 2WD — 13Rear Suspension 4WD — 17Road Wheels & Tires — 6Brake System LHD — 24Brake System RHD — 24Parking Brake System — 8Brake Control System without ESP — 44Brake Control System with ESP — 63Steering System — 14Steering Control System — 27Seat Belt — 8SRS Airbag — 24SRS Airbag Control System — 93Ventilation System — 11Heater & Air Conditioning System HR16DE — 28Heater & Air Conditioning System MR16DDT — 28Heater & Air Conditioning Control System Type 1 — 49Heater & Air Conditioning Control System Type 2 — 51Heater & Air Conditioning Control System Type 3 — 32Heater & Air Conditioning Control System Type 4 — 40Heater & Air Conditioning Control System Type 5 — 21Interior — 16Instrument Panel — 10Seat — 18Door & Lock Type 1 — 83Door & Lock type 2 — 80Door & Lock type 3 — 65Door & Lock type 4 — 60Security Control System with intelligent key system — 82Security Control System without intelligent key system — 41Glass & Window System — 15Power Window Control System — 28Body Repair — 13Exterior — 20Mirrors — 26Exterior Lighting System Halogen type — 51Interior Lighting System — 24Wiper & Washer — 45Defogger — 31Horn — 4Power Outlet — 4Body Control System With intelligent key system — 21Body Control System Without intelligent key system — 23LAN system can fundamental — 6LAN system can — 31LAN System can system (type 1) — 1LAN System can system (type 2) — 1LAN System can system (type 3) — 1LAN System can system (type 4) — 1LAN System can system (type 5) — 1LAN System can system (type 6) — 1LAN System can system (type 7) — 2LAN System can system (type 8) — 1LAN System can system (type 9) — 1LAN System can system (type 10) — 1LAN System can system (type 11) — 1Power Control System IPDM E/R (with I-key) — 14Power Control System IPDM E/R (without I-key) — 14Power Control System Power distribution system — 25Charging System — 22Power Supply, Ground & Circuit Elements — 20Meter, Warning Lamp & Indicator — 33Warning Chime System — 22Audio, Visual & Navigation System Audio without navigation — 30Audio, Visual & Navigation System Audio with navigation — 33Audio, Visual & Navigation System NISSAN dynamic control system — 22Cruise Control System — 1Drive Mode System — 10Maintenance — 14
~4min read

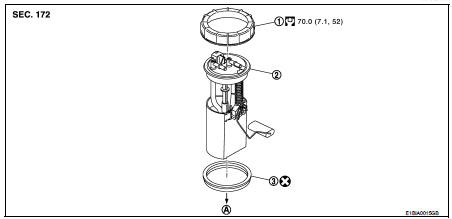
Exploded View

1. Lock ring

1. Lock ring
2. Fuel level sensor unit 3. Seal packing

A. To fuel tank

disassembly: Always replace after every
disassembly

Removal and Installation

WARNING:
Read “General Precautions” when working on the fuel system. Refer to FL-45, "General Precautions".

REMOVAL

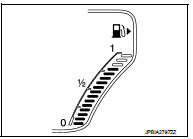
1. Check fuel level on fuel gauge. If fuel gauge indicates more than the level as shown in the figure (full or almost full), drain fuel from fuel tank until fuel gauge indicates level as shown in the figure or below.

NOTE

:
Because fuel will be spilled when removing fuel level sensor units for the top of the fuel is above the fuel level sensor units installation surface.

• As a guide, fuel level becomes the position as shown in the figure or below when approximately 10 (2-5/8 US gal, 2-1/4 Imp gal) of fuel are drained from fuel tank.

• In a case that fuel pump does not operate, perform the following procedure
a. Insert hose of less than 25 mm (0.98 in) in diameter into fuel filler tube

a. Insert hose of less than 25 mm (0.98 in) in diameter into fuel filler tube through fuel filler opening to draw fuel from fuel filler tube. b. Disconnect fuel filler hose from fuel filler tube. Refer to FL-55, "Exploded View".

c. Insert hose into fuel tank through fuel filler hose to draw fuel from fuel tank.

2. Open fuel filler lid. 3. Open filler cap and release the pressure inside fuel tank. 4. Remove rear seat. Refer to SE-32, "Exploded View".

5. Remove inspection hole cover.

• Using a screwdriver, remove it by turning clips clockwise by 90 degrees.

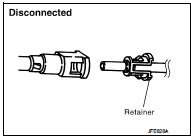
6. Disconnect harness connector (1), fuel feed tube (4) and quick connector (3).

2 : Fuel level sensor unit : Vehicle front


• Hold the connector while pushing in tabs, and pull out the

• Hold the connector while pushing in tabs, and pull out the tube.
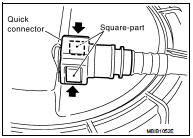

CAUTION:

CAUTION:
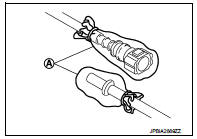
• Quick connector can be removed when the tabs are completely depressed. Never twist it more than necessary. • Never use any tools to disconnected quick connector. • Keep resin tube away from heat. Be especially careful when welding near the resin tube. • Prevent acid liquid such as battery electrolyte, etc. from getting on resin tube. • Never bend or twist resin tube during installation and disconnection. • To keep the connecting portion clean and to avoid damage and foreign materials, cover them completely with plastic bags (A) or something similar.

• Never insert plug, preventing damage on O-ring in quick connector.
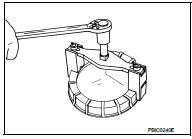
7. Using lock ring wrench [SST: KV99104700 (Mot.1397)], remove lock ring.

7. Using lock ring wrench [SST: KV99104700 (Mot.1397)], remove lock ring.

CAUTION:
Rotate SST while pressing fuel level sensor unit as spring reaction force is applied from fuel tank inside to up ward.

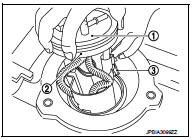
8. Remove fuel level sensor unit.

2 : O-ring

CAUTION:
• Be careful not to bend the float arm (3) when removing.

• Handle them carefully without subjecting them to impacts such as dropping.
INSTALLATION

INSTALLATION

Note to the following, and install in the reverse order of removal.

Fuel Level Sensor Unit
1. Temporarily install the O-ring to the fuel level sensor unit.

2. Insert the fuel level sensor unit to the fuel tank, and then install the temporarily installed O-ring (Step 1) to the opening of the fuel tank.
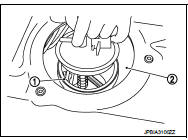
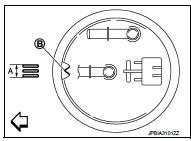
3. Install fuel level sensor unit to fuel tank with alignment mark (B)

3. Install fuel level sensor unit to fuel tank with alignment mark (B) on the upper surface facing the tree inscribed lines (A) on the tank side.

CAUTION:: Vehicle front


CAUTION:
• Never allow O-ring to drop.

• Never bend float arm during installing.
4. Install lock ring for fuel level sensor unit, fuel filter and fuel pump

4. Install lock ring for fuel level sensor unit, fuel filter and fuel pump assembly with lock ring wrench [SST: KV993G0010 (Mot. 1397)] by turning clockwise.

CAUTION:
Install lock ring horizontally.
Quick Connector

Quick Connector
Connect quick connector as follows: 1. Check the connection for damage or any foreign materials. 2. Align the connector with the tube, then insert the connector straight into the tube until a click sound is heard.

3. After connecting, check that the connection is secure by following method.

• Visually confirm that the two tabs are connected to the connector.

• Pull (A) the tube and the connector to check they are securely connected.

1 : Quick connector

Fuel tank