Outside mirror
Exploded View

1. Door mirror cover 2. Actuator
3. Glass mirror
4. Door mirror corner cover 5. Door mirror assembly
 : Clip
 : Pawl
Door mirror assembly
DOOR MIRROR ASSEMBLY : Removal and Installation CAUTION:When removing, always use a remover tool that is made of plastic.
REMOVAL
1. Disengage door mirror corner cover fixing clips with a remover tool (A) and then remove door mirror corner cover.
 : Clip

2. Remove front door finisher. Refer to INT-13, "Removal and Installation". 3. Disconnect door mirror harness connector.
4. Remove door mirror mounting nuts, and then remove door mirror assembly.
INSTALLATION
Install in the reverse order of removal.
Glass mirror
GLASS MIRROR : Removal and InstallationREMOVAL
1. Place the glass mirror upward. 2. Put a strip of protective tape (B) on mirror body (1).3. Insert a small flat-bladed screwdriver (A) into the recess at lower side between glass mirror (2) and actuator, and push up pawls to remove glass mirror lower side.
NOTE:
Insert a small flat-bladed screwdriver into recesses, and push up while rotating (twisting) to make work easier.
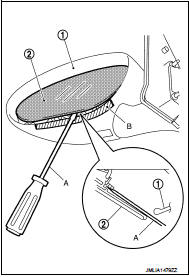
4. Remove glass mirror from mirror body.
INSTALLATION
Note the following item, and then install in the reverse order of removal.
CAUTION:After installation, visually check that pawls are securely engaged.
Door mirror cover
DOOR MIRROR COVER : Removal and InstallationREMOVAL
1. Remove door mirror assembly from the door panel. Refer to MIR-43, "DOOR MIRROR ASSEMBLY : Removal and Installation". 2. Remove the glass mirror. Refer to MIR-44, "GLASS MIRROR : Removal and Installation".3. Disengage door mirror cover fixing pawls while pressing the pawls toward the direction of the arrows.
 : Pawl
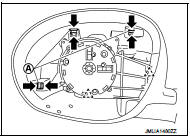
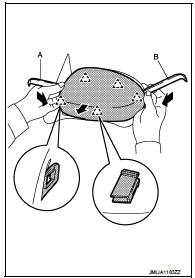
4. Insert two remover tools (A) and (B) between door mirror cover and mirror body to disengage the pawls, and then remove door mirror cover.
 : Pawl
5. Remove actuator fixing screws (A).
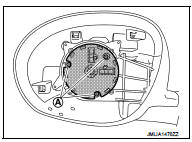
6. Disconnect actuator harness connector and then remove actuator from door mirror.
INSTALLATION
Note the following item and then install in the reverse order of removal.
CAUTION:After installation, visually check that pawls are securely engaged.