Engine Cooling System HR16DE

Refilling

In this manual: Engine Cooling System HR16DE
Foreword — 1General information — 45Engine Mechanical MR16DDT — 61Engine Mechanical HR16DE — 52Engine Mechanical K9K — 46Engine Lubrication System MR16DDT — 18Engine Lubrication System HR16DE — 14Engine Lubrication System K9K — 11Engine Cooling System MR16DDT — 28Engine Cooling System HR16DE — 29Engine Cooling System K9K — 24Engine Control System MR16DDT — 163Engine Control System HR16DE — 115Engine Control System K9K — 129Fuel System MR16DDT — 13Fuel system HR16DE — 11Fuel system K9K — 12Exhaust system MR16DDT — 7Exhaust system HR16DE — 10Exhaust system K9K — 7Starting system — 24Accelerator control system — 6Clutch — 25Driveline transfer: TY21B — 77Driveline rear propeller Shaft: 3Fφ16-ETJ75 — 12Driveline rear final drive: RTVS — 31Transaxle & transmission 5MT: RS5F92R — 31Transaxle & transmission 6MT: RS6F94R — 30Transaxle & transmission CVT: RE0F10B — 93Transaxle & transmissioN CVT: RE0F11A — 103Front Axle MR16DDT — 18Front Axle HR16DE — 17Front Axle K9K — 17Rear Axle 2WD — 6Rear Axle 4WD — 13Front Suspension — 21Rear Suspension 2WD — 13Rear Suspension 4WD — 17Road Wheels & Tires — 6Brake System LHD — 24Brake System RHD — 24Parking Brake System — 8Brake Control System without ESP — 44Brake Control System with ESP — 63Steering System — 14Steering Control System — 27Seat Belt — 8SRS Airbag — 24SRS Airbag Control System — 93Ventilation System — 11Heater & Air Conditioning System HR16DE — 28Heater & Air Conditioning System MR16DDT — 28Heater & Air Conditioning Control System Type 1 — 49Heater & Air Conditioning Control System Type 2 — 51Heater & Air Conditioning Control System Type 3 — 32Heater & Air Conditioning Control System Type 4 — 40Heater & Air Conditioning Control System Type 5 — 21Interior — 16Instrument Panel — 10Seat — 18Door & Lock Type 1 — 83Door & Lock type 2 — 80Door & Lock type 3 — 65Door & Lock type 4 — 60Security Control System with intelligent key system — 82Security Control System without intelligent key system — 41Glass & Window System — 15Power Window Control System — 28Body Repair — 13Exterior — 20Mirrors — 26Exterior Lighting System Halogen type — 51Interior Lighting System — 24Wiper & Washer — 45Defogger — 31Horn — 4Power Outlet — 4Body Control System With intelligent key system — 21Body Control System Without intelligent key system — 23LAN system can fundamental — 6LAN system can — 31LAN System can system (type 1) — 1LAN System can system (type 2) — 1LAN System can system (type 3) — 1LAN System can system (type 4) — 1LAN System can system (type 5) — 1LAN System can system (type 6) — 1LAN System can system (type 7) — 2LAN System can system (type 8) — 1LAN System can system (type 9) — 1LAN System can system (type 10) — 1LAN System can system (type 11) — 1Power Control System IPDM E/R (with I-key) — 14Power Control System IPDM E/R (without I-key) — 14Power Control System Power distribution system — 25Charging System — 22Power Supply, Ground & Circuit Elements — 20Meter, Warning Lamp & Indicator — 33Warning Chime System — 22Audio, Visual & Navigation System Audio without navigation — 30Audio, Visual & Navigation System Audio with navigation — 33Audio, Visual & Navigation System NISSAN dynamic control system — 22Cruise Control System — 1Drive Mode System — 10Maintenance — 14
~3min read

1. Install reservoir tank if removed and radiator drain plug.

CAUTION:
Be sure to clean drain plug and install with new O-ring.

Radiator drain plug : Refer to CO-42, "Exploded View".

• If water drain plugs on cylinder block are removed, close and tighten them. Refer to EM-228, "Disassembly and Assembly".

2. Check that each hose clamp has been firmly tightened. 3. Remove air duct (between air cleaner case and electric throttle control actuator). Refer to EM-161, "Exploded View".

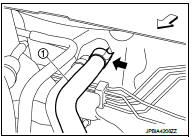
4. Disconnect heater hose (1) at position () in the figure.
) in the figure.

• Enhance heater hose as high as possible.: Vehicle front


• Enhance heater hose as high as possible.
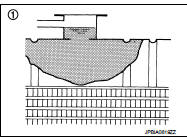
5. Fill radiator (1) to specified level.

5. Fill radiator (1) to specified level.

• Pour coolant slowly of less than 2 (2-1/8 US qt, 1-3/4 Imp qt) a minute to allow air in system to escape. • When engine coolant overflows disconnected heater hose, connect heater hose, and continue filling the engine coolant. • Use Genuine NISSAN Engine Coolant or equivalent in its quality mixed with water (distilled or demineralized). Refer to MA-13, "Fluids and Lubricants".

Engine coolant capacity (With reservoir tank at “MAX” level) Refer to CO-54, "Periodical Maintenance Specification".
6. Refill reservoir tank to “MAX” level line with engine coolant.

6. Refill reservoir tank to “MAX” level line with engine coolant.

A : MAX
B : MIN

Reservoir tank engine coolant capacity (At “MAX” level)
Refer to CO-54, "Periodical Maintenance Specification".

7. Install air duct (between air cleaner case and electric throttle control

7. Install air duct (between air cleaner case and electric throttle control actuator). Refer to EM-161, "Exploded View". 8. Install radiator cap.

9. Warm up engine until opening thermostat. Standard for warming-up time is approximately 10 minutes at 3,000 rpm.

• Check thermostat opening condition by touching radiator hose (lower) to see a flow of warm water.

CAUTION:
Watch water temperature gauge so as not to overheat engine

.

10. Stop the engine and cool down to less than approximately 50 °C.

• Cool down using fan to reduce the time.

• If necessary, refill radiator up to filler neck with engine coolant.

CAUTION:
Never adhere the engine coolant to electronic equipments (alternator etc.).
11. Refill reservoir tank to “MAX” level line with engine coolant. 12. Repeat steps 5 through 10 two or more times with radiator cap installed until engine coolant level no longer drops. 13. Check cooling system for leakage with engine running.

14. Warm up the engine, and check for sound of engine coolant flow while running engine from idle up to 3,000 rpm with heater temperature controller set at several position between “COOL” and “WARM”.

• Sound may be noticeable at heater unit.

15. Repeat step 14 three times.

16. If sound is heard, bleed air from cooling system by repeating step 5 through 10 until reservoir tank level no longer drops.