Exhaust system HR16DE

Removal and Installation

In this manual: Exhaust system HR16DE
Foreword — 1General information — 45Engine Mechanical MR16DDT — 61Engine Mechanical HR16DE — 52Engine Mechanical K9K — 46Engine Lubrication System MR16DDT — 18Engine Lubrication System HR16DE — 14Engine Lubrication System K9K — 11Engine Cooling System MR16DDT — 28Engine Cooling System HR16DE — 29Engine Cooling System K9K — 24Engine Control System MR16DDT — 163Engine Control System HR16DE — 115Engine Control System K9K — 129Fuel System MR16DDT — 13Fuel system HR16DE — 11Fuel system K9K — 12Exhaust system MR16DDT — 7Exhaust system HR16DE — 10Exhaust system K9K — 7Starting system — 24Accelerator control system — 6Clutch — 25Driveline transfer: TY21B — 77Driveline rear propeller Shaft: 3Fφ16-ETJ75 — 12Driveline rear final drive: RTVS — 31Transaxle & transmission 5MT: RS5F92R — 31Transaxle & transmission 6MT: RS6F94R — 30Transaxle & transmission CVT: RE0F10B — 93Transaxle & transmissioN CVT: RE0F11A — 103Front Axle MR16DDT — 18Front Axle HR16DE — 17Front Axle K9K — 17Rear Axle 2WD — 6Rear Axle 4WD — 13Front Suspension — 21Rear Suspension 2WD — 13Rear Suspension 4WD — 17Road Wheels & Tires — 6Brake System LHD — 24Brake System RHD — 24Parking Brake System — 8Brake Control System without ESP — 44Brake Control System with ESP — 63Steering System — 14Steering Control System — 27Seat Belt — 8SRS Airbag — 24SRS Airbag Control System — 93Ventilation System — 11Heater & Air Conditioning System HR16DE — 28Heater & Air Conditioning System MR16DDT — 28Heater & Air Conditioning Control System Type 1 — 49Heater & Air Conditioning Control System Type 2 — 51Heater & Air Conditioning Control System Type 3 — 32Heater & Air Conditioning Control System Type 4 — 40Heater & Air Conditioning Control System Type 5 — 21Interior — 16Instrument Panel — 10Seat — 18Door & Lock Type 1 — 83Door & Lock type 2 — 80Door & Lock type 3 — 65Door & Lock type 4 — 60Security Control System with intelligent key system — 82Security Control System without intelligent key system — 41Glass & Window System — 15Power Window Control System — 28Body Repair — 13Exterior — 20Mirrors — 26Exterior Lighting System Halogen type — 51Interior Lighting System — 24Wiper & Washer — 45Defogger — 31Horn — 4Power Outlet — 4Body Control System With intelligent key system — 21Body Control System Without intelligent key system — 23LAN system can fundamental — 6LAN system can — 31LAN System can system (type 1) — 1LAN System can system (type 2) — 1LAN System can system (type 3) — 1LAN System can system (type 4) — 1LAN System can system (type 5) — 1LAN System can system (type 6) — 1LAN System can system (type 7) — 2LAN System can system (type 8) — 1LAN System can system (type 9) — 1LAN System can system (type 10) — 1LAN System can system (type 11) — 1Power Control System IPDM E/R (with I-key) — 14Power Control System IPDM E/R (without I-key) — 14Power Control System Power distribution system — 25Charging System — 22Power Supply, Ground & Circuit Elements — 20Meter, Warning Lamp & Indicator — 33Warning Chime System — 22Audio, Visual & Navigation System Audio without navigation — 30Audio, Visual & Navigation System Audio with navigation — 33Audio, Visual & Navigation System NISSAN dynamic control system — 22Cruise Control System — 1Drive Mode System — 10Maintenance — 14
~3min read

REMOVAL

• Disconnect each joint and mounting.

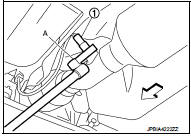
• Remove heated oxygen sensor 2 with following procedure:

- Using heated oxygen sensor wrench [SST: KV10114400] (A), removal heated oxygen sensor 2 (1).

CAUTION:
Be careful not to damage heated oxygen sensor 2.
INSTALLATION

INSTALLATION

Note the following, and install in the reverse order of removal.

CAUTION:
• Always replace seal bearings with new ones when reassembling. • Discard any heated oxygen sensor 2 which has been dropped onto a hard surface such as a concrete floor. Use a new one. • Before installing a new heated oxygen sensor 2, clean exhaust system threads using the heated oxygen sensor thread cleaner [commercial service tool: J-43897-18 or J-43897-12] and apply anti-seize lubricant (commercial service tool). • Never over torque heated oxygen sensor 2. Doing so may cause damage to the heated oxygen sensor 2, resulting in the “MIL” coming on. • If heat insulator is badly deformed, repair or replace it. If deposits such as mud pile up on the heat insulator, remove them. • When installing heat insulator avoid large gaps or interference between heat insulator and each exhaust pipe. • Remove deposits from the sealing surface of each connection. Connect them securely to avoid gas leakage. • When installing each mounting rubber, use silicon oil to avoid twisting. • Temporarily tighten mounting nuts and bolts. Check each part for unusual interference and mounting rubber interference, and then tighten them to the specified torque.

• When installing each mounting rubber, avoid twisting or unusual extension in up/down, front/rear and right/left directions.

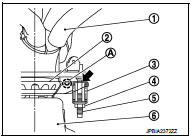
Exhaust Manifold to Exhaust Front Tube 1. Securely insert seal bearing (2) into exhaust manifold (1) side in the direction shown in the figure.

3 : Spring
4 : Nut
5 : Stud bolt
6 : Exhaust front tube

CAUTION:
Be careful not to damage seal bearing surface when installing.

2. With spring, tighten nut.

CAUTION:
• Fasten stud bolts to the flange of exhaust manifold side to the specified torque before fastening mounting nuts. • Ensure springs are seated correctly on the flange and not sitting on (A).

• Be careful that stud bolt does not interfere with mounting hole of exhaust front tube (3. After installing, check that stud bolt does not interfere with mounting hole ).


3. After installing, check that stud bolt does not interfere with mounting hole of exhaust front tube.

Exhaust Front Tube to Center Muffler
1. Securely insert seal bearing (2) into exhaust front tube (1) side

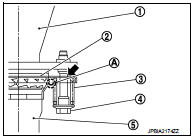
1. Securely insert seal bearing (2) into exhaust front tube (1) side in the direction shown in the figure.

3 : Spring
4 : Bolt
5 : Center muffler

CAUTION:
Be careful not to damage seal bearing surface when installing.

2. With spring, tighten bolt.

CAUTION:
• Ensure springs are seated correctly on the flange and not sitting on (A).

• Be careful that bolt does not interfere with mounting hole of center muffler ( 3. After installing, check that bolt does not interfere with mounting hole of).


3. After installing, check that bolt does not interfere with mounting hole of center muffler.
Inspection