Road Wheels & Tires

Removal and installation
In this manual: Road Wheels & Tires
Foreword — 1General information — 45Engine Mechanical MR16DDT — 61Engine Mechanical HR16DE — 52Engine Mechanical K9K — 46Engine Lubrication System MR16DDT — 18Engine Lubrication System HR16DE — 14Engine Lubrication System K9K — 11Engine Cooling System MR16DDT — 28Engine Cooling System HR16DE — 29Engine Cooling System K9K — 24Engine Control System MR16DDT — 163Engine Control System HR16DE — 115Engine Control System K9K — 129Fuel System MR16DDT — 13Fuel system HR16DE — 11Fuel system K9K — 12Exhaust system MR16DDT — 7Exhaust system HR16DE — 10Exhaust system K9K — 7Starting system — 24Accelerator control system — 6Clutch — 25Driveline transfer: TY21B — 77Driveline rear propeller Shaft: 3Fφ16-ETJ75 — 12Driveline rear final drive: RTVS — 31Transaxle & transmission 5MT: RS5F92R — 31Transaxle & transmission 6MT: RS6F94R — 30Transaxle & transmission CVT: RE0F10B — 93Transaxle & transmissioN CVT: RE0F11A — 103Front Axle MR16DDT — 18Front Axle HR16DE — 17Front Axle K9K — 17Rear Axle 2WD — 6Rear Axle 4WD — 13Front Suspension — 21Rear Suspension 2WD — 13Rear Suspension 4WD — 17Road Wheels & Tires — 6Brake System LHD — 24Brake System RHD — 24Parking Brake System — 8Brake Control System without ESP — 44Brake Control System with ESP — 63Steering System — 14Steering Control System — 27Seat Belt — 8SRS Airbag — 24SRS Airbag Control System — 93Ventilation System — 11Heater & Air Conditioning System HR16DE — 28Heater & Air Conditioning System MR16DDT — 28Heater & Air Conditioning Control System Type 1 — 49Heater & Air Conditioning Control System Type 2 — 51Heater & Air Conditioning Control System Type 3 — 32Heater & Air Conditioning Control System Type 4 — 40Heater & Air Conditioning Control System Type 5 — 21Interior — 16Instrument Panel — 10Seat — 18Door & Lock Type 1 — 83Door & Lock type 2 — 80Door & Lock type 3 — 65Door & Lock type 4 — 60Security Control System with intelligent key system — 82Security Control System without intelligent key system — 41Glass & Window System — 15Power Window Control System — 28Body Repair — 13Exterior — 20Mirrors — 26Exterior Lighting System Halogen type — 51Interior Lighting System — 24Wiper & Washer — 45Defogger — 31Horn — 4Power Outlet — 4Body Control System With intelligent key system — 21Body Control System Without intelligent key system — 23LAN system can fundamental — 6LAN system can — 31LAN System can system (type 1) — 1LAN System can system (type 2) — 1LAN System can system (type 3) — 1LAN System can system (type 4) — 1LAN System can system (type 5) — 1LAN System can system (type 6) — 1LAN System can system (type 7) — 2LAN System can system (type 8) — 1LAN System can system (type 9) — 1LAN System can system (type 10) — 1LAN System can system (type 11) — 1Power Control System IPDM E/R (with I-key) — 14Power Control System IPDM E/R (without I-key) — 14Power Control System Power distribution system — 25Charging System — 22Power Supply, Ground & Circuit Elements — 20Meter, Warning Lamp & Indicator — 33Warning Chime System — 22Audio, Visual & Navigation System Audio without navigation — 30Audio, Visual & Navigation System Audio with navigation — 33Audio, Visual & Navigation System NISSAN dynamic control system — 22Cruise Control System — 1Drive Mode System — 10Maintenance — 14
~3min read
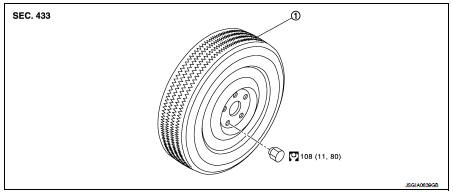
Road wheel tire assembly Exploded View
1. Tire assembly

1. Tire assembly

Removal and Installation: N·m (kg-m, ft-lb)


Removal and Installation

REMOVAL

1. Remove wheel nuts.

2. Remove tire assembly.

INSTALLATION

Install in the reverse order of removal.

Inspection

ALUMINUM WHEEL

1. Check tires for wear and improper inflation.

2. Check wheels for deformation, cracks and other damage. If deformed, remove wheel and check wheel runout.

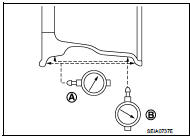
a. Remove tire from aluminum wheel and mount on a tire balance machine. b. Set dial indicator as shown in the figure.

c. Check radial runout, if the lateral deflection (A) or vertical deflection (B) for radial runout value exceeds the limit, replace aluminum wheel.

Limit
Lateral deflection (A) : Refer to WT-9, "Road Wheel".

Vertical deflection (B) : Refer to WT-9, "Road Wheel".
STEEL WHEEL

STEEL WHEEL

1. Check tires for were and improper inflation.

2. Check wheels for deformation, cracks and other damage. If deformed, remove wheel and check wheel runout.

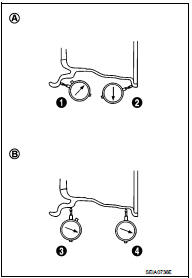
a. Remove tire from steel wheel and mount wheel on a tire balance machine. b. Set two dial indicators as shown in the illustration. c. Set each dial indicator to “0”. d. Rotate wheel and check dial indicators at several points around the circumference of the wheel.

e. Calculate runout at each point as shown below.

Lateral runout (A): ( 1+2 )/2 Radial runout (B): ( 3+4 )/2

f. Select maximum positive runout value and the maximum negative value. Add the two values to determine total runout.

CAUTION:
In case a positive or negative value is not available, use the maximum value (negative or positive) for total runout.
Limit
Lateral deflection (A) : Refer to WT-9, "Road Wheel".

Vertical deflection (B) : Refer to WT-9, "Road Wheel".

g. If the total runout value exceeds limit, replace steel wheel.
How to Handle Puncture Repair Agent (Without T-type Spare Tire) infoid

How to Handle Puncture Repair Agent (Without T-type Spare Tire) infoid CAUTION:
• Never spill the sealant in the tire during repair.

• If the sealant spills, wipe it out with a waste cloth

.

1. Remove tires. Refer to WT-7, "Removal and Installation".

2. Remove tire from road wheel, using a tire changer.

CAUTION:
• When deflating a tire, cover the valve with a waste cloth to prevent the sealant from splattering.

• Never spill the sealant in the tire during repair.

3. Dispose of sealant in the removed tire.

CAUTION:
• Wipe out sealant spilled on the road wheel, tire, tire changer, and floor with a waste cloth. • Drained sealant or expired sealant returned by the customer must be disposed according to the law and local regulations.

• Fix a tire blowout, if repairable.

NOTE

:
Sealant blocks holes caused by blowouts. These holes may not be found and repaired, depending on the level of blowout. Therefore, it is necessary to check tire air pressure frequently and replace tire with a new one, if the air pressure is decreasing.

• Replace tire with a new one, if not repairable.

CAUTION:
Never dispose of tires with the sealant contained.