Removal and Installation
REMOVAL
1. Remove engine assembly. Refer to EM-55, "2WD : Exploded View" (2WD) , EM-59, "4WD : Exploded View" (4WD). 2. Remove oil pan (lower). Refer to EM-41, "Removal and Installation". 3. Remove front cover, and other related parts. Refer to EM-67, "Exploded View".4. Remove oil pump sprocket with the following procedure: • Add matching mark if necessary for easier installation.
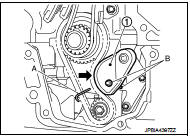
a. Push oil pump drive chain tensioner (1) in the direction show in the figure (A). b. Insert a stopper pin (A) into the body hole (B).c. Remove oil pump chain tensioner.
• When the holes on lever and tensioner body cannot be aligned, align these holes by slightly moving the oil pump chain tensioner slack guide.
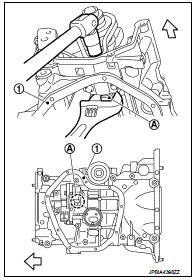
d. Hold the WAF part of oil pump shaft [WAF: 10 mm (0.39 in)] (A), and then loosen the oil pump sprocket bolt and remove it.
1 : Oil pan (upper)
 : Engine front
CAUTION:
• Secure the oil pump shaft with the WAF part.
• Never loosen the oil pump sprocket bolt by tightening the oil pump drive chain.
e. Remove oil pump sprocket.
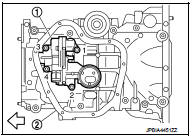
5. Remove oil pump.
• Loosen bolts in reverse order as shown in the figure.
1 : Oil pump
2 : Oil pan (upper)
: Engine front
INSTALLATION
Note the following, and install in the reverse order of removal.
Oil Pump
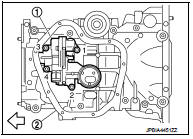
• Tighten bolts in numerical order as shown in the figure.
1 : Oil pump
2 : Oil pan (upper)
: Engine front