Service Equipment
RECOVERY/RECYCLING RECHARGING EQUIPMENT
Be certain to follow the manufacturer’s instructions for machine operation and machine maintenance. Never introduce any refrigerant other than that specified into the machine.
ELECTRICAL LEAK DETECTOR
Be certain to follow the manufacturer’s instructions for tester operation and tester maintenance.
VACUUM PUMP
The lubricant contained inside the vacuum pump is not compatible with the specified lubricant for HFC-134a (R-134a) A/C systems.
The vent side of the vacuum pump is exposed to atmospheric pressure.
So the vacuum pump lubricant may migrate out of the pump into the service hose. This is possible when the pump is switched OFF after evacuation (vacuuming) and hose is connected to it.
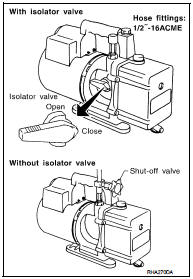
To prevent this migration, use a manual valve placed near the hoseto- pump connection, as per the following.
• Vacuum pumps usually have a manual isolator valve as part of the pump. Close this valve to isolate the service hose from the pump. • Use a hose equipped with a manual shut-off valve near the pump end for pumps without an isolator. Close the valve to isolate the hose from the pump.• Disconnect the hose from the pump if the hose has an automatic shut-off valve. As long as the hose is connected, the valve is open and lubricating oil may migrate.
Some one-way valves open when vacuum is applied and close under no vacuum condition. Such valves may restrict the pump’s ability to pull a deep vacuum and are not recommended.
MANIFOLD GAUGE SET
Be certain that the gauge face indicates HFC-134a or R-134a. Be sure the gauge set has 1/2″-16 ACME threaded connections for service hoses. Confirm the set has been used only with refrigerant HFC-134a (R-134a) and specified lubricants.
SERVICE HOSES

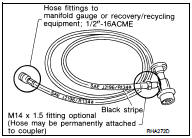
Be certain that the service hoses display the markings described (colored hose with black stripe). All hoses must equip positive shutoff devices (either manual or automatic) near the end of the hoses opposite to the manifold gauge.
SERVICE COUPLERS
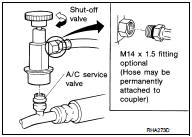
Never attempt to connect HFC-134a (R-134a) service couplers to the CFC-12 (R-12) A/C system. The HFC-134a (R-134a) couplers do not properly connect to the CFC-12 (R-12) system. However, if an improper connection is attempted, discharging and contamination may occur.

REFRIGERANT WEIGHT SCALE
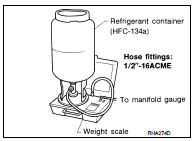
Verify that no refrigerant other than HFC-134a (R-134a) and specified lubricants have been used with the scale. The hose fitting must be 1/2″-16 ACME if the scale controls refrigerant flow electronically.
CALIBRATING ACR4 WEIGHT SCALE
Calibrate the scale each three month.
To calibrate the weight scale on the ACR4: 1. Press “Shift/Reset” and “Enter” at the same time. 2. Press “8787”. “A1” is displayed. 3. Remove all weight from the scale. 4. Press “0”, then press “Enter”. “0.00” is displayed and change to “A2”. 5. Place a known weight (dumbbell or similar weight), between 4.5 and 8.6 kg (10 and 19 lb.) on the center of the weight scale. 6. Enter the known weight using four digits. (Example 10 lb. = 10.00, 10.5 lb. = 10.50)7. Press “Enter”— the display returns to the vacuum mode. 8. Press “Shift/Reset” and “Enter” at the same time. 9. Press “6”— the known weight on the scale is displayed. 10. Remove the known weight from the scale. “0.00” is displayed.
11. Press “Shift/Reset” to return the ACR4 to the program mode.
CHARGING CYLINDER
Using a charging cylinder is not recommended. Refrigerant may be vented into air from cylinder’s top valve when filling the cylinder with refrigerant. Also, the accuracy of the cylinder is generally less than that of an electronic scale or of quality recycle/recharge equipment.