Unit removal and installation
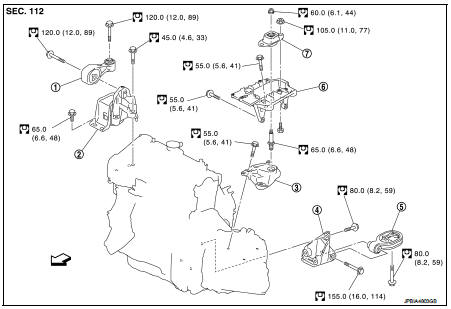
1. Engine torque rod 2. Engine mounting insulator 3. Engine mounting stay
4. Transaxle mounting stay 5. Engine mounting rear bracket 6. Transaxle torque rod
7. Transaxle mounting upper bracket 8. Transaxle mounting insulator
 : Vehicle front
 : N·m (kg-m, ft-lb)
Removal and Installation WARNING:
• Situate vehicle on a flat and solid surface. • Place chocks at front and back of rear wheels.
• For engines not equipped with engine slingers, attach proper slingers and bolts described in PARTS CATALOG.
CAUTION:• Always be careful to work safely, avoid forceful or uninstructed operations. • Never start working until exhaust system and coolant are cool enough. • If items or work required are not covered by the engine main body section, refer to the applicable sections. • Always use the support point specified for lifting. • Use either 2-pole lift type or separate type lift as best you can. If board-on type is used for unavoidable reasons, support at the rear axle jacking point with transmission jack or similar tool before starting work, in preparation for the backward shift of center of gravity.
• For supporting points for lifting and jacking point at rear axle, refer to GI-37, "Board-On Lift".
REMOVAL
Description of work
Remove engine and transaxle assembly from vehicle down ward. Separate engine and transaxle.
Preparation
1. Remove the following parts.
• Battery ground cable. • Engine undercover. • LH/RH front wheel. Refer to WT-7, "Exploded View".• LH/RH fender protector. Refer to EXT-22, "Exploded View".
Engine room
2. Drain engine coolant. Refer to CO-62, "Draining".
Perform when engine is cold. 3. Remove air cleaner case. Refer to EM-280, "Exploded View". 4. Remove turbocharger air inlet pipe. Refer to EM-280, "Exploded View". 5. Remove reservoir tank hoses. Refer to CO-66, "Exploded View". 6. Remove radiator upper hose. Refer to CO-66, "Exploded View". 7. Remove cooling fan shroud assembly. Refer to CO-68, "Exploded View". 8. Remove alternator. 9. Remove vacuum hose. Refer to EM-293, "Exploded View". 10. Disconnect heater hoses. 11. Disconnect engine room harness from the engine side and set it aside for easier work. 12. Disconnect transaxle side harness and clutch tube. 13. Disconnect shift cable and select cable. Refer to TM-78, "Exploded View". 14. Disconnect all the body-side vacuum hoses and air hoses at engine side.
15. Disconnect fuel feed and return hoses, and plug it to prevent fuel from draining.
Vehicle underbody16. Remove radiator lower hose. Refer to CO-66, "Exploded View". 17. Disconnect thermo plunger connector and earth cable. Refer to CO-72, "Exploded View". 18. Remove thermo plunger unit stay, and set thermo plunger unit aside for easier work. 19. Remove drive shaft lock pin and lock nut. Refer to FAX-77, "Exploded View". 20. Remove strut lower bolts. 21. Remove drive shaft assembly RH and LH. Refer to FAX-77, "Exploded View". 22. Remove A/C compressor with piping connected from engine. Temporarily secure it on body with a rope to avoid putting load on it. 23. Remove altarnator bracket. 24. Remove diesel particulate filter assembly. Refer to EX-17, "Exploded View".
25. Remove engine rear mounting bracket.
Removal
26. Use a manual lift table caddy (commercial service tool) or equivalently rigid tool such as a jack or trestle. Securely support bottom of engine and transaxle.
Put a piece of wood or something similar as the supporting surface, secure a completely stable condition. 27. Remove RH and LH engine mounting bolts.
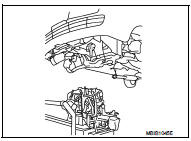
28. Remove engine and transaxle assembly from vehicle downward by carefully operating supporting tools.
CAUTION:• During the operation, make sure that no part interferes with body side. • Before and during this lifting, always check if any harnesses are left connected. • During the removal operation, always be careful to prevent vehicle from falling off the lift due to changes in the center of gravity.
• If necessary, support vehicle by setting a jack or equivalent tool at the rear.
Separation Work
CAUTION:
During the operation, secure support the engine by placing a piece of wood under the engine oil pan, transaxle oil pan and suspended the engine slinger by baby crane (movable hoist) etc. 29. Remove starter motor. 30. Separate engine and transaxle.
31. Lift with the hoist and separate the engine from the transaxle assembly.
INSTALLATION
Install in the reverse order of removal.
• Do not allow oil to get on mounting insulator. Be careful not to damage mounting insulator. • When installation directions are specified, install parts according to the direction marks on them referring to components illustration.• Make sure that each mounting insulator is seated properly, and tighten mounting bolts and nuts.
InspectionINSPECTION AFTER INSTALLATION
• Before starting engine check the levels of coolant, lubrications and working oils. If less than required quantity, fill to the specified level. • Before starting engine, bleed air from fuel piping. Refer to FL-50, "Air Bleeding". • Run engine to check for unusual noise and vibration. • Warm up engine thoroughly to make sure there is no leakage of coolant, lubricants, working oil, fuel and exhaust gas.• Bleed air from passages in pipes and tubes of applicable lines.