Wheel alignment
DESCRIPTION
CAUTION:• The adjustment mechanisms of camber, caster, and kingpin inclination angles are not included. • If camber, caster, or kingpin inclination angle is outside the standard, check front suspension parts for wear and damage. Replace suspect parts if a malfunction is detected.
• Kingpin inclination angle is reference value, no inspection is required.
Measure wheel alignment under unladen conditions.
NOTE:
“Unladen conditions” means that fuel, engine coolant, and lubricant are full. Spare tire, jack, hand tools and mats are in designated positions.
PRELIMINARY CHECK
Check the following:• Tires for improper air pressure and wear. • Road wheels for runout. Refer to WT-7, "Inspection". • Wheel bearing axial end play. Refer to FAX-9, "Inspection". • Transverse link ball joint axial end play. Refer to FSU-14, "Inspection". • Strut operation. • Each mounting part of axle and suspension for looseness and deformation. • Each of suspension member, strut and transverse link for cracks, deformation and other damage.
• Vehicle height (posture).
CAMBER, CASTER, AND KINGPIN INCLINATION ANGLES
Before inspection, mount front wheels onto turning radius gauge. Mount rear wheels onto a stand at the same height so that vehicle remains horizontal.
Using a CCK Gauge
Install the CCK gauge attachment (SST: KV991040S1) with the following procedure on wheel, then measure wheel alignment.
4. Insert the plate assembly on the guide bolt. Put the spring in, and then evenly screw the three guide bolt nuts. When fastening the guide nuts, do not completely compress the spring.
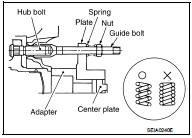
5. Place the dent of alignment gauge onto the projection of the center plate and tightly contact them to measure.
Camber, caster, kingpin inclination angles : Refer to FSU-21, "Wheel Alignment".
CAUTION:• If camber, caster, or kingpin inclination angle exceeds the standard value, check front suspension parts for wear and damage. Replace suspect parts if a malfunction is detected.
• Kingpin inclination angle is reference value, no inspection is required.

TOE-IN
Measure toe-in by the following procedure.
WARNING:• Always perform the following procedure on a flat surface.
• Check that no person is in front of vehicle before pushing it.
1. Bounce front of vehicle up and down to stabilize the vehicle height (posture). 2. Push vehicle straight ahead about 5 m (16 ft).3. Put matching mark (A) on base line of the tread (rear side) of both tires at the same height of hub center. These are measuring points.
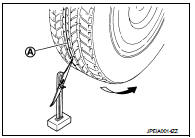
4. Measure distance (A) (rear side).
 : Vehicle front
5. Push vehicle slowly ahead to rotate wheels 180 degrees (1/2 turn).
NOTE:
If the wheels rotates more than 180 degrees (1/2 turn), start this procedure again from the beginning. Do not push the vehicle backward.
6. Measure distance (B) (front side).
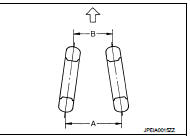
Total toe-in = A – B
Total toe-in : Refer to FSU-21, "Wheel Alignment".
• If toe-in exceeds the standard value, adjust toe-in by varying the length of between steering outer socket and inner socket.