Removal
HINT:
- Use the same procedure for the RH and LH sides.
- The procedure listed below is for the LH side.
1. DISCONNECT CABLE FROM NEGATIVE BATTERY TERMINAL
CAUTION:
Wait at least 90 seconds after disconnecting the cable from the negative (-) battery terminal to disable the SRS system.
NOTICE:
When disconnecting the cable, some systems need to be initialized after the cable is reconnected (See page  ).
2. REMOVE REAR NO. 2 SEAT ASSEMBLY (w/ Rear No. 2 Seat)
(a) Remove the rear No. 2 seat assembly (See page ).
3. REMOVE REAR NO. 1 FLOOR STEP COVER (w/ Rear No. 2 Seat)
4. REMOVE QUARTER SCUFF PLATE LH (w/ Rear No. 2 Seat)
5. REMOVE REAR DOOR SCUFF PLATE LH
6. REMOVE REAR DOOR OPENING TRIM WEATHERSTRIP LH
7. REMOVE NO. 1 LUGGAGE COMPARTMENT TRIM COVER (w/o Deck Board)
8. REMOVE NO. 1 DECK BOARD SUB-ASSEMBLY (w/o Deck Board)
9. REMOVE NO. 2 LUGGAGE COMPARTMENT TRIM COVER (w/ Deck Board)
10. REMOVE NO. 2 DECK BOARD SUB-ASSEMBLY (w/ Deck Board)
11. REMOVE REAR NO. 2 FLOOR BOARD ASSEMBLY (w/ Deck Board)
12. REMOVE LUGGAGE COMPARTMENT SIDE COVER SUB-ASSEMBLY LH (w/ Deck Board)
13. REMOVE LUGGAGE COMPARTMENT SIDE COVER SUB-ASSEMBLY RH (w/ Deck Board)
14. REMOVE DECK BOARD ASSEMBLY (w/ Deck Board)
15. REMOVE INNER FLOOR SIDE RAIL SUB-ASSEMBLY (w/ Deck Board)
16. REMOVE REAR FLOOR MAT REAR SUPPORT PLATE
17. REMOVE REAR FLOOR CARPET ASSEMBLY (w/o Deck Board)
18. REMOVE REAR NO. 1 SEAT OUTER LAP BELT ANCHOR COVER
19. REMOVE NO. 1 LUGGAGE COMPARTMENT TRIM HOOK
20. REMOVE FRONT DECK SIDE TRIM COVER LH
21. REMOVE NO. 1 LUGGAGE COMPARTMENT TRIM COVER
22. REMOVE DECK TRIM SIDE PANEL ASSEMBLY LH
23. REMOVE REAR AIRBAG SENSOR LH
(a) Remove the nut and rear airbag sensor. |
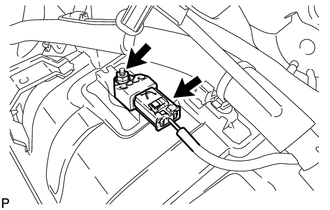 |
(b) Disconnect the connector.
Test yourself
A quick Toyota 4Runner quiz: every answer comes with an explanation and a link to the manual page.