Installation
INSTALLATION
COMPONENTS (INSTALLATION)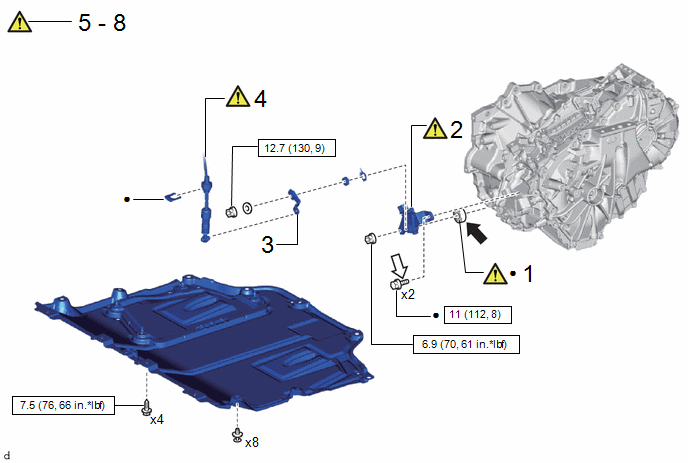
Procedure | Part Name Code |  |  |  |
|
|---|---|---|---|---|---|
1 |
SHIFT LEVER POSITION SENSOR SEAL |
- |
 |
- |
- |
2 |
SHIFT LEVER POSITION SENSOR |
89451A |
|
- |
- |
3 |
TRANSMISSION CONTROL SHAFT LEVER |
33572D |
- |
- |
- |
4 |
TRANSMISSION CONTROL CABLE ASSEMBLY |
33820B |
|
- |
- |
5 |
INSPECT SHIFT LEVER POSITION SENSOR POSITION |
- |
|
- |
- |
6 |
ADJUST SHIFT LEVER POSITION SENSOR POSITION |
- |
|
- |
- |
7 |
INSPECT SHIFT LEVER POSITION |
- |
|
- |
- |
8 |
ADJUST SHIFT LEVER POSITION |
- |
|
- |
- |
9 |
NO. 1 ENGINE UNDER COVER ASSEMBLY |
51410 |
- |
- |
- |
*1 |
LOCK NUT |
*2 |
LOCK PLATE |
 |
Tightening torque for "Major areas involving basic vehicle performance such as moving/turning/stopping" : N*m (kgf*cm, ft.*lbf) |
 |
N*m (kgf*cm, ft.*lbf): Specified torque |
● |
Non-reusable part |
 |
MP grease |
 |
Toyota Genuine Adhesive 1324, Three Bond 1324 or equivalent |
- |
- |
PROCEDURE
1. INSTALL SHIFT LEVER POSITION SENSOR SEAL
|
HINT: Perform this procedure only when replacement of the shift lever position sensor seal is necessary. |
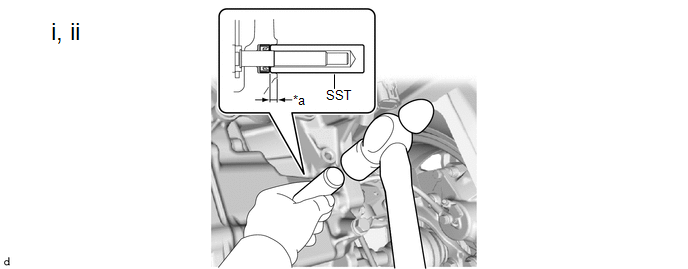
*a |
Depth |
- |
- |
(1) Coat the lip of a new shift lever position sensor seal with MP grease.
(2) Using SST and a hammer, install the shift lever position sensor seal to the hybrid vehicle transaxle assembly.
SST: 09350-30020
09350-07110
Standard Depth:
6.25 to 7.60 mm (0.246 to 0.299 in.)
NOTICE:
- Be sure to install the shift lever position sensor seal in the correct direction.
- Do not install the shift lever position sensor seal at an angle.
2. INSTALL SHIFT LEVER POSITION SENSOR

(1) Move the shift lever to N.
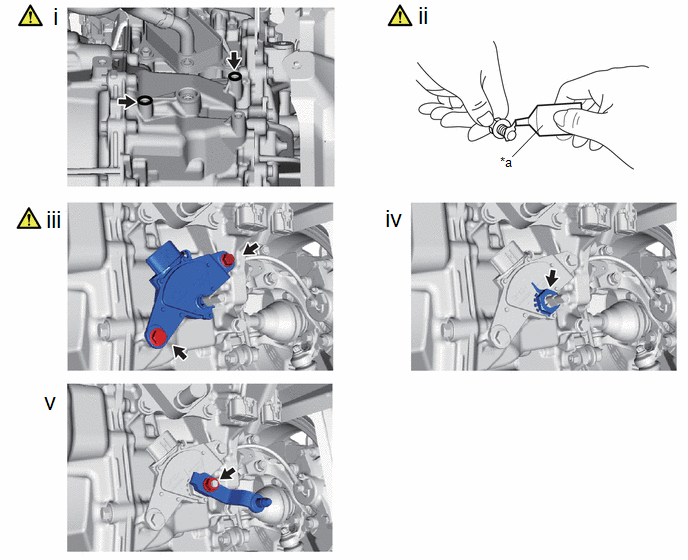
*a |
Adhesive |
- |
- |
(1) Clean and degrease the 2 bolt holes of the hybrid transaxle assembly.
(2) Apply a few drops of adhesive to 2 or 3 threads at the tip of the 2 bolts.
Adhesive:
Toyota Genuine Adhesive 1324, Three Bond 1324 or equivalent
(3) Temporarily install the shift lever position sensor to the hybrid vehicle transaxle assembly with the 2 new bolts.
NOTICE:
- Do not reuse the shift lever position sensor if it has been dropped or subjected to a severe impact.
- Do not allow moisture to adhere to the connector terminal.
(4) Install the lock plate to the shift lever position sensor with the lock nut.
Torque:
6,9 N·m {70 kgf·cm, 61 in·lbf}
(5) Temporarily install the control shaft lever to the shift lever position sensor.
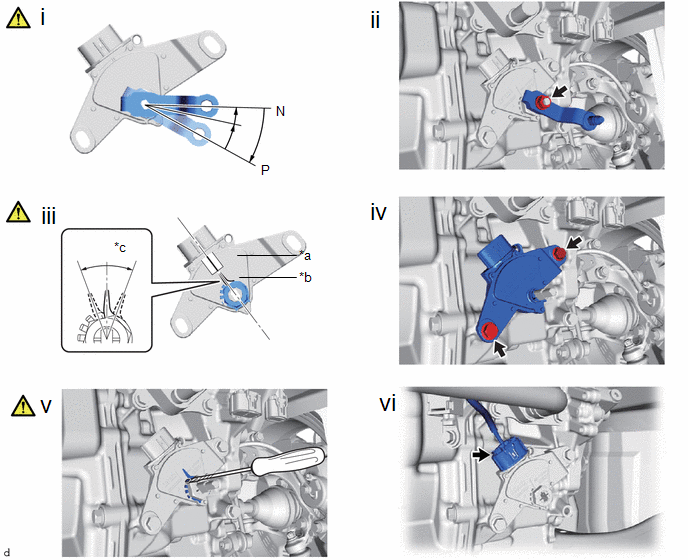
*a |
Neutral Basic Line |
*b |
Indicator |
*c |
Range of Play |
- |
- |
(1) Turn the control shaft lever clockwise until it stops, then turn it counterclockwise 2 notches.
(2) Remove the control shaft lever from the shift lever position sensor.
(3) Align the indicator with the neutral basic line.
NOTICE:
The indicator of the lock plate has a certain amount of play. Align the center point of the range of play with the neutral basic line.
(4) Tighten the 2 bolts.
Torque:
11 N·m {112 kgf·cm, 8 ft·lbf}
(5) Using a screwdriver with its tip wrapped with protective tape, secure the lock nut with the lock plate.
(6) Connect the connector.
3. INSTALL TRANSMISSION CONTROL SHAFT LEVER
Torque:
12,7 N·m {130 kgf·cm, 9 ft·lbf}
4. CONNECT TRANSMISSION CONTROL CABLE ASSEMBLY
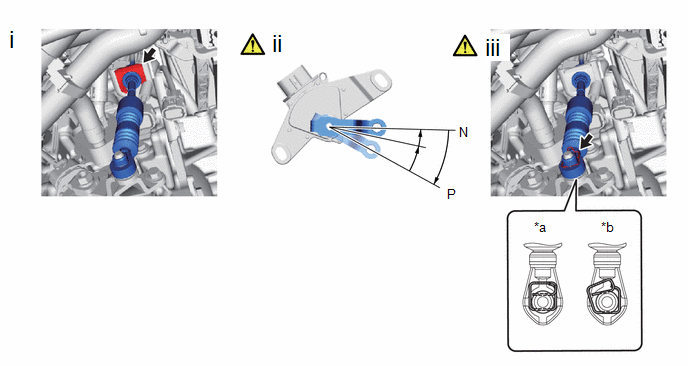
*a |
OK |
*b |
NG |
(1) Connect the transmission control cable assembly to the No. 1 transmission control cable bracket with a new clip.
(2) Turn the control shaft lever clockwise until it stops, then turn it counterclockwise 2 notches.
(3) Connect the transmission control cable assembly to the control shaft lever as shown in the illustration.
5. INSPECT SHIFT LEVER POSITION SENSOR POSITION
Click here
6. ADJUST SHIFT LEVER POSITION SENSOR POSITION
Click here
7. INSPECT SHIFT LEVER POSITION
Click here
8. ADJUST SHIFT LEVER POSITION
Click here
9. INSTALL NO. 1 ENGINE UNDER COVER ASSEMBLY
Click here