Installation
INSTALLATION
COMPONENTS (INSTALLATION)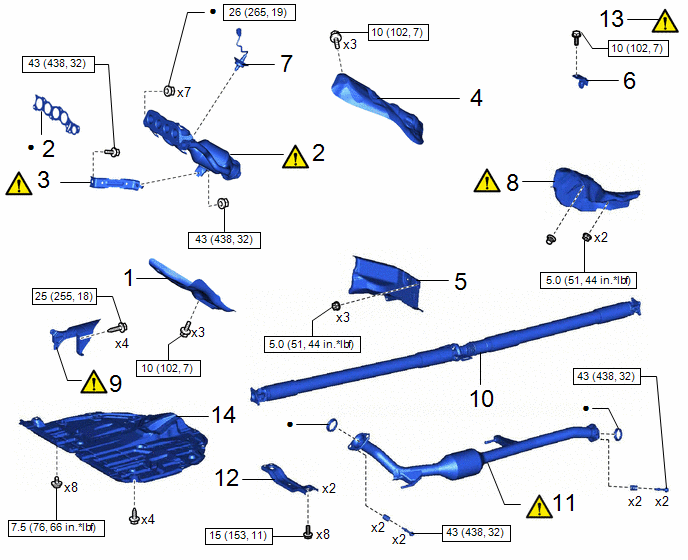
Procedure | Part Name Code |  |  |  |
|
|---|---|---|---|---|---|
1 |
NO. 2 EXHAUST MANIFOLD HEAT INSULATOR |
17168 |
- |
- |
- |
2 |
EXHAUST MANIFOLD (TWC: Front Catalyst) |
17141 |
- |
- |
|
3 |
MANIFOLD STAY |
17118 |
- |
- |
|
4 |
NO. 1 EXHAUST MANIFOLD HEAT INSULATOR |
17167 |
- |
- |
|
5 |
DASH PANEL HEAT INSULATOR |
55225C |
- |
- |
- |
6 |
WIRE HARNESS CLAMP BRACKET |
- |
- |
- |
- |
7 |
AIR FUEL RATIO SENSOR |
89467B |
- |
- |
- |
8 |
FRONT NO. 1 FLOOR HEAT INSULATOR |
58151 |
- |
- |
- |
9 |
PROPELLER SHAFT HEAT INSULATOR |
37117B |
- |
- |
- |
10 |
PROPELLER SHAFT WITH CENTER BEARING ASSEMBLY |
37100 |
- |
- |
- |
11 |
FRONT EXHAUST PIPE ASSEMBLY (TWC: Rear Catalyst) |
17410 |
- |
- |
|
12 |
FRONT FLOOR CENTER BRACE |
57533B |
- |
- |
- |
13 |
INSPECT FOR EXHAUST GAS LEAK |
- |
- |
- |
|
14 |
NO. 1 ENGINE UNDER COVER ASSEMBLY |
51410 |
- |
- |
- |
 |
N*m (kgf*cm, ft.*lbf): Specified torque |
● |
Non-reusable part |
PROCEDURE
1. INSTALL NO. 2 EXHAUST MANIFOLD HEAT INSULATOR
Torque:
10 N·m {102 kgf·cm, 7 ft·lbf}
2. INSTALL EXHAUST MANIFOLD (TWC: Front Catalyst)
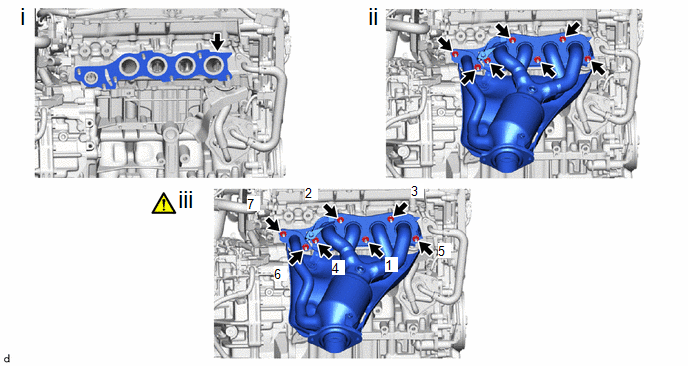
(1) Install a new exhaust manifold to head gasket to the cylinder head sub-assembly.
(2) Using a 12 mm deep socket wrench, temporarily install the exhaust manifold (TWC: Front Catalyst) to the cylinder head sub-assembly with 7 new nuts.
(3) Using the 12 mm deep socket wrench, tighten the 7 nuts in the order shown in the illustration.
Torque:
26 N·m {265 kgf·cm, 19 ft·lbf}
3. INSTALL MANIFOLD STAY
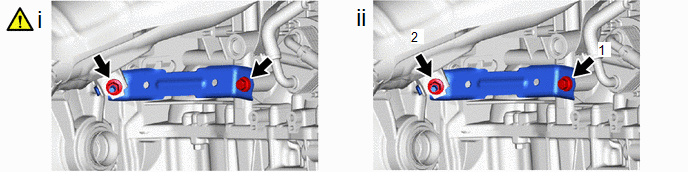
(1) Temporarily install the manifold stay to the exhaust manifold (TWC: Front Catalyst) and cylinder block sub-assembly with the bolt and nut.
(2) Tighten the bolt and nut in the order shown in the illustration.
Torque:
43 N·m {438 kgf·cm, 32 ft·lbf}
4. INSTALL NO. 1 EXHAUST MANIFOLD HEAT INSULATOR
Torque:
10 N·m {102 kgf·cm, 7 ft·lbf}
5. INSTALL DASH PANEL HEAT INSULATOR
Torque:
5 N·m {51 kgf·cm, 44 in·lbf}
6. INSTALL WIRE HARNESS CLAMP BRACKET
Torque:
10 N·m {102 kgf·cm, 7 ft·lbf}
7. INSTALL AIR FUEL RATIO SENSOR
Click here 
8. INSTALL FRONT NO. 1 FLOOR HEAT INSULATOR
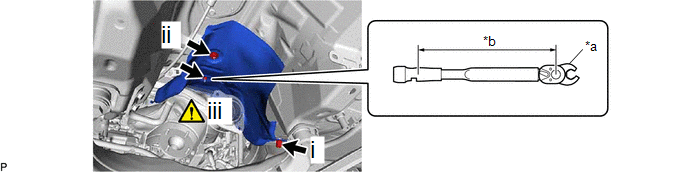
*a |
10 mm Union Nut Wrench |
*b |
Torque Wrench Fulcrum Length |
(1) Install the clip.
(2) Install the nut.
Torque:
5 N·m {51 kgf·cm, 44 in·lbf}
(3) Using a 10 mm union nut wrench, Install the No. 1 exhaust manifold heat insulator with the nut.
Torque:
Specified tightening torque :
5 N·m {51 kgf·cm, 44 in·lbf}
HINT:
- Calculate the torque wrench reading when changing the fulcrum length of the torque wrench
Click here
- When using a union nut wrench (fulcrum length of 22 mm (0.866 in.)) + torque wrench (fulcrum length of 162 mm (6.38 in.)): 4.4 N*m (44 kgf*cm, 38 in.*lbf)
9. INSTALL PROPELLER SHAFT HEAT INSULATOR

(1) Install the propeller shaft heat insulator with the 4 bolts.
Torque:
25 N·m {255 kgf·cm, 18 ft·lbf}
NOTICE:
Temporarily install the bolt (A), and then tighten the 4 bolts in the order of (B), (A), (D) and (C).
10. INSTALL PROPELLER SHAFT WITH CENTER BEARING ASSEMBLY
Click here
11. INSTALL FRONT EXHAUST PIPE ASSEMBLY (TWC: Rear Catalyst)
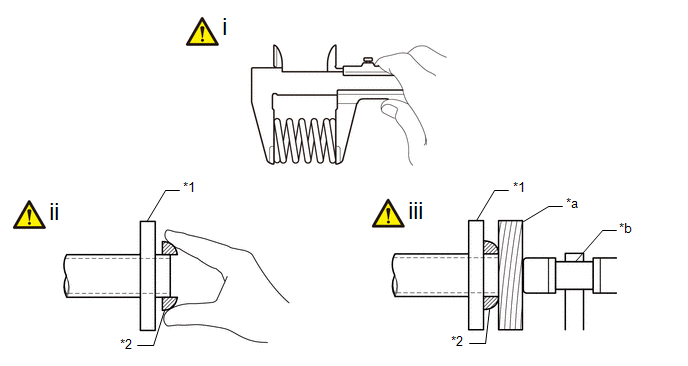
*1 |
Exhaust Manifold (TWC: Front Catalyst) or Front Exhaust Pipe Assembly (TWC: Rear Catalyst) |
*2 |
Gasket |
*a |
Wooden Block |
*b |
Plastic Hammer |
(1) Using a vernier caliper, measure the free length of the compression springs.
Standard Length (Front) |
43 mm (1.69 in.) |
Standard Length (Rear) |
40 mm (1.57 in.) |
Minimum Free Length (Front) |
41.5 mm (1.63 in.) |
Minimum Free Length (Rear) |
38.5 mm (1.52 in.) |
If the free length is less than the minimum, replace the compression spring.
(2) temporarily install 2 new gaskets to the exhaust manifold (TWC: Front Catalyst) and front exhaust pipe assembly (TWC: Rear Catalyst).
(3) Using a plastic hammer and wooden block, tap in each gasket until its surface is flush with the exhaust manifold (TWC: Front Catalyst) and front exhaust pipe assembly (TWC: Rear Catalyst).
NOTICE:
- Be sure to install the gasket in the correct direction.
- Do not reuse the gaskets.
- Do not damage the gaskets.
- Do not push in the gaskets by using the exhaust pipes when connecting them.
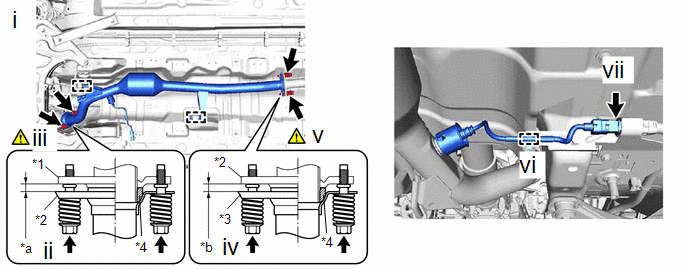
*1 |
Exhaust Manifold (TWC: Front Catalyst) |
*2 |
Front Exhaust Pipe Assembly (TWC: Rear Catalyst) |
*3 |
Tail Exhaust Pipe Assembly |
*4 |
Gasket |
*a |
Space between Flanges: 8.5 mm (0.335in.) |
*b |
Space between Flanges: 6.5 mm (0.256in.) |
(1) Connect the front exhaust pipe assembly to the 2 exhaust pipe supports.
(2) Install the front exhaust pipe assembly (TWC: Rear Catalyst) to the exhaust manifold (TWC: Front Catalyst) with the 2 compression springs and 2 bolts.
Torque:
43 N·m {438 kgf·cm, 32 ft·lbf}
(3) After installation, check that the space between the flanges of the exhaust manifold (TWC: Front Catalyst) and front exhaust pipe assembly (TWC: Rear Catalyst) is consistent front-to-rear and left-to-right.
(4) Install the front exhaust pipe assembly (TWC: Rear Catalyst) to the tail exhaust pipe assembly with the 2 compression springs and 2 bolts.
Torque:
43 N·m {438 kgf·cm, 32 ft·lbf}
(5) After installation, check that the space between the flanges of the front exhaust pipe assembly (TWC: Rear Catalyst) and tail exhaust pipe assembly is consistent front-to-rear and left-to-right.
(6) Engage the wire harness clamp.
(7) Connect the heated oxygen sensor connector.
12. INSTALL FRONT FLOOR CENTER BRACE
Torque:
15 N·m {153 kgf·cm, 11 ft·lbf}
13. INSPECT FOR EXHAUST GAS LEAK
Click here
14. INSTALL NO. 1 ENGINE UNDER COVER ASSEMBLY
Click here