Installation
INSTALLATION
NOTICE:
This procedure includes the installation of small-head bolts. Refer to Small-Head Bolts of Basic Repair Hint to identify the small-head bolts.
Click here 
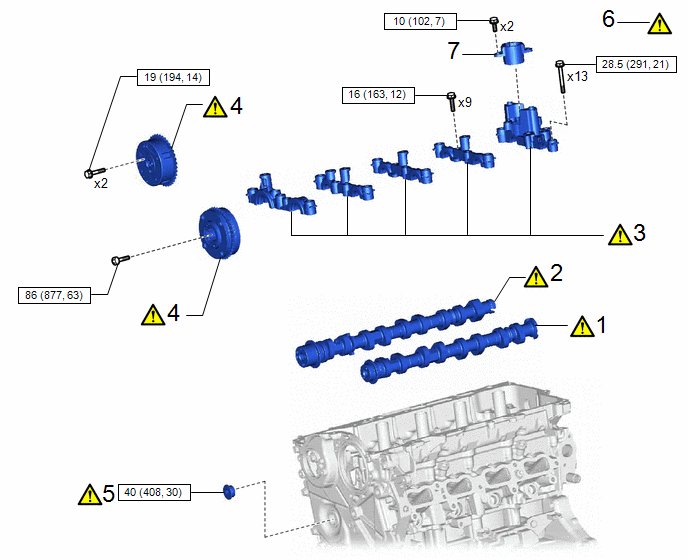
Procedure | Part Name Code |  |  |  |
|
|---|---|---|---|---|---|
1 |
EXHAUST CAMSHAFT SUB-ASSEMBLY |
- |
|
- |
- |
2 |
INTAKE CAMSHAFT SUB-ASSEMBLY |
- |
|
- |
- |
3 |
CAMSHAFT BEARING CAP |
- |
|
- |
- |
4 |
CAMSHAFT TIMING GEAR ASSEMBLY |
- |
|
- |
- |
5 |
STRAIGHT SCREW PLUG |
- |
|
- |
- |
6 |
SET NO. 1 CYLINDER TO TDC (COMPRESSION) |
- |
|
- |
- |
7 |
FUEL PUMP LIFTER GUIDE |
23477 |
- |
- |
- |
 |
N*m (kgf*cm, ft.*lbf): Specified torque |
- |
- |
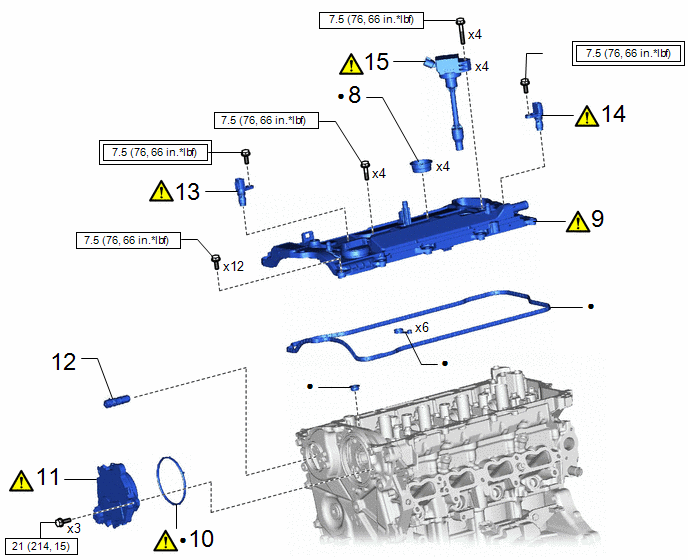
Procedure | Part Name Code | | | |
|
|---|---|---|---|---|---|
8 |
SPARK PLUG TUBE GASKET |
11193 |
- |
- |
- |
9 |
CYLINDER HEAD COVER SUB-ASSEMBLY |
11201 |
|
- |
- |
10 |
CAM TIMING CONTROL MOTOR O-RING |
13090E |
|
- |
- |
11 |
CAM TIMING CONTROL MOTOR WITH EDU ASSEMBLY |
13090D |
|
- |
- |
12 |
CAMSHAFT TIMING OIL CONTROL VALVE ASSEMBLY (EXHAUST CAMSHAFT TIMING GEAR BOLT ASSEMBLY) |
- |
|
- |
- |
13 |
CAMSHAFT POSITION SENSOR (for Exhaust Side) |
11102A |
|
- |
- |
14 |
CAMSHAFT POSITION SENSOR (for Intake Side) |
11102A |
|
- |
- |
15 |
IGNITION COIL ASSEMBLY |
19500 |
|
- |
- |
 |
Tightening torque for "Major areas involving basic vehicle performance such as moving/turning/stopping" : N*m (kgf*cm, ft.*lbf) |
|
N*m (kgf*cm, ft.*lbf): Specified torque |
● |
Non-reusable part |
★ |
Precoated part |
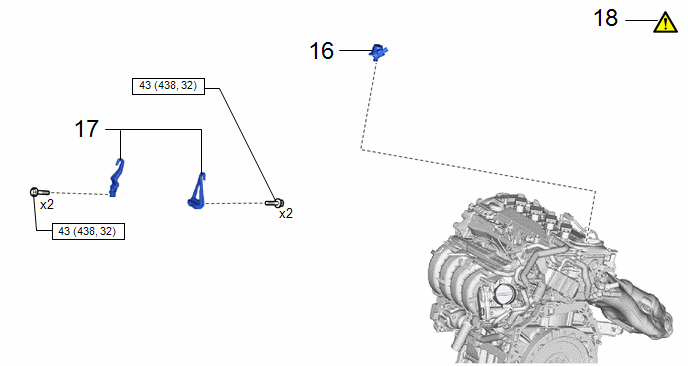
Procedure | Part Name Code | | | |
|
|---|---|---|---|---|---|
16 |
FUEL (ENGINE ROOM SIDE) PUMP ASSEMBLY |
23100X |
- |
- |
- |
17 |
ENGINE HANGERS |
- |
|
- |
- |
18 |
ENGINE ASSEMBLY FROM ENGINE STAND |
- |
|
- |
- |
|
N*m (kgf*cm, ft.*lbf): Specified torque |
- |
- |
PROCEDURE
1. INSTALL EXHAUST CAMSHAFT SUB-ASSEMBLY
|
HINT: Perform Inspection After Repair after replacing the intake camshaft sub-assembly, exhaust camshaft sub-assembly, camshaft timing gear assembly and camshaft timing exhaust gear assembly. Click here |
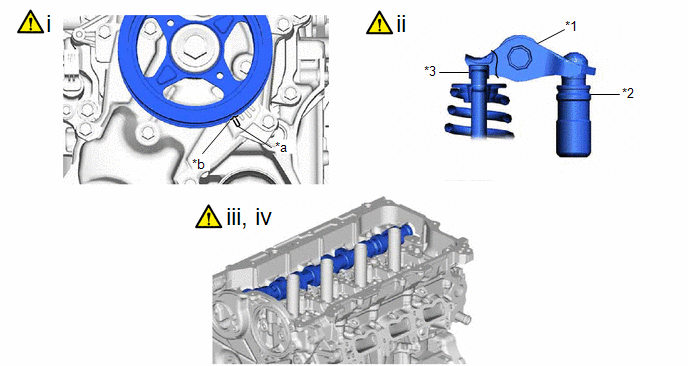
*1 |
No. 1 Valve Rocker Arm Sub-assembly |
*2 |
Valve Lash Adjuster Assembly |
*3 |
Valve Stem Cap |
- |
- |
*a |
"0" Timing Mark |
*b |
Timing Mark |
(1) Turn the crankshaft clockwise to align the timing mark (cutout) on the crankshaft pulley assembly with the "0" timing mark on the No. 2 timing chain cover assembly.
(2) Check that the No. 1 valve rocker arm sub-assembly is correctly installed as shown in the illustration.
(3) Clean the camshaft housing sub-assembly and the cams and journals of the intake camshaft sub-assembly and exhaust camshaft sub-assembly, and then apply engine oil to them.
(4) Apply a light coat of engine oil to the journals of the exhaust camshaft sub-assembly and install the exhaust camshaft sub-assembly to the camshaft housing sub-assembly.
2. INSTALL INTAKE CAMSHAFT SUB-ASSEMBLY

(1) Clean the camshaft housing sub-assembly and the cams and journals of the intake camshaft sub-assembly, and then apply engine oil to them.
(2) Apply a light coat of engine oil to the journals of the intake camshaft sub-assembly and install the intake camshaft sub-assembly to the camshaft housing sub-assembly.
3. INSTALL CAMSHAFT BEARING CAP
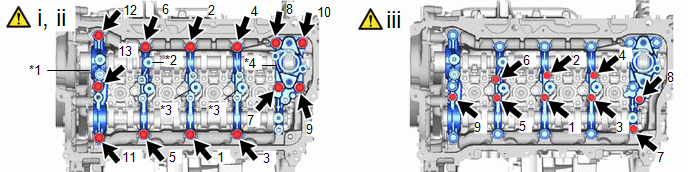
*1 |
No. 1 Camshaft Bearing Cap |
*2 |
No. 2 Camshaft Bearing Cap |
*3 |
No. 3 Camshaft Bearing Cap |
*4 |
No. 4 Camshaft Bearing Cap |
(1) Set the No. 1 camshaft bearing cap, No. 2 camshaft bearing cap, 2 No. 3 camshaft bearing caps and No. 4 camshaft bearing cap as shown in the illustration.
(2) Uniformly tighten the 13 bolts in the order shown in the illustration.
Torque:
28 N·m {291 kgf·cm, 21 ft·lbf}
(3) Uniformly tighten the 9 bolts in the order shown in the illustration.
Torque:
16 N·m {163 kgf·cm, 12 ft·lbf}
4. INSTALL CAMSHAFT TIMING GEAR ASSEMBLY
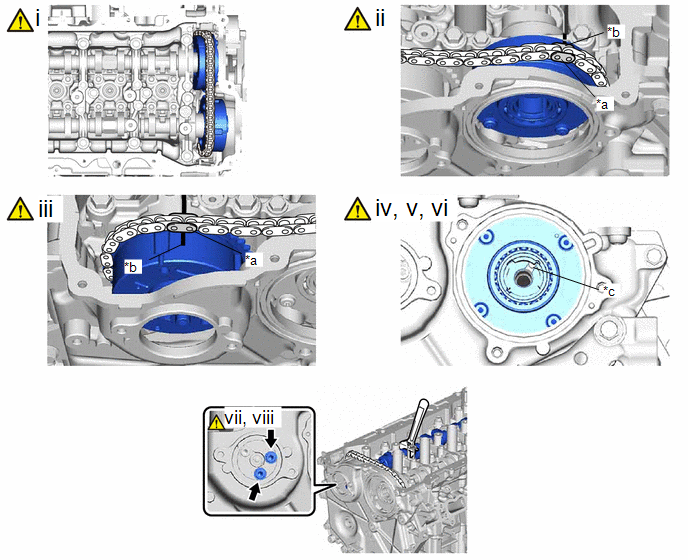
*a |
Paint Mark |
*b |
Timing Mark |
*c |
Knock Pin |
- |
- |
(1) Set the camshaft timing gear assembly and camshaft timing exhaust gear assembly to the chain sub-assembly as shown in the illustration.
(2) Align the timing mark on the camshaft timing gear assembly with the paint mark on the chain sub-assembly.
(3) Align the timing mark on the camshaft timing exhaust gear assembly with the paint mark on the chain sub-assembly.
(4) Using the hexagonal portion of the intake camshaft sub-assembly, install the camshaft timing gear assembly to the intake camshaft sub-assembly.
(5) Check that the knock pin matches the pin hole from the No. 2 timing chain cover sub-assembly side.
(6) Using a 10 mm bi-hexagon socket wrench, temporarily install the camshaft timing gear assembly with the bolt.
HINT:
Temporarily install the bolt enough that the camshaft timing gear assembly does not detach from the knock pin of the intake camshaft sub-assembly.
(7) Using the hexagonal portion of the exhaust camshaft sub-assembly, install the camshaft timing exhaust gear assembly to the exhaust camshaft sub-assembly.
(8) Temporarily install the 2 bolts.
HINT:
The 2 bolts can only be installed as shown in the illustration if the knock pin on the exhaust camshaft sub-assembly and the pin hole on the camshaft timing exhaust gear assembly match. If the 2 bolts cannot be installed, the knock pin and pin hole do not match.
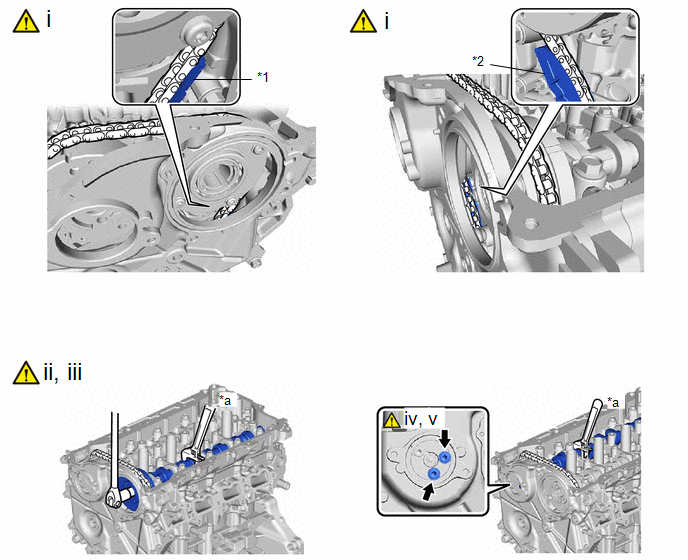
*1 |
No. 1 Chain Vibration Damper |
*2 |
Chain Tensioner Slipper |
*a |
Hold |
- |
- |
(1) Check the status of the camshaft timing gear assembly and camshaft timing exhaust gear assembly temporarily installed to each camshaft.
- Camshaft timing gear assembly side:
Check that the chain sub-assembly does not overlap the No. 1 chain vibration damper as shown in the illustration.
NOTICE:
If the chain sub-assembly overlaps the No. 1 chain vibration damper, install it again.
- Camshaft timing exhaust gear assembly side:
Check that the chain sub-assembly does not overlap the chain tensioner slipper as shown in the illustration.
NOTICE:
If the chain sub-assembly overlaps the chain tensioner slipper, install it again.
(2) Using the hexagonal portion of the intake camshaft sub-assembly, hold the intake camshaft sub-assembly.
NOTICE:
- Do not damage the camshaft housing sub-assembly, cylinder head sub-assembly and spark plug tube.
- Do not disassemble the camshaft timing gear assembly.
(3) Using a 10 mm bi-hexagon socket wrench, tighten the bolt on the camshaft timing gear assembly.
Torque:
86 N·m {877 kgf·cm, 63 ft·lbf}
(4) Using the hexagonal portion of the exhaust camshaft sub-assembly, hold the exhaust camshaft sub-assembly.
NOTICE:
Do not damage the camshaft housing sub-assembly, cylinder head sub-assembly and spark plug tube.
(5) Using a 5 mm hexagon wrench, tighten the 2 bolts.
Torque:
19 N·m {194 kgf·cm, 14 ft·lbf}
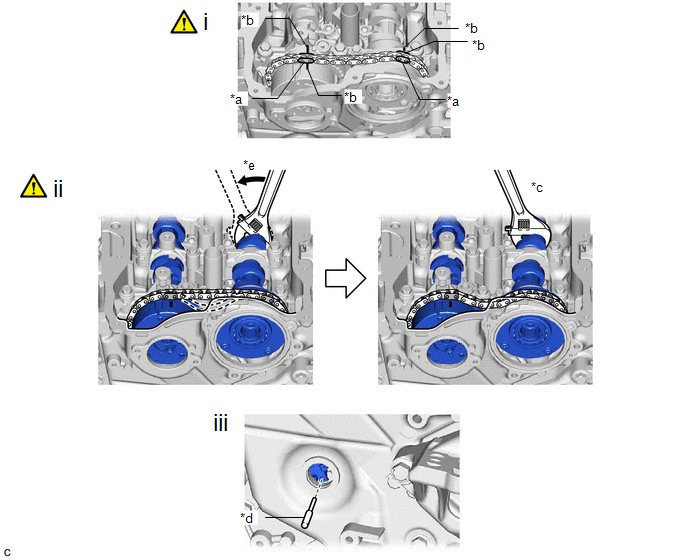
*a |
Paint Mark |
*b |
Timing Mark |
*c |
Hold |
*d |
Pin |
*e |
Turn |
- |
- |
(1) Check that the paint marks and timing marks are positioned as shown in the illustration.
(2) Using the hexagonal portion of the intake camshaft sub-assembly, check that the chain sub-assembly slackens when the intake camshaft sub-assembly is moved in the direction shown in the illustration.
NOTICE:
If the chain sub-assembly remains tight and does not slacken, the chain tensioner slipper and No. 1 chain vibration damper may overlap the chain sub-assembly, so install them again.
(3) Remove the pin from the No. 1 chain tensioner assembly.
5. INSTALL STRAIGHT SCREW PLUG
|
Click here |
6. SET NO. 1 CYLINDER TO TDC (COMPRESSION)
|
Click here |
7. INSTALL FUEL PUMP LIFTER GUIDE
Click here
8. INSTALL SPARK PLUG TUBE GASKET
Click here
9. INSTALL CYLINDER HEAD COVER SUB-ASSEMBLY
|
Click here |
10. INSTALL CAM TIMING CONTROL MOTOR O-RING
|
Click here |
11. INSTALL CAM TIMING CONTROL MOTOR WITH EDU ASSEMBLY
|
Click here |
12. INSTALL CAMSHAFT TIMING OIL CONTROL VALVE ASSEMBLY (EXHAUST CAMSHAFT TIMING GEAR BOLT ASSEMBLY)
Click here
13. INSTALL CAMSHAFT POSITION SENSOR (for Exhaust Side)
|
Click here |
14. INSTALL CAMSHAFT POSITION SENSOR (for Intake Side)
|
Click here |
15. INSTALL IGNITION COIL ASSEMBLY
|
Click here |
16. INSTALL FUEL (ENGINE ROOM SIDE) PUMP ASSEMBLY
Click here
17. INSTALL ENGINE HANGERS
|
Click here |
18. REMOVE ENGINE ASSEMBLY FROM ENGINE STAND
|
Click here |