Installation
INSTALLATION
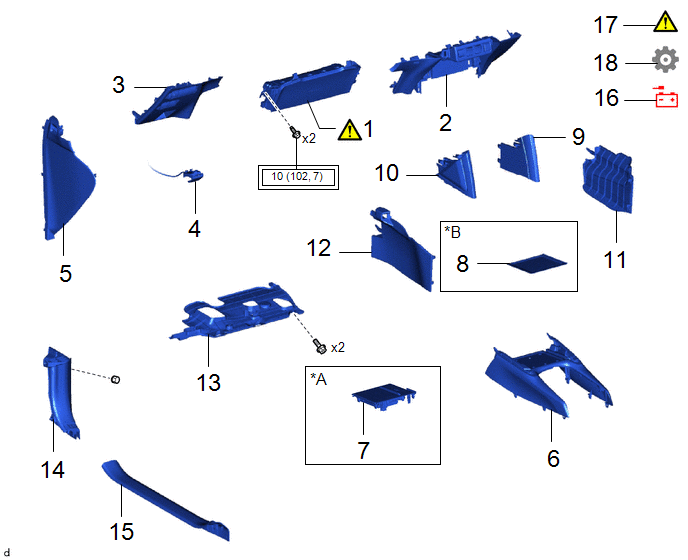
Procedure | Part Name Code |  |  |  |
|
|---|---|---|---|---|---|
1 |
LOWER NO. 1 INSTRUMENT PANEL AIRBAG ASSEMBLY |
73900 |
 |
- |
- |
2 |
LOWER CENTER INSTRUMENT PANEL FINISH PANEL |
55434F |
- |
- |
- |
3 |
LOWER NO. 1 INSTRUMENT PANEL FINISH PANEL |
55432D |
- |
- |
- |
4 |
HOOD LOCK CONTROL LEVER SUB-ASSEMBLY |
53601 |
- |
- |
- |
5 |
NO. 1 INSTRUMENT SIDE PANEL |
55317E |
- |
- |
- |
6 |
FRONT CONSOLE UPPER PANEL GARNISH |
58831A |
- |
- |
- |
7 |
MOBILE WIRELESS CHARGER CRADLE ASSEMBLY |
- |
- |
- |
- |
8 |
NO. 2 BOX BOTTOM MAT |
58917 |
- |
- |
- |
9 |
NO. 1 CONSOLE UPPER PANEL GARNISH |
58833B |
- |
- |
- |
10 |
NO. 2 CONSOLE UPPER PANEL GARNISH |
58834B |
- |
- |
- |
11 |
NO. 2 FRONT CONSOLE BOX INSERT |
58817A |
- |
- |
- |
12 |
NO. 1 FRONT CONSOLE BOX INSERT |
58816D |
- |
- |
- |
13 |
NO. 1 INSTRUMENT PANEL UNDER COVER SUB-ASSEMBLY |
55606 |
- |
- |
- |
14 |
COWL SIDE TRIM SUB-ASSEMBLY LH |
62112A |
- |
- |
- |
15 |
FRONT DOOR SCUFF PLATE LH |
67914B |
- |
- |
- |
16 |
CABLE TO NEGATIVE AUXILIARY BATTERY TERMINAL |
- |
- |
- |
- |
17 |
INSPECT SRS WARNING LIGHT |
- |
|
- |
- |
18 |
INITIALIZATION AFTER RECONNECTING AUXILIARY BATTERY TERMINAL |
- |
- |
- |
|
*A |
w/ Wireless Charger |
*B |
w/o Wireless Charger |
 |
Tightening torque for "Major areas involving basic vehicle performance such as moving/turning/stopping": N*m (kgf*cm, ft.*lbf) |
- |
- |
PROCEDURE
1. INSTALL LOWER NO. 1 INSTRUMENT PANEL AIRBAG ASSEMBLY
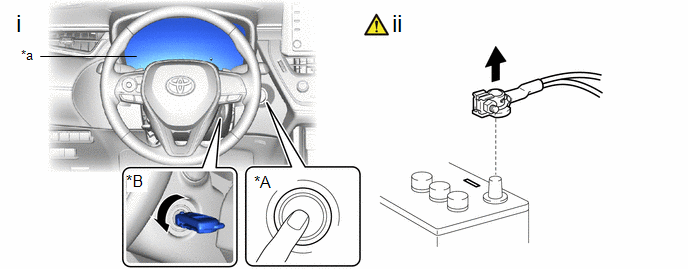
*A |
w/ Smart Key System |
*B |
w/o Smart Key System |
*a |
Illumination off |
- |
- |
(1) Check that the ignition switch is off.
(2) Check that the cable is disconnected from the negative (-) auxiliary battery terminal.
CAUTION:
- Wait at least 90 seconds after disconnecting the cable from the negative (-) auxiliary battery terminal to disable the SRS system.
- If the airbag deploys for any reason, it may cause a serious accident.
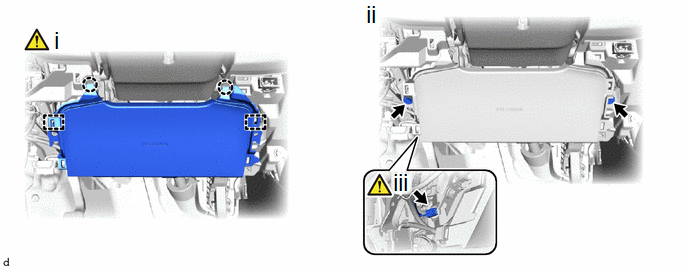
(1) Engage the hooks and claws to install the lower No. 1 instrument panel airbag assembly.
(2) Install the 2 bolts.
Torque:
10 N·m {102 kgf·cm, 7 ft·lbf}
NOTICE:
Confirm that the lower No. 1 instrument panel airbag assembly is installed securely without any excessive gaps and is not protruding outward.
(3) Connect the airbag connector.
NOTICE:
When connecting any airbag connector, take care not to damage the airbag wire harness.
HINT:
Refer to How to Connect or Disconnect Airbag Connector:
Click here
2. INSTALL LOWER CENTER INSTRUMENT PANEL FINISH PANEL
3. INSTALL LOWER NO. 1 INSTRUMENT PANEL FINISH PANEL
4. CONNECT HOOD LOCK CONTROL LEVER SUB-ASSEMBLY
5. INSTALL NO. 1 INSTRUMENT SIDE PANEL
6. INSTALL FRONT CONSOLE UPPER PANEL GARNISH
7. INSTALL MOBILE WIRELESS CHARGER CRADLE ASSEMBLY (w/ Wireless Charger)
8. INSTALL NO. 2 BOX BOTTOM MAT (w/o Wireless Charger)
9. INSTALL NO. 1 CONSOLE UPPER PANEL GARNISH
10. INSTALL NO. 2 CONSOLE UPPER PANEL GARNISH
11. INSTALL NO. 2 FRONT CONSOLE BOX INSERT
12. INSTALL NO. 1 FRONT CONSOLE BOX INSERT
13. INSTALL NO. 1 INSTRUMENT PANEL UNDER COVER SUB-ASSEMBLY
14. INSTALL COWL SIDE TRIM SUB-ASSEMBLY LH
15. INSTALL FRONT DOOR SCUFF PLATE LH
16. CONNECT CABLE TO NEGATIVE AUXILIARY BATTERY TERMINAL
- for Gasoline Model
Click here
- for HEV Model
Click here
17. INSPECT SRS WARNING LIGHT
|
Click here |
18. INITIALIZATION AFTER RECONNECTING AUXILIARY BATTERY TERMINAL
HINT:
When disconnecting and reconnecting the auxiliary battery, there is an automatic learning function that completes learning when the respective system is used.
Click here