Reassembly
REASSEMBLY
COMPONENTS (REASSEMBLY)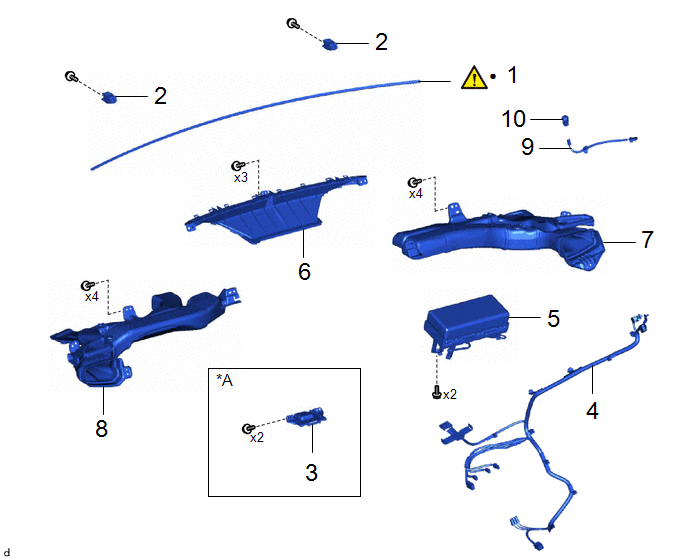
Procedure | Part Name Code |  |  |  |
|
|---|---|---|---|---|---|
1 |
INSTRUMENT PANEL CUSHION |
55349A |
 |
- |
- |
2 |
NO. 1 INSTRUMENT PANEL PIN |
55328 |
- |
- |
- |
3 |
NAVIGATION ANTENNA ASSEMBLY WITH BRACKET |
- |
- |
- |
- |
4 |
ANTENNA CORD SUB-ASSEMBLY |
86101 |
- |
- |
- |
5 |
INSTRUMENT PANEL PASSENGER AIRBAG ASSEMBLY |
73960A |
- |
- |
- |
6 |
DEFROSTER NOZZLE ASSEMBLY |
55950G |
- |
- |
- |
7 |
NO. 2 HEATER TO REGISTER DUCT SUB-ASSEMBLY |
55085 |
- |
- |
- |
8 |
NO. 1 HEATER TO REGISTER DUCT SUB-ASSEMBLY |
55084E |
- |
- |
- |
9 |
NO. 2 INSTRUMENT PANEL WIRE |
82142A |
- |
- |
- |
10 |
AUTOMATIC LIGHT CONTROL SENSOR |
89120A |
- |
- |
- |
*A |
w/ Navigation Antenna |
- |
- |
● |
Non-reusable part |
- |
- |
PROCEDURE
1. INSTALL INSTRUMENT PANEL CUSHION
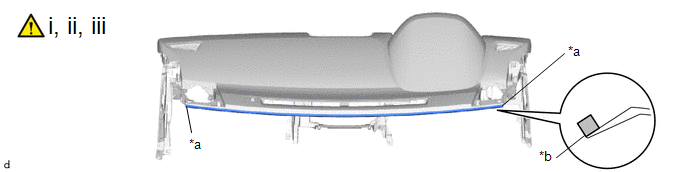
*a |
Edge of Curved Surface |
*b |
Outline |
(1) Clean the upper instrument panel assembly surface by the below procedure.
1. Remove any remaining double-sided tape from the upper instrument panel assembly.
2. Wipe off any tape adhesive residue with cleaner.
(2) Remove the release paper from a new instrument panel cushion.
HINT:
After removing the release paper, keep the exposed adhesive free from foreign matter.
(3) Install the instrument panel cushion as shown in the illustration.
2. INSTALL NO. 1 INSTRUMENT PANEL PIN
3. INSTALL ANTENNA CORD SUB-ASSEMBLY
4. INSTALL NAVIGATION ANTENNA ASSEMBLY WITH BRACKET
5. INSTALL INSTRUMENT PANEL PASSENGER AIRBAG ASSEMBLY
6. INSTALL DEFROSTER NOZZLE ASSEMBLY
7. INSTALL NO. 2 HEATER TO REGISTER DUCT SUB-ASSEMBLY
8. INSTALL NO. 1 HEATER TO REGISTER DUCT SUB-ASSEMBLY
9. INSTALL NO. 2 INSTRUMENT PANEL WIRE
10. INSTALL AUTOMATIC LIGHT CONTROL SENSOR