Removal
REMOVAL
COMPONENTS (REMOVAL)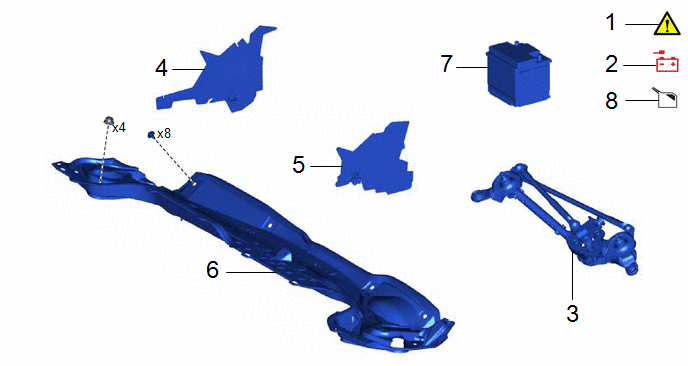
Procedure | Part Name Code |  |  |  |
|
|---|---|---|---|---|---|
1 |
PRECAUTION |
- |
 |
- |
- |
2 |
DISCONNECT CABLE FROM NEGATIVE AUXILIARY BATTERY TERMINAL |
- |
- |
- |
- |
3 |
WINDSHIELD WIPER MOTOR AND LINK ASSEMBLY |
- |
- |
- |
- |
4 |
NO. 1 HEATER AIR DUCT SPLASH SHIELD SEAL |
55737B |
- |
- |
- |
5 |
WATER GUARD PLATE |
55734D |
- |
- |
- |
6 |
OUTER COWL TOP PANEL SUB-ASSEMBLY |
55701J |
- |
- |
- |
7 |
AUXILIARY BATTERY |
- |
- |
- |
- |
8 |
DRAIN BRAKE FLUID |
- |
- |
|
- |
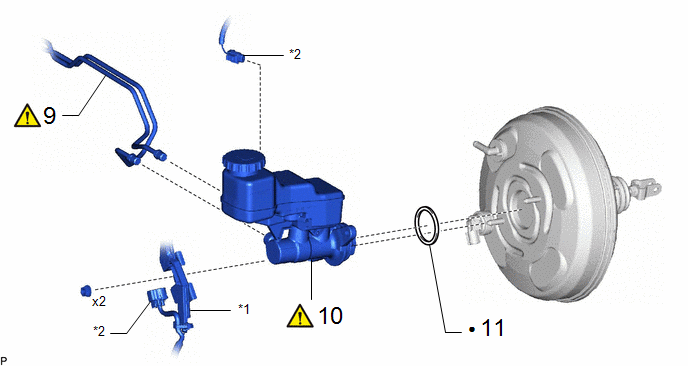
Procedure | Part Name Code | | | |
|
|---|---|---|---|---|---|
9 |
BRAKE LINE |
- |
|
- |
- |
10 |
BRAKE MASTER CYLINDER SUB-ASSEMBLY |
47201 |
|
- |
- |
11 |
BRAKE MASTER CYLINDER O-RING |
- |
- |
- |
- |
*1 |
WIRE HARNESS |
*2 |
CONNECTOR |
● |
Non-reusable part |
- |
- |
The necessary procedures (adjustment, calibration, initialization, or registration) that must be performed after parts are removed, installed, or replaced during brake master cylinder sub-assembly removal/installation are shown below.
NOTICE:
Make sure to release vacuum from the brake booster assembly before removing the brake master cylinder sub-assembly from the brake booster assembly.
HINT:
When the cable is disconnected/reconnected to the auxiliary battery terminal, systems temporarily stop operating. However, each system has a function that completes learning the first time the system is used.
- Learning completes when vehicle is driven
Effect/Inoperative Function When Necessary Procedures are not Performed
Necessary Procedures
Link
Front camera system
Drive the vehicle straight ahead at 15 km/h or more for 1 second or more.
Stop and start system
Drive the vehicle until stop and start control is permitted (approximately 5 to 60 minutes)
- Learning completes when vehicle is operated normally
Effect/Inoperative Function When Necessary Procedures are not Performed
Necessary Procedures
Link
Power door lock control system
- Back door opener
Perform door unlock operation with door control switch or electrical key transmitter sub-assembly switch.
Power back door system
Fully close the back door by hand.
HINT:
Initialization is not necessary if the above procedures are performed while the back door is closed.
Air conditioning system
After the ignition switch is turned to ON, the servo motor standard position is recognized.
-
PROCEDURE
1. PRECAUTION
|
NOTICE: After turning the ignition switch off, waiting time may be required before disconnecting the cable from the negative (-) auxiliary battery terminal. Click here |
2. DISCONNECT CABLE FROM NEGATIVE AUXILIARY BATTERY TERMINAL
Click here
3. REMOVE WINDSHIELD WIPER MOTOR AND LINK ASSEMBLY
Click here
4. REMOVE NO. 1 HEATER AIR DUCT SPLASH SHIELD SEAL
Click here
5. REMOVE WATER GUARD PLATE
Click here
6. REMOVE OUTER COWL TOP PANEL SUB-ASSEMBLY
Click here
7. REMOVE AUXILIARY BATTERY
Click here
8. DRAIN BRAKE FLUID
NOTICE:
If brake fluid leaks onto any painted surface, immediately wash it off.
9. DISCONNECT BRAKE LINE
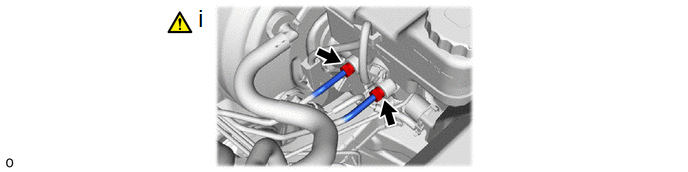
(1) Using a union nut wrench, disconnect the 2 brake lines from the brake master cylinder sub-assembly.
NOTICE:
- Do not damage or deform the brake lines.
- Do not allow any foreign matter such as dirt or dust to enter the brake lines from the connecting parts.
10. REMOVE BRAKE MASTER CYLINDER SUB-ASSEMBLY
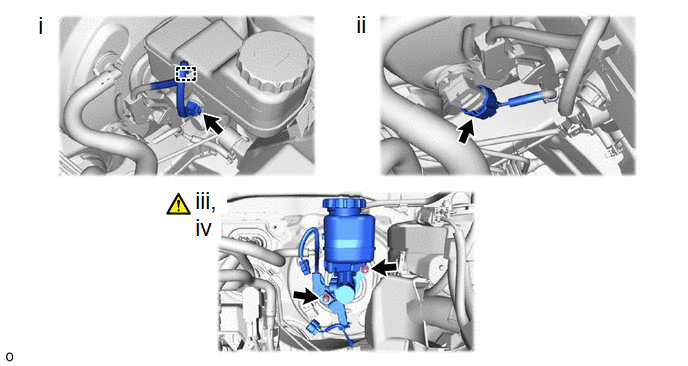
(1) Disengage the clamp and disconnect the connector from the brake master cylinder reservoir assembly.
(2) Disconnect the connector from the vacuum sensor assembly.
(3) Remove the 2 nuts and separate the wire harness.
(4) Remove the brake master cylinder sub-assembly from the brake booster assembly.
NOTICE:
- The brake master cylinder sub-assembly requires careful handling. Do not drop or subject the brake master cylinder sub-assembly to any impact. Do not reuse a brake master cylinder sub-assembly that has been dropped.
- Do not hold the brake master cylinder sub-assembly by the master cylinder piston. Hold the brake master cylinder sub-assembly by its body or its reservoir when carrying it.
- Do not pull out the master cylinder piston.
- Do not strike or pinch the master cylinder piston, or cause any damage to the master cylinder piston by any other means.
- When installing the brake master cylinder sub-assembly to the brake booster assembly, or when removing the brake master cylinder sub-assembly from the brake booster assembly, make sure that the brake master cylinder sub-assembly is kept horizontal or with its tip facing downward (the master cylinder piston is facing upward) to prevent the master cylinder piston from falling out.
- Do not allow any foreign matter to contaminate the master cylinder piston. If any foreign matter gets on the master cylinder piston, remove it by using a piece of new and dry cloth. Do not use water or detergent. Then apply an even layer of lithium soap base glycol grease around the circumference (sliding part) of the master cylinder piston.
- Do not use any other types of grease.
- Make sure to release vacuum from the brake booster assembly before removing the brake master cylinder sub-assembly from the brake booster assembly.
11. REMOVE BRAKE MASTER CYLINDER O-RING