Removal
REMOVAL
HINT:
When the cable is disconnected/reconnected to the auxiliary battery terminal, systems temporarily stop operating. However, each system has a function that completes learning the first time the system is used.
- Learning completes when vehicle is driven
Effect/Inoperative Function When Necessary Procedures are not Performed
Necessary Procedures
Link
Front Camera System
Drive the vehicle straight ahead at 15 km/h or more for 1 second or more.

- Learning completes when vehicle is operated normally
Effect/Inoperative Function When Necessary Procedures are not Performed
Necessary Procedures
Link
Power door lock control system
- Back door opener
Perform door unlock operation with door control switch or electrical key transmitter sub-assembly switch.
Power back door system
Fully close the back door by hand.
HINT:
Initialization is not necessary if the above procedures are performed while the back door is closed.
Air conditioning system
After the ignition switch is turned to ON, the servo motor standard position is recognized.
-
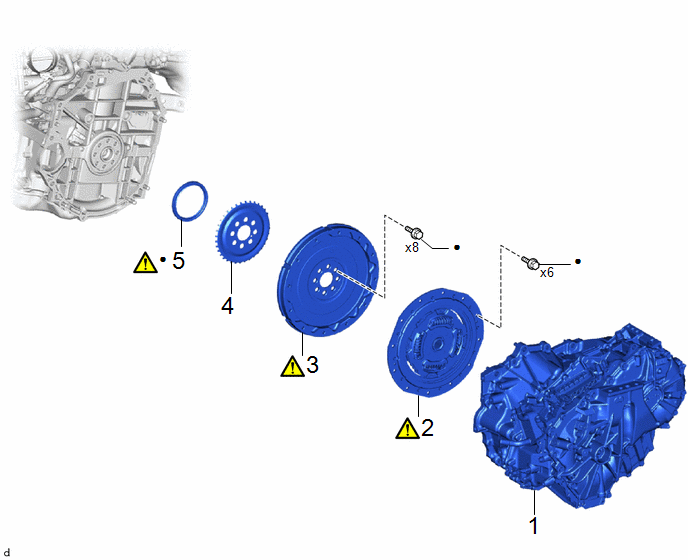
Procedure | Part Name Code |  |  |  |
|
|---|---|---|---|---|---|
1 |
HYBRID VEHICLE TRANSAXLE ASSEMBLY |
30900 |
- |
- |
- |
2 |
TRANSMISSION INPUT DAMPER ASSEMBLY |
31270 |
|
- |
- |
3 |
FLYWHEEL SUB-ASSEMBLY |
13405 |
|
- |
- |
4 |
NO. 1 CRANKSHAFT POSITION SENSOR PLATE |
19315 |
- |
- |
- |
5 |
REAR ENGINE OIL SEAL |
11401L |
|
- |
- |
● |
Non-reusable part |
★ |
Precoated part |
PROCEDURE
1. REMOVE HYBRID VEHICLE TRANSAXLE ASSEMBLY
Click here
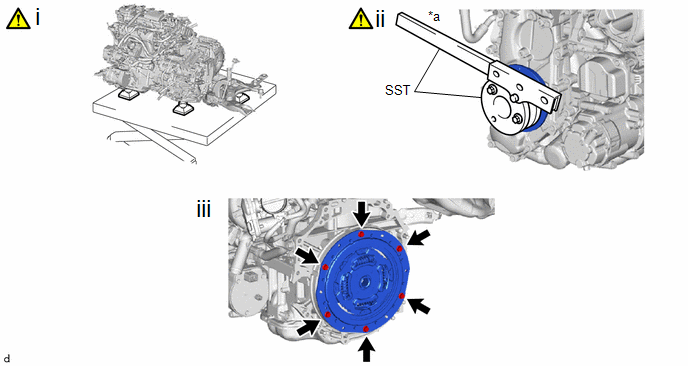
2. REMOVE TRANSMISSION INPUT DAMPER ASSEMBLY
*a |
Hold |
- |
- |
(1) Using height adjustment attachments and plate lift attachments, place the engine assembly on a flat level surface.
NOTICE:
- Using height adjustment attachments and plate lift attachments, keep the engine assembly level.
- To prevent the oil pan sub-assembly from deforming, do not place any attachments under the oil pan sub-assembly of the engine assembly.
- Using an engine sling device and engine lift, secure the engine assembly before servicing.
(2) Using SST, hold the crankshaft pulley assembly.
SST: 09213-54015
SST: 09330-00021
(3) Remove the 6 bolts and transmission input damper assembly from the flywheel sub-assembly.
3. REMOVE FLYWHEEL SUB-ASSEMBLY
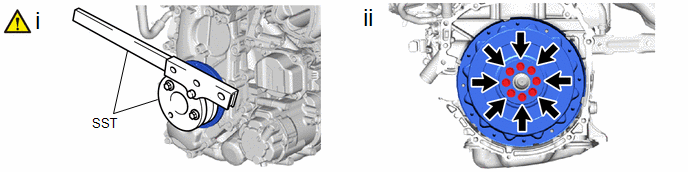
(1) Using SST, hold the crankshaft pulley assembly.
SST: 09213-54015
SST: 09330-00021
(2) Remove the 8 bolts and flywheel sub-assembly from the crankshaft.
4. REMOVE NO. 1 CRANKSHAFT POSITION SENSOR PLATE

5. REMOVE REAR ENGINE OIL SEAL
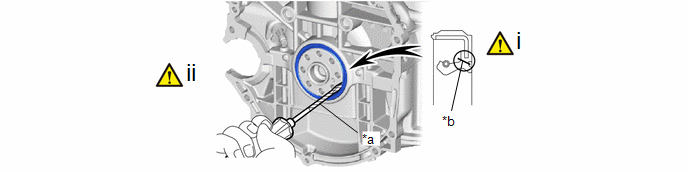
*a |
Protective Tape |
*b |
Cut Position |
(1) Using a knife, cut off the lip of the rear engine oil seal.
(2) Using a screwdriver, pry out the rear engine oil seal.
NOTICE:
Do not damage the surface of the rear engine oil seal press fit hole or the crankshaft.
HINT:
Tape the screwdriver tip before use.