Washer Nozzle (for Rear Side)
On-vehicle Inspection
ON-VEHICLE INSPECTION
PROCEDURE
1. INSPECT REAR WASHER NOZZLE
(a) Operate the rear washer nozzle and check the position that the washer fluid contacts the back door glass.
Standard:
Washer fluid contacts the back door glass in the area shown in the illustration.
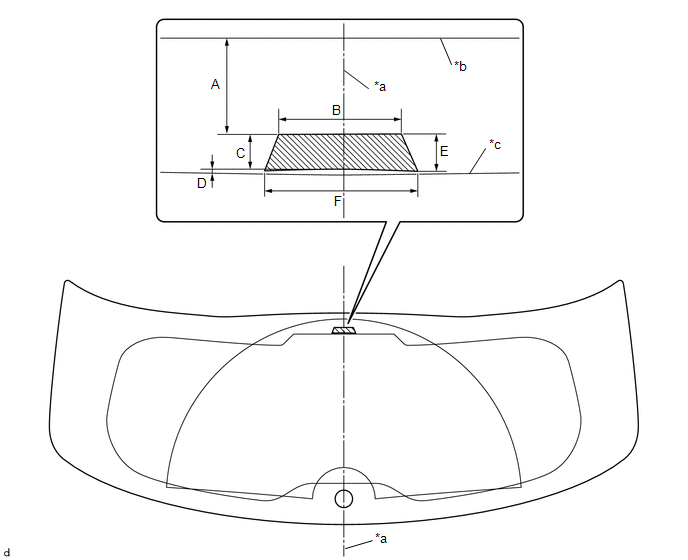
*a |
Vehicle Center Line |
*b |
Back Door Glass Edge Side |
*c |
Ceramic Line |
- |
- |
 |
Measurement |
- |
- |
Standard Measurement:
Area | Measurement | Area | Measurement |
|---|---|---|---|
A |
30.8 mm (1.21in.) |
B |
39.6 mm (1.56 in.) |
C |
10.6 mm (0.417 in.) |
D |
2.0 mm (0.0787 in.) |
E |
11.8 mm (0.465 in.) |
F |
49.3 mm (1.94 in.) |
If the result is not as specified, adjust the rear washer nozzle.
Removal
REMOVAL
COMPONENTS (REMOVAL)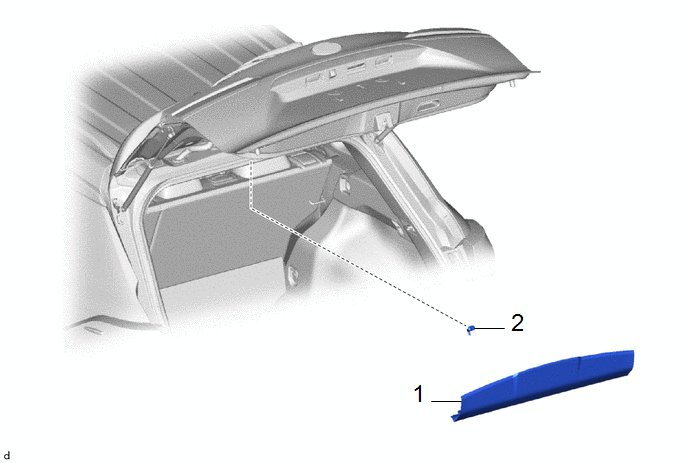
Procedure | Part Name Code |  |  |  |
|
|---|---|---|---|---|---|
1 |
UPPER BACK DOOR TRIM PANEL ASSEMBLY |
64790B |
- |
- |
- |
2 |
WASHER NOZZLE SUB-ASSEMBLY |
85345R |
- |
- |
- |
PROCEDURE
1. REMOVE UPPER BACK DOOR TRIM PANEL ASSEMBLY
Click here 
2. REMOVE REAR WASHER NOZZLE
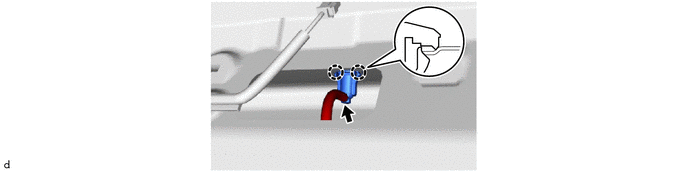
Adjustment
ADJUSTMENT
PROCEDURE
1. ADJUST REAR WASHER NOZZLE
(a) Using a screwdriver, adjust the direction of the rear washer nozzle. NOTICE: Do not use a safety pin or other pointed tool. Doing so may damage the inside of the washer nozzle. |
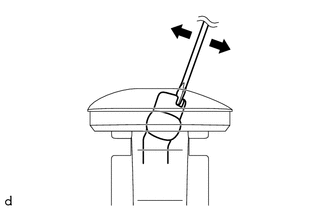 |
Installation
INSTALLATION
COMPONENTS (INSTALLATION)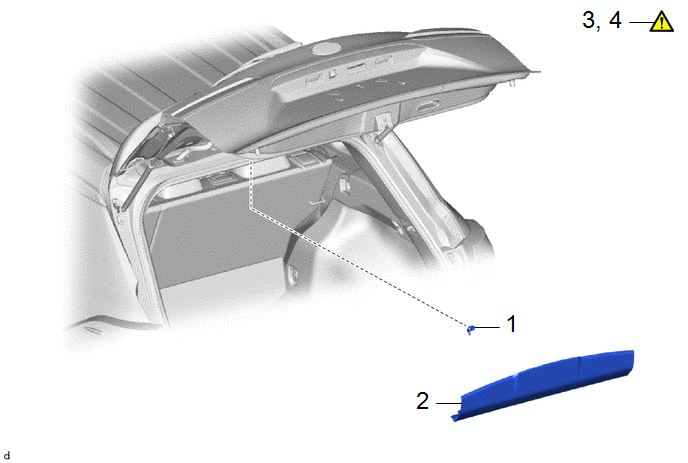
Procedure | Part Name Code |  |  |  |
|
|---|---|---|---|---|---|
1 |
INSTALL WASHER NOZZLE SUB-ASSEMBLY |
85345R |
- |
- |
- |
2 |
UPPER BACK DOOR TRIM PANEL ASSEMBLY |
64790B |
- |
- |
- |
3 |
INSPECT WASHER NOZZLE SUB-ASSEMBLY |
85345R |
 |
- |
- |
4 |
ADJUST WASHER NOZZLE SUB-ASSEMBLY |
85345R |
|
- |
- |
PROCEDURE
1. INSTALL REAR WASHER NOZZLE
2. INSTALL UPPER BACK DOOR TRIM PANEL ASSEMBLY
3. INSPECT REAR WASHER NOZZLE
Click here
4. ADJUST REAR WASHER NOZZLE
Click here