Replacement
: components:
1. Table of bolt, screw and nut Notice: be sure to tape the tip of the screwdriver when using it to disengage the meshing of the clips and claws.
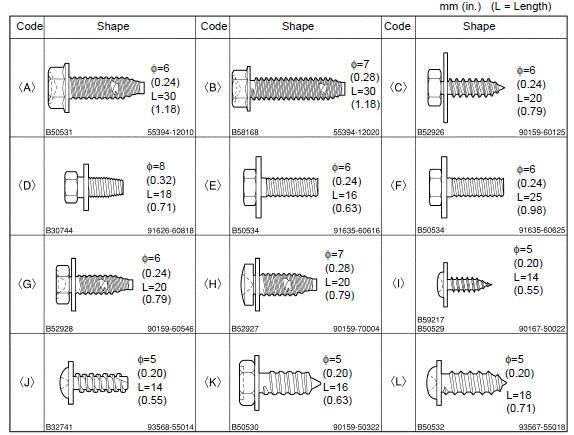
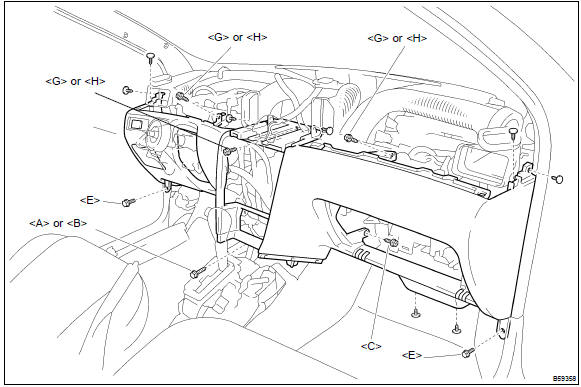
Hint: indicate the bolts, screws and nuts, which are necessary for installation and removal of the instrument panel, in the illustration and the text with alphabets.
sst 09950–50013 (09951–05010, 09952–05010, 09953–05020, 09954–05021)
7. Remove meter hood sub–assy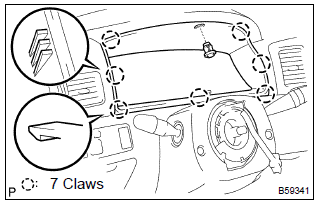
- Remove the clip.
- using a screwdriver, disengage the 7 claws, then remove the meter hood sub–assy.
: tape the screwdriver tip before use.
8. Remove combination meter assy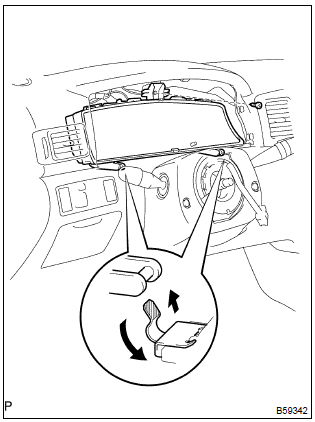
- Remove the screw<l>.
- disengage the 2 claws as shown in the illustration.
- disconnect the connector, then remove the combination meter assy.
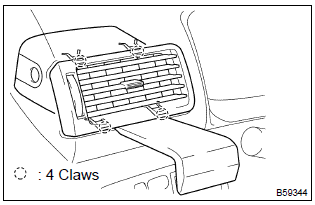
- Using a moulding remover, disengage the 4 claws, then remove the instrument panel register assy no.1.
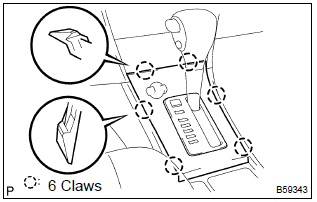
- Using a screwdriver, disengage the 6 claws.
: tape the screwdriver tip before use.
- disconnect the connector, then remove the console panel upper.
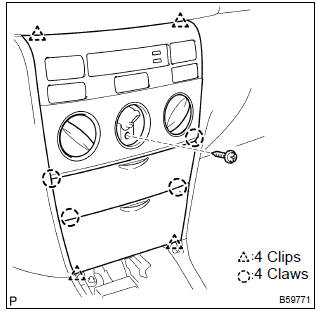
- Remove the screw<j>.
- using a screwdriver, disengage the 4 clips and 4 claws, then remove the instrument cluster finish panel.
Hint: tape the screwdriver tip before use.
- disconnect the connectors.
: do not pull the lid of auxiliary box.
15. Remove instrument cluster finish panel sub–assy center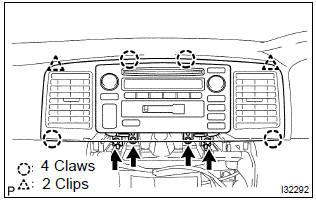
- Remove the 4 screws<k>.
- using a screwdriver, disengage the 2 clips and 4 claws, then remove the instrument cluster finish panel sub–assy center with radio receiver assy.
: tape the screwdriver tip before use.
- disconnect the connectors.
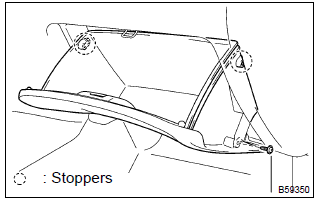
- Remove the screw<i> from the glove compartment door stopper sub–assy.
- deform the upper part of the glove compartment door assy to release the stoppers.
- pull the glove compartment door assy upward to remove it.
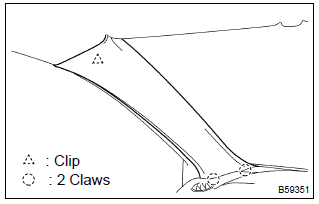
- Disengage the clip.
- pull the front pillar garnish lh upward and disengage the 2 claws, then remove the front pillar garnish lh.
- remove the bolt<d> and 2 screws<j>.
- using a moulding remover, disengage the 3 clips and 8 claws.
- remove the instrument panel sub–assy upper.
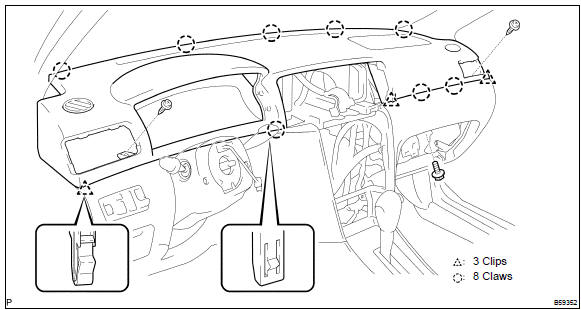
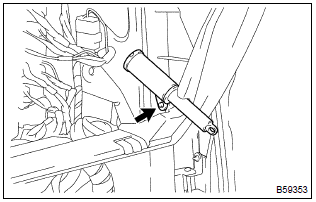
- Disengage the clip, then remove the glove compartment door stopper sub–assy.
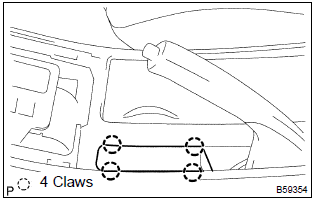
- Using a screwdriver, disengage the 4 claws, then remove the parking brake hole cover sub–assy.
: tape the screwdriver tip before use.
27. Remove console box carpet 28. Remove console box sub–assy rear (m/t transaxle) 29. Remove console box sub–assy rear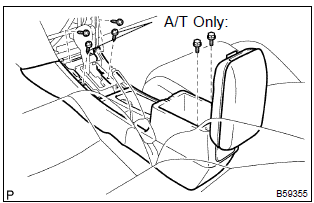
- A/t transaxle: remove the 2 bolts<f>, 4 screws<j> and console box sub–assy rear.
- m/t transaxle: remove the 2 bolts<f>, 2 screws<j> and console box sub–assy rear.
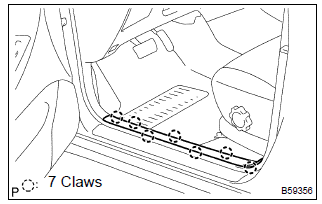
- Using a screwdriver, disengage the 7 claws, then remove the front door scuff plate lh.
: tape the screwdriver tip before use.
31. Remove front door scuff plate rh 32. Remove cowl side trim board lh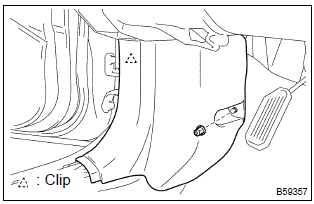
- Remove the clip.
- disengage the clip, then remove the cowl side trim board lh.
- disconnect the dlc3 connector.
- remove the hood lock control lever.
- remove the 3 screws<g> or <h>.
- remove the 2 bolts<e>.
- remove the bolt<a> or <b>.
- remove the bolt<c>.
- remove the 8 clips and instrument panel sub–assy lower.
- install the instrument panel sub–assy upper.
- install the bolt<d> and 2 screws<j>.
Torque: bolt <d>: 20 nvm (204 kgfvcm, 15 ftvlbf)
39. Install instrument cluster finish panel sub–assy center 40. Center spiral cable 41. Install steering wheel assy 42. Inspect steering wheel center point 43. Inspect horn button assy 44. Install horn button assy 45. Inspect srs warning lightTest yourself
A quick Toyota Corolla quiz: every answer comes with an explanation and a link to the manual page.