Installation (2005/11-2006/01)
- Install no. 1 Roof silencer pad
- W/o sliding roof:
- Install the 5 silencer pads.
- W/ sliding roof:
- Install the 2 silencer pads.
- Install no. 3 Roof silencer pad
- Install no. 1 Roof wire
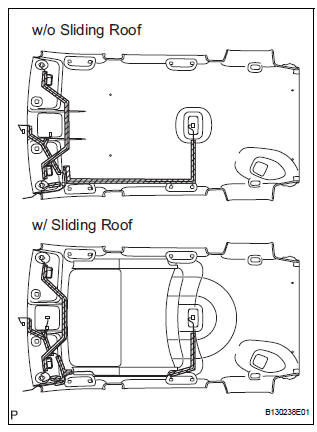
- Only when replacing the roof headlining:
- Align the marking, and then install the wire harness with tape.
Be careful that dirt or foreign objects do not stick to the adhesive part when peeling off the double-sided tape.
- Attach the roof wire harness along the adhesive part.
The roof wire harness should be attached securely.
- Install no. 1 Roof headlining support
- Install no. 2 Roof headlining support
- Install no. 3 Roof headlining support
- Install no. 4 Roof headlining support
- Install roof headlining assembly
- W/o sliding roof:
- Install the headlining with the 4 clips.
- W/ sliding roof:
- Install the headlining with the 2 clips.
- Connect the connector to the sliding roof drive gear.
- Connect the connector to the roof wire.
- Attach the clamp of the roof wire.
- Install sun roof opening trim moulding
- Install shoulder belt anchor cover rh (see page sb-65)
- Install child restraint seat tether anchor cover (see page sb-77)
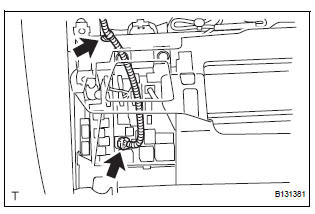
- Install rear assist grip assembly
- Attach the 4 claws to install the assist grip.
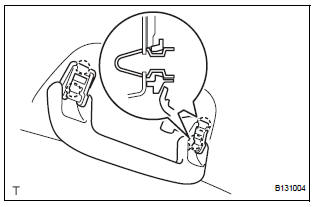
- Install assist grip cover (for rear grip)
- Attach the 4 claws to install the 2 assist grip covers.
- Install assist grip sub-assembly
- attach the 4 claws to install the assist grip.
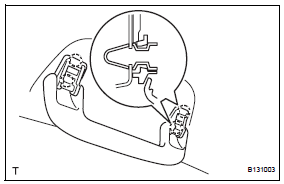
- Install assist grip cover (for front grip)
- Attach the 4 claws to install the 2 assist grip covers.
- Install room light assembly (see page li-119)
- Install map light assembly (see page li-116)
- Install vanity light assembly (see page li- 129)
- Install visor holder
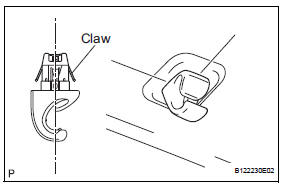
- Set the claws of the visor holder as shown in the illustration.
- Insert the visor holder to install it.
- Install visor assembly lh
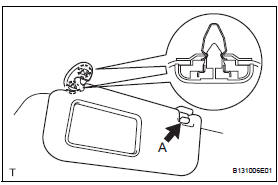
- Attach the 2 claws to install the visor.
- Install portion a of the visor onto the visor holder.
- Attach the 4 claws to install the visor bracket cover.
- Install visor assembly rh
Use the same procedures described for the lh side.
- Install rear room partition net hook lh
- Install the net hook with the 2 screws.

- Install rear room partition net hook rh
Use the same procedures described for the lh side.
- Install inner roof side garnish assembly lh (w/o rear no. 2 Seat)
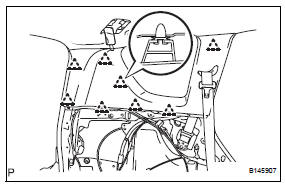
- Attach the 8 clips to install the garnish.
- Install inner roof side garnish assembly lh (w/ rear no. 2 Seat)

- Attach the 8 clips to install the garnish.
- Connect the rear no. 2 Seat belt's shoulder anchor.
- Connect the shoulder anchor with the bolt.
- Install inner roof side garnish assembly rh

Hint:
Use the same procedures described for the lh side.
- Install deck trim side panel assembly lh (w/ o rear no. 2 Seat)
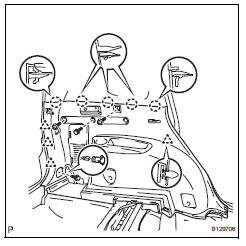
- Install the belt hanger to the trim board.
- Connect the power outlet socket connector.
- Attach the 4 clips and 5 claws to install the trim board.
- Install the 2 screws and 2 bolts.
- Connect the rear no. 1 Seat belt's floor anchor.
- Connect the floor anchor with the bolt.
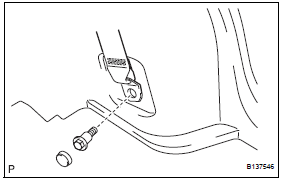
- Install deck trim side panel assembly lh (w/ rear no. 2 Seat)
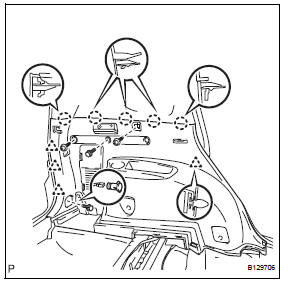
- Install the belt hanger to the trim board.
- Connect the power outlet socket connector.
- Attach the 4 clips and 5 claws to install the trim board.
- Install the 2 screws and 2 bolts.
- Connect the rear no. 2 Seat belt's floor anchor.
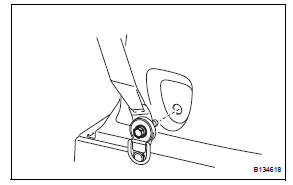
- Connect the floor anchor with the bolt.
- Connect the rear no. 1 Seat belt's floor anchor.
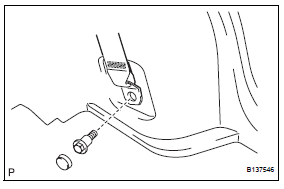
- Connect the floor anchor with the bolt.
- Install deck trim side panel assembly rh (w/o rear no. 2 Seat)
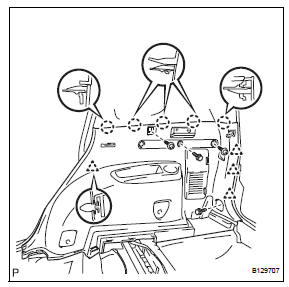
- Install the belt hanger to the trim board.
- Attach the 4 clips and 5 claws to install the trim board.
- Install the 2 screws and 2 bolts.
- Connect the rear no. 1 Seat belt's floor anchor.
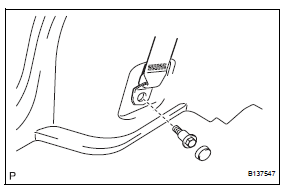
- Connect the floor anchor with the bolt.
- Install deck trim side panel assembly rh (w/ rear no. 2 Seat)
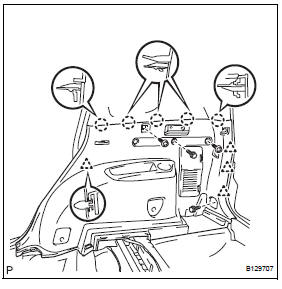
- Install the belt hanger to the trim board.
- Attach the 4 clips and 5 claws to install the trim board.
- Install the 2 screws and 2 bolts.
- Connect the rear no. 2 Seat belt's floor anchor.
- Connect the floor anchor with the bolt.
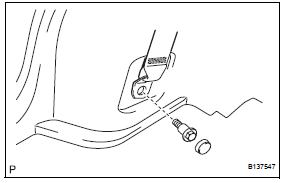
- Connect the rear no. 1 Seat belt's floor anchor.
- Connect the floor anchor with the bolt.
- Install tether anchor bracket subassembly (w/o rear no. 2 Seat)
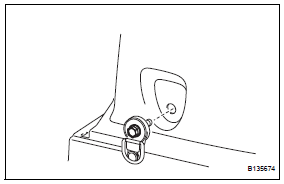
- Install the tether anchor bracket with the bolt.
- Install reclining remote control lever bezel lh (w/o rear no. 2 Seat) (see page se-73)
- Install reclining remote control lever bezel rh (w/o rear no. 2 Seat) (see page se-105)
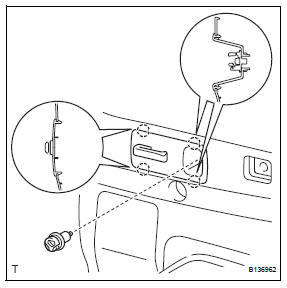
- Install rear deck trim cover lh (w/ rear no. 2 Seat)
- Attach the 4 claws to install the trim cover.
- Install the bolt.
- Install rear deck trim cover rh (w/ rear no. 2 Seat)
Use the same procedures described for the lh side.
- Install rear floor finish plate
- Attach the 6 claws and 6 clips to install the finish plate.
- Install back door weatherstrip
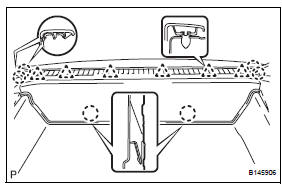
- Install rear floor no. 1 Mat support side plate
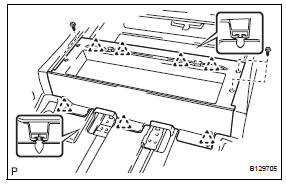
- W/o rear no. 2 Seat:
- Attach the 7 clips to install the side plate.
- Install the 4 screws.
- W/ rear no. 2 Seat:
- Attach the 8 clips to install the side plate.
- Install rear floor no. 3 Board
- Install rear floor no. 2 Board
- Install rear no. 2 Seat assembly lh (w/ rear no. 2 Seat) (see page se-121)
- Install rear no. 2 Seat assembly rh (w/ rear no. 2 Seat)
Use the same procedures described for the lh side.
- Install no. 2 Seat leg cover lh (w/ rear no. 2 Seat) (see page se-123)
- Install no. 2 Seat leg cover rh (w/ rear no. 2 Seat)
Use the same procedures described for the lh side.
- Install no. 2 Seat hinge cover lh (w/ rear no.
Use the same procedures described for the lh side.
- Install deck board assembly (w/o rear no. 2 Seat)
- Install rear floor no. 1 Board (w/o rear no.
- Attach the clip to install the garnish.
- Install the 2 screws.
- Install center pillar garnish rh
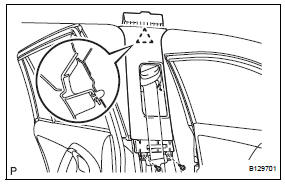
Hint:
Use the same procedures described for the lh side.
Install lower center pillar garnish lh
- Attach the 2 claws and 2 clips to install the garnish.
- Connect the front seat outer belt's floor anchor.
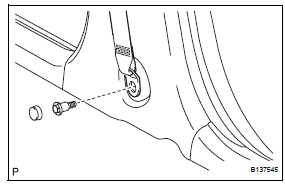
- Connect the floor anchor with the bolt.
- Install lower center pillar garnish rh
Use the same procedures described for the lh side.
- Install rear door opening trim weatherstrip lh
- Install rear door opening trim weatherstrip rh
- Install rear door scuff plate lh
- Attach the 9 claws and 2 clips to install the scuff plate.
- Install rear door scuff plate rh
Use the same procedures described for the lh side.
- Install instrument panel sub-assembly (see page ip-9)
- Install front pillar garnish lh
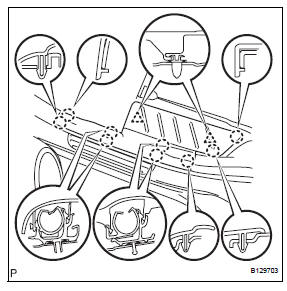
- W/ curtain shield airbag:
- Remove the piece of cloth or nylon.
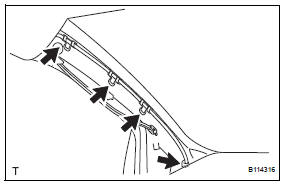
- Install the 4 wire harness clamps.
- W/ curtain shield airbag:
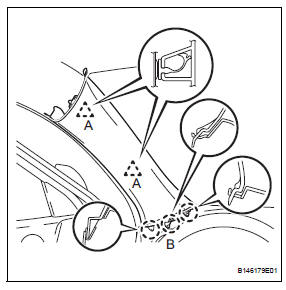
- Install 2 new clips labeled a to the vehicle body.
- Set the 3 claws of the pillar garnish to the area labeled b.
- Insert the tips of the clips labeled a into the pillar garnish's holes.
- Using needle-nose pliers, rotate the tips of clips labeled a 90°. Then push the pillar garnish toward the vehicle body to attach the base of the 2 clips labeled a.
- W/o curtain shield airbag:
- Attach the 2 clips and 3 claws to install the garnish.
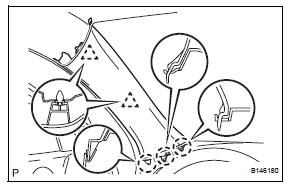
- Install front pillar garnish rh
- W/ curtain shield airbag:
- Remove the piece of cloth or nylon.

- W/ curtain shield airbag:
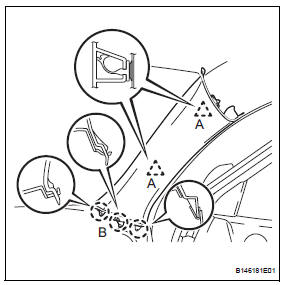
- Install 2 new clips labeled a to the vehicle body.
- Set the 3 claws of the pillar garnish to the area labeled b.
- Insert the tips of the clips labeled a into the pillar garnish's holes.
- Using needle-nose pliers, rotate the tips of clips labeled a 90°. Then push the pillar garnish toward the vehicle body to attach the base of the 2 clips labeled a.
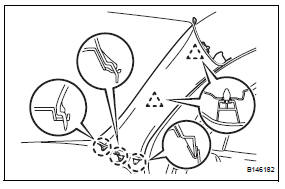
- W/o curtain shield airbag:
- Attach the 2 clips and 3 claws to install the garnish.
- Install glove compartment door assembly (see page ip-25)
- Install instrument panel register assembly center (see page ip-10)
- Install radio receiver (see page ip-10)
- Install no. 2 Instrument cluster finish panel center (see page ip-10)
- Install no. 1 Instrument cluster finish panel center (see page ip-10)
- Install combination meter assembly (see page ip-11)
- Install instrument cluster finish panel assembly (see page ip-11)
- Install front door opening trim weatherstrip lh
- Install front door opening trim weatherstrip rh
- Install cowl side trim board lh
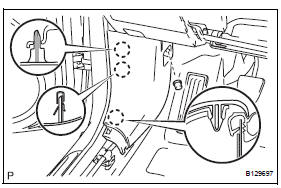
- Attach the 3 claws to install the trim board.
- Install the cap nut.
- Install cowl side trim board rh
Hint:
Use the same procedures described for the lh side.
- Install front door scuff plate lh
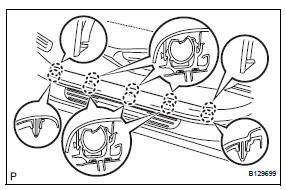
- Attach the 10 claws to install the scuff plate.
- Install front door scuff plate rh
Use the same procedures described for the lh side.
- Connect cable to negative battery terminal
Test yourself
A quick Toyota RAV4 quiz: every answer comes with an explanation and a link to the manual page.