Outer rear view mirror
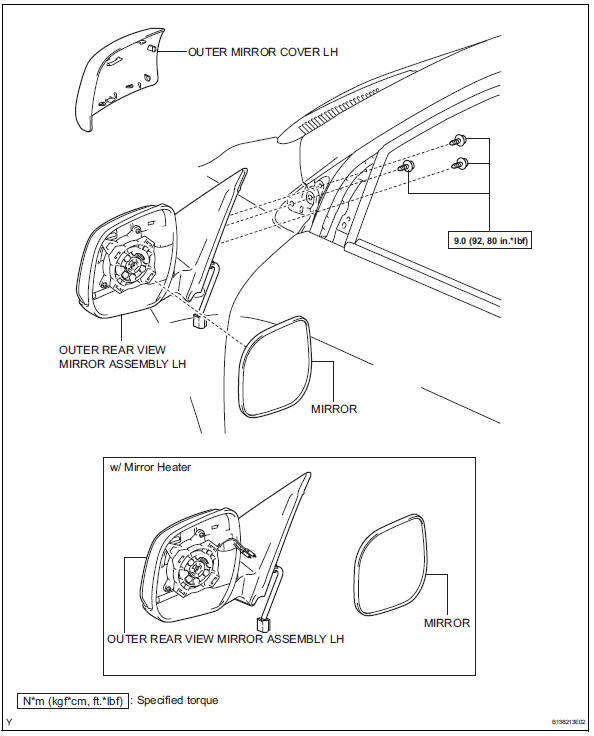
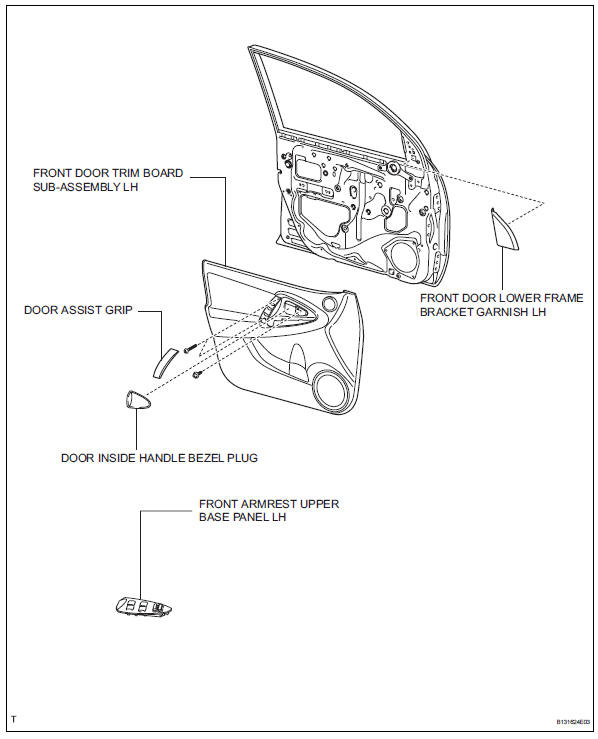
Removal Hint:
- Use the same procedures for the lh side and rh side.
- The procedures listed below are for the lh side.
- Remove front door lower frame bracket garnish lh (see page ed-19)
- Remove front armrest upper base panel lh (see page ed-19)
- Remove front door trim board subassembly lh (see page ed-20)
- Remove outer rear view mirror assembly lh
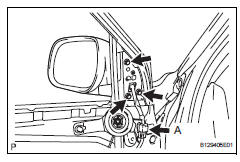
- Disconnect the mirror connector labeled a.
- Remove the 3 screws.
- Remove the outer rear view mirror.
- Remove outer mirror cover lh (w/ mirror heater)
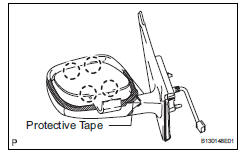
- Using a moulding remover, detach the 4 claws.
Apply protective tape to the mirror body.
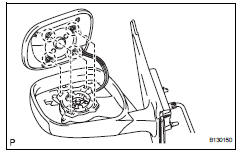
- Remove the 2 connectors and disconnect the mirror.

- Using a screwdriver, detach the 8 claws and remove the mirror cover.
Tape the screwdriver tip before use.
- Remove outer mirror cover lh (w/o mirror heater)
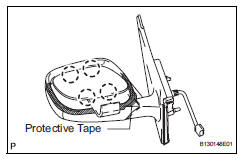
- Using a moulding remover, detach the 4 claws.
Apply protective tape to the mirror body.
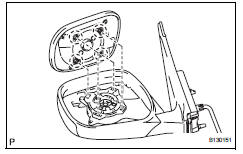
- Disconnect the mirror.
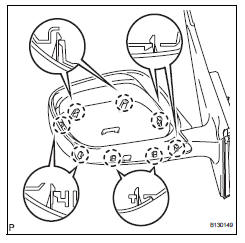
- Using a screwdriver, detach the 8 claws and remove the mirror cover.
Tape the screwdriver tip before use.
Inspection- Inspect outer rear view mirror assembly lh

- Disconnect the mirror connector.
- Apply battery voltage and check the operation of the mirror.
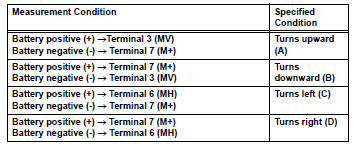
If the result is not as specified, replace the mirror assembly.
- W/ mirror heater:
Check the resistance.
- Measure the resistance between the terminals.
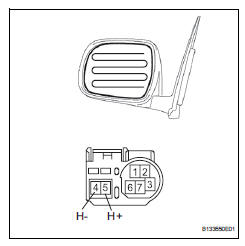
Standard resistance

If the result is not as specified, replace the outer rear view mirror.
- Connect the cable from the negative battery (-) terminal to terminal 5 and the positive battery (+) terminal to terminal 4, then check that the mirror becomes warm.
It takes a short time for the mirror to become warm.
If the result is not as specified, replace the outer rear view mirror.
- Inspect outer rear view mirror assembly rh

- Disconnect the mirror connector.
- Apply battery voltage and check the operation of the mirror.
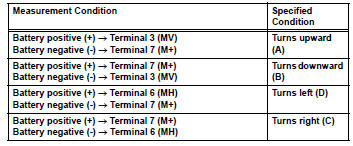
If the result is not as specified, replace the mirror assembly.
- W/ mirror heater:
Check the resistance.
- Measure the resistance between the terminals.

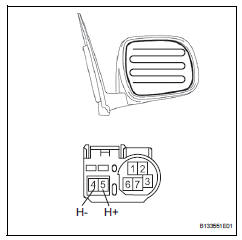
If the result is not as specified, replace the outer rear view mirror.
- Connect the cable from the negative battery (-) terminal to terminal 5 and the positive battery (+) terminal to terminal 4, then check that the mirror becomes warm.
It takes a short time for the mirror to become warm.
If the result is not as specified, replace the outer rear view mirror.
Installation- Install outer mirror cover lh
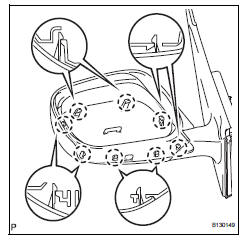
- Attach the 8 claws and install the mirror cover.
- After installing the outer mirror cover, check that there is no gap between the cover and mirror body.
If there is a gap between the cover and body, noise will occur during driving.
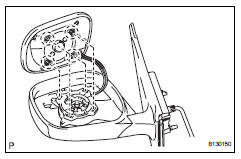
- W/ mirror heater: connect the 2 connectors. Attach the 4 claws to install the mirror.
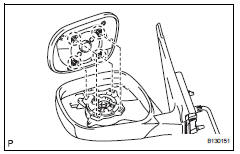
- W/o mirror heater: attach the 4 claws to install the mirror.
- Install outer rear view mirror assembly lh

- Pass the connector labeled a and wire harness of the mirror through the wire harness hole.
- Temporarily install the mirror by inserting the bosses on the mirror into the holes on the vehicle.
- Tighten the 3 screws in the sequence shown in the illustration and install the mirror.
- Install front door trim board subassembly lh (see page ed-33)
- Install front door lower frame bracket garnish lh (see page ed-35)
Test yourself
A quick Toyota RAV4 quiz: every answer comes with an explanation and a link to the manual page.