Engine hood / door
Disassembly
In this manual: Engine hood / door
56steps
~336min
4/5difficulty
Done 0 of 56
1. REMOVE REAR DOOR WINDOW FRAME MOULDING REAR LH (See page ET-31)
2. REMOVE REAR DOOR WINDOW FRAME MOULDING SUB-ASSEMBLY LH (See page ET-32)
3. REMOVE SLIDE DOOR WINDOW GARNISH LH
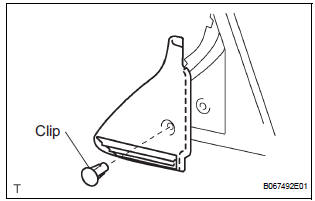
- Fully open the slide door window.
- Remove the glass run.
- Using a screwdriver, disengage the clip and remove the garnish.
HINT: Tape the screwdriver tip before use.
- Using a screwdriver, disengage the 2 claws and remove the weatherstrip inner from the garnish.
HINT: Tape the screwdriver tip before use.
4. REMOVE SIDE TRIM BOARD COVER REAR LH
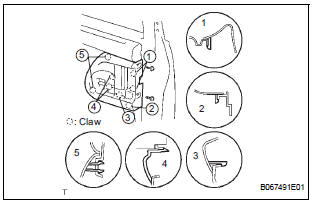
- Remove the 2 screws.
- Using a screwdriver, disengage the 8 claws and remove the cover together with the window control switch.
HINT: Tape the screwdriver tip before use.
- Remove the 2 screws and window control switch.
5. REMOVE REAR DOOR TRIM BOARD SUBASSEMBLY LH
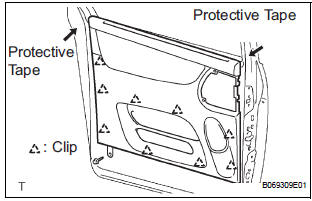
- Remove the screw.
- Using a screwdriver, disengage the 9 clips and remove the trim board.
HINT:
- Tape the screwdriver tip before use.
- In order to prevent the door panel from being damaged, cover the areas with protective tape as indicated by arrow marks in the illustration.
- Using a clip remover, remove the 6 clips and weatherstrip No. 2.
- Using a screwdriver, disengage the 11 claws and remove the weatherstrip inner from trim board.
HINT: Tape the screwdriver tip before use.
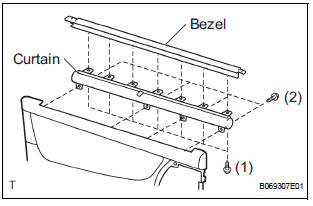
- w/ Sunshade: Remove the sunshade.
- Remove the 7 screws and sunshade bezel.
- Remove the 4 screws and curtain.
6. REMOVE SLIDE DOOR WINDOW ASSEMBLY LH
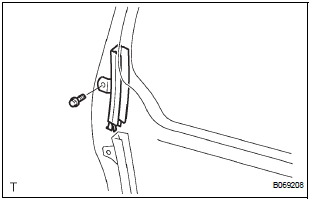
- w/ Sunshade: Remove the sun shade hook.
- Remove the bolt and window frame.
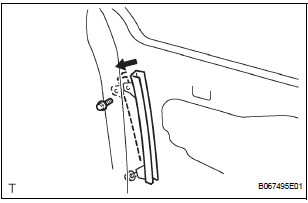
- Remove the bolt.
- Loosen the nut.
- Push the window frame rear lower in the direction indicated by the arrow mark in the illustration.
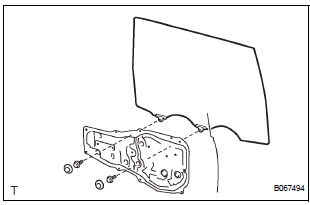
- Remove the 2 hole plugs.
- Move the window until the bolts appear in the service holes.
NOTICE:
- Do not damage the window.
- When the bolts are removed, the window may fall and become deformed.
- Remove the 2 bolts and window.
7. REMOVE REAR DOOR GLASS WEATHERSTRIP ASSEMBLY OUTER LH (See page ET-23)
8. REMOVE SLIDE DOOR ATTACHMENT CONTROL LH
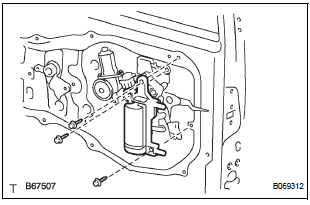
- Remove the 2 screws, bolt and inside handle.
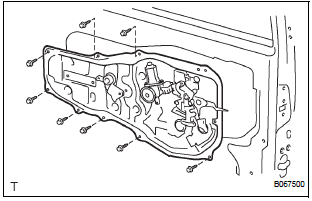
- Disconnect the connectors from the lock actuator, the power window regulator motor and lock release motor and power slide door lock.
- Disengage the control wires.
- Remove the 8 bolts and attachment control.
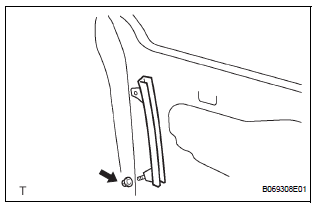
- Remove the nut and window frame rear lower.
NOTICE: When the nut is removed, the window frame may fall and become deformed.
HINT: Remove the window frame rear lower through the service hole.
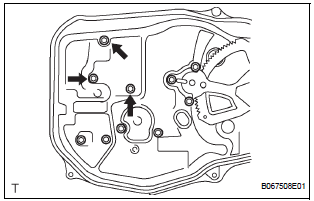
- Remove the control rod.
- Remove the 3 bolts and lock remote control.
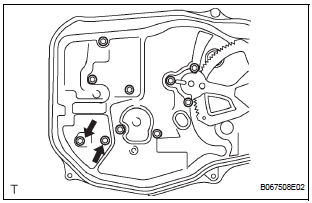
- Remove the 2 screws and lock actuator.
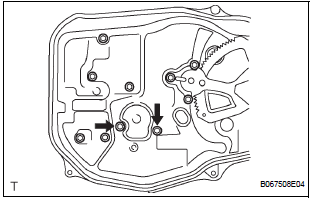
- Remove the 2 screws and lock release motor.
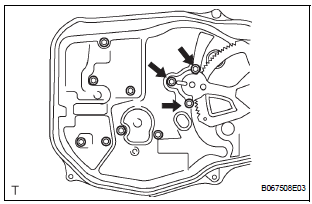
- Remove the 3 screws and power window regulator motor.
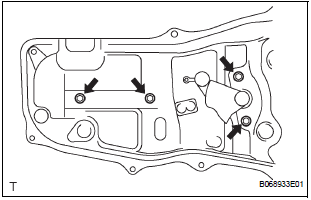
- Remove the half stop control lever and door lock control bellcrank.
- Remove the 4 bolts and the window regulator.
9. REMOVE REAR DOOR OUTSIDE HANDLE COVER LH

- Remove the outside handle hole cover.
- Using a torx socket wrench (T30), loosen the screw and remove the outside handle cover with the lock key cylinder installed
10. REMOVE REAR DOOR OUTSIDE HANDLE ASSEMBLY LH
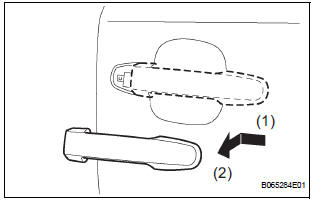
- Pushing and pulling the outside handle in the direction indicated by the arrow mark in the illustration, remove the outside handle.
- Remove the outside handle pads front and rear.
11. REMOVE REAR DOOR OUTSIDE HANDLE FRAME SUB-ASSEMBLY LH
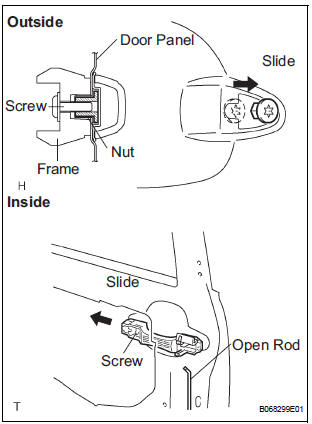
- Remove the open rod to the outside handle frame.
- Using a torx socket wrench (T30), loosen the screw.
- Slide the outside handle frame in the direction indicated by the arrow mark in the illustration and remove it.
HINT: Remove the outside handle frame through the service hole.
12. REMOVE POWER SLIDE DOOR CONTROL MOTOR AND CLUTCH
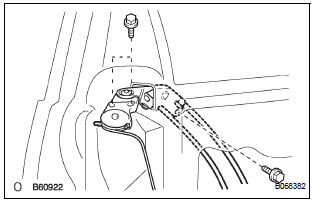
- Remove the 3 bolts from the upper part of the control motor and clutch.
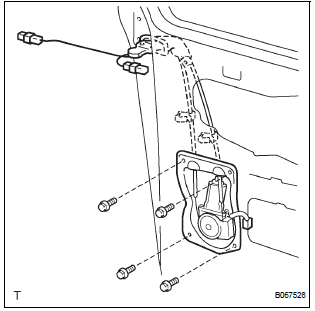
- Remove the 2 clips and 4 bolts from the lower part of the control motor and clutch.
- Remove the control motor and clutch.
HINT: Remove the motor and clutch through the service hole.
13. REMOVE REAR DOOR STIFFENER CUSHION LH
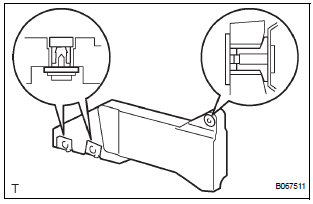
- Remove the 2 screws, clip and stiffener cushion.
HINT: Remove the stiffener cushion through the service hole.
- Remove the 2 grommets and 2 clips.
14. REMOVE SLIDE DOOR LOCK ASSEMBLY FRONT LH

- Disconnect the 2 cables.
- Using a torx socket wrench (T30), remove the 3 screws and lock.
HINT: Remove the lock front through the service hole.
15. REMOVE POWER SLIDE DOOR LOCK ASSEMBLY LH
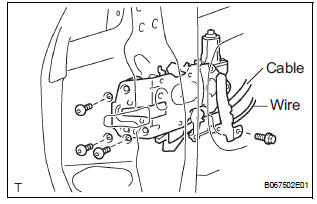
- Disconnect the cable and wire.
- Using a torx socket wrench (T30), remove the 3 screws.
- Remove the bolt and lock.
HINT: Remove the lock through the service hole.
16. REMOVE REAR DOOR WIRE SUB-ASSEMBLY LH
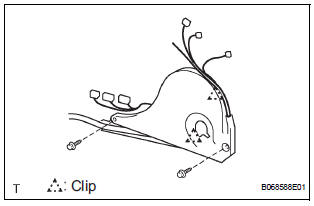
- Remove the 2 screws.
- Using a screwdriver, remove the 2 clips and wire.
HINT: Tape the screwdriver tip before use.
17. REMOVE POWER SLIDE DOOR ECU LH
- Remove the 2 screws and power slide door ECU with the warning buzzer.
- Disengage the claw and remove the warning buzzer.
18. REMOVE POWER SLIDE DOOR TOUCH SENSOR LH
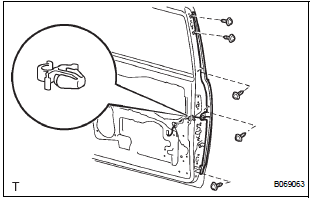
- Disconnect the connector.
- Remove the 5 screws and touch sensor.
Test yourself
A quick Toyota Sienna quiz: every answer comes with an explanation and a link to the manual page.
Was this page helpful?