Installation
1. INSTALL HEATED OXYGEN SENSOR (for Bank 2 Sensor 2) (See page EC-39) 2. INSTALL FRONT EXHAUST PIPE ASSEMBLY
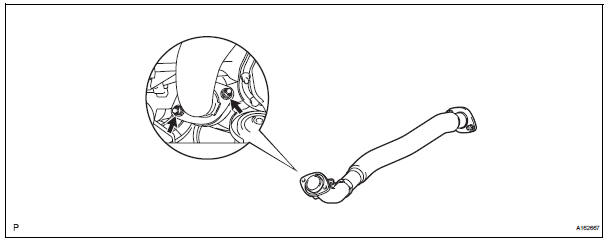
(a) Install a new gasket to the front exhaust pipe assembly.
(b) Install the front exhaust pipe assembly with the 2 nuts.
Torque: 62 N*m (632 kgf*cm, 46 ft.*lbf)
3. V
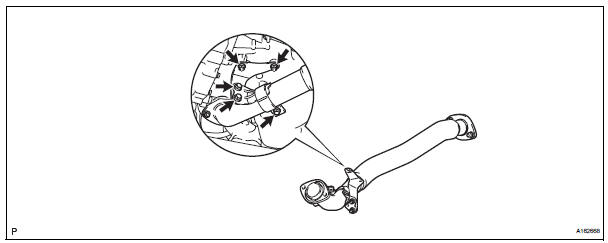
V(A) install 2 new gaskets to the center exhaust pipe assembly.
(B) connect the 2 exhaust pipe supports, and install the center exhaust pipe assembly.
(C) install 2 new bolts and 2 nuts.
Torque: bolt 43 n*m (438 kgf*cm, 32 ft.*Lbf) nut 62 n*m (632 kgf*cm, 46 ft.*Lbf)

4. Install no. 1 Exhaust pipe support bracket
(a) Install the No. 1 exhaust pipe support bracket to oil pan sub-assembly with 2 new nuts.
Torque: 21 N*m (214 kgf*cm, 15 ft.*lbf) (b) Loosen the No. 1 exhaust pipe support bracket bolts.
(c) Install the clamp to No. 1 exhaust pipe support bracket.
(d) Retighten the No. 1 exhaust pipe support bracket bolts.
Torque: 21 N*m (214 kgf*cm, 15 ft.*lbf) (e) Install the clamp with a new bolt.
Torque: 21 N*m (214 kgf*cm, 15 ft.*lbf)
(f) Connect the heated oxygen sensor (for bank 2 sensor 2) connector.
5. INSTALL TAIL EXHAUST PIPE ASSEMBLY
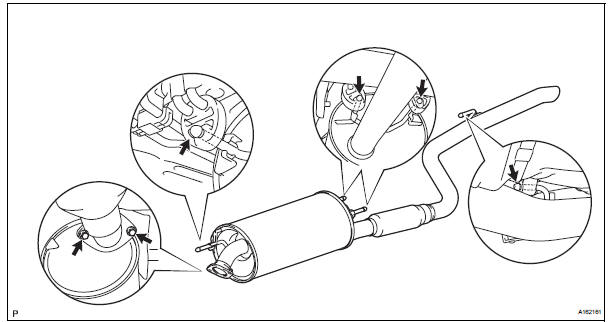
(a) Install a new gasket to the center exhaust pipe assembly.
(b) Connect the 4 exhaust pipe supports, and install the tail exhaust pipe assembly.
(c) Install 2 new bolts.
Torque: 43 N*m (438 kgf*cm, 32 ft.*lbf)
6. INSTALL HEATED OXYGEN SENSOR (for Bank 1 Sensor 2) (See page EC-41)
7. CONNECT CABLE TO NEGATIVE BATTERY TERMINAL
8. INSPECT FOR EXHAUST GAS LEAK
If exhaust gas is leaking, repair the leak. Replace damaged parts as necessary.
Test yourself
A quick Toyota Sienna quiz: every answer comes with an explanation and a link to the manual page.