Seat belt
Removal
In this manual: Seat belt
9steps
~54min
2/5difficulty
Done 0 of 9
1. REMOVE REAR DOOR SCUFF PLATE
2. REMOVE REAR DOOR WEATHERSTRIP
3. REMOVE BACK DOOR WEATHERSTRIP
4. REMOVE BACK DOOR SCUFF PLATE
5. REMOVE FRONT QUARTER TRIM PANEL ASSEMBLY
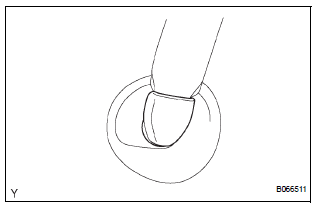
- Remove the floor anchor cover.
- Remove the bolt and disconnect the No. 2 rear seat outer belt assembly on the floor anchor side.
- Remove the 2 package holder net hooks.
- Using a screwdriver, disengage the claw and remove the courtesy light.
- Disconnect the courtesy light connectors.
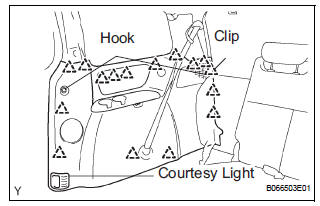
- Using a screwdriver, disengage the 16 clips and remove the quarter trim panel assembly.
HINT: Tape the screwdriver tip before use.
6. REMOVE REAR WINDOW SIDE GARNISH ASSEMBLY
7. REMOVE NO. 1 REAR SEAT OUTER BELT ASSEMBLY (for 7-Passenger)
HINT: Refer to the instructions for disassembly of the rear No. 1 seat assembly (for captain seat type).
- Remove the rear seatback board RH.
- Remove the rear seat shoulder belt cover.
- Remove the bolt, nut and No. 1 rear seat outer belt assembly.
8. REMOVE 3 POINT TYPE REAR SEAT BELT ASSEMBLY (for 8-Passenger)
- Remove the nut and disconnect the 3 point type rear seat belt on the shoulder anchor side.
9. REMOVE NO. 2 REAR SEAT OUTER BELT ASSEMBLY
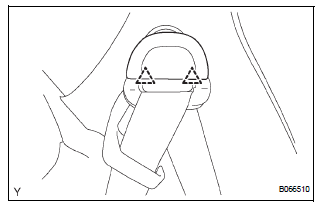
- Using a screwdriver, disengage the 2 claws and remove the cover of the No. 2 rear seat outer belt assembly on the shoulder anchor side.
HINT: Tape the screwdriver tip before use.
Test yourself
A quick Toyota Sienna quiz: every answer comes with an explanation and a link to the manual page.
Was this page helpful?