Front Lower Suspension Arm(when Using The Engine Support Bridge)
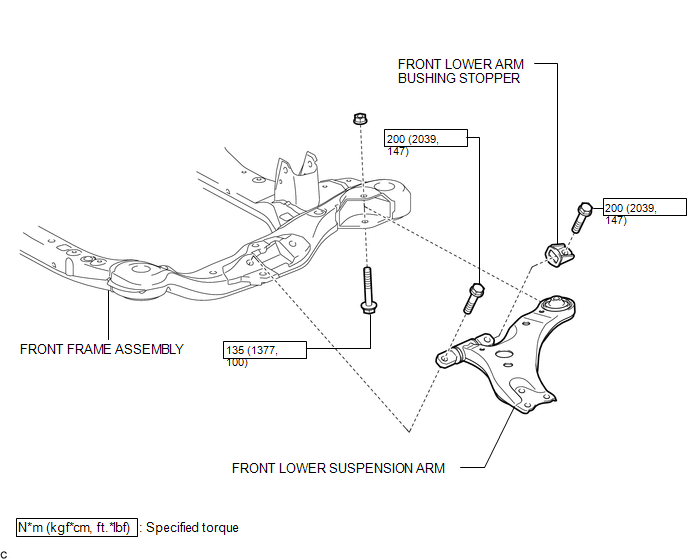
Removal REMOVAL CAUTION / NOTICE / HINT
HINT:
- Use the same procedure for the LH side and RH side.
- The following procedure is for the LH side.
1. REMOVE FRONT FRAME ASSEMBLY
for 1AR-FE: (See page  )
for 2GR-FE: (See page )
2. REMOVE FRONT LOWER SUSPENSION ARM
(a) Remove the 3 bolts, nut and front lower suspension arm from the front frame assembly. |
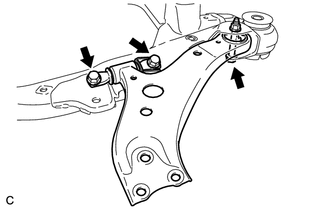 |
(b) Remove the front lower arm bushing stopper from the front lower suspension arm.
Installation INSTALLATION CAUTION / NOTICE / HINTHINT:
- Use the same procedure for the LH side and RH side.
- The following procedure is for the LH side.
1. INSTALL FRONT LOWER SUSPENSION ARM
(a) Install the front lower arm bushing stopper to the front lower suspension arm.
(b) Temporarily tighten the front lower suspension arm to the front frame assembly with the 3 bolts and nut.
(c) Tighten the 3 bolts in the order shown in the illustration. Torque: Bolt 1, 2 : 200 N·m {2039 kgf·cm, 147 ft·lbf} Bolt 3 : 135 N·m {1377 kgf·cm, 100 ft·lbf} HINT: Start installing the bolts from the front of the vehicle. |
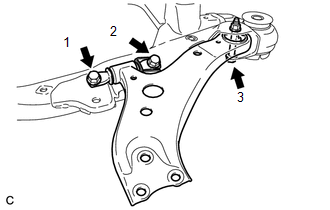 |
2. INSTALL FRONT FRAME ASSEMBLY
for 1AR-FE: (See page  )
for 2GR-FE: (See page )
Test yourself
A quick Toyota Venza quiz: every answer comes with an explanation and a link to the manual page.