Reassembly
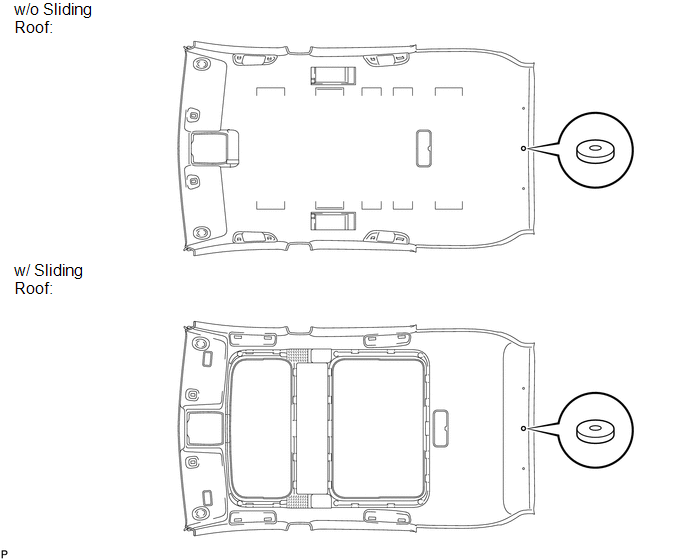
1. INSTALL NO. 14 ROOF SILENCER PAD
(a) Align the markings on the roof headlining assembly with the No. 14 roof silencer pad and install the silencer pad using hot-melt glue as shown in the illustration.
2. INSTALL NO. 1 ROOF WIRE (w/o Sliding Roof)
(a) Install the No. 1 roof wire.
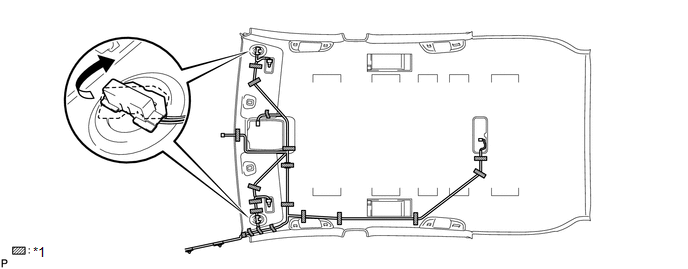 Text in Illustration
*1 |
Adhesive Tape |
- |
- |
(b) Turn the visor connectors clockwise approximately 90° to install the connectors to the roof headlining assembly.
(c) Apply adhesive tape to the locations shown in the illustration.
HINT:
As shown in the illustration, line up and secure the reference tape of the wire harness to the tip of the roof headlining assembly.
3. INSTALL NO. 1 ROOF WIRE (w/ Sliding Roof)
(a) Install the No. 1 roof wire.
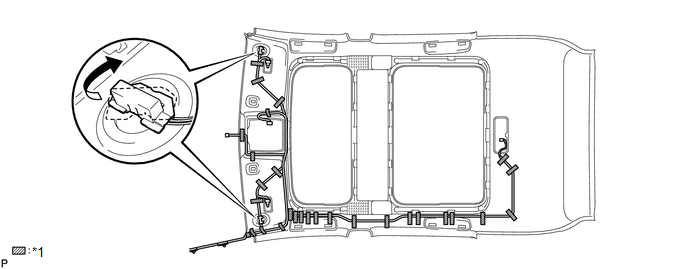 Text in Illustration
*1 |
Adhesive Tape |
- |
- |
(b) Turn the visor connectors clockwise approximately 90° to install the connectors to the roof headlining assembly.
(c) Apply adhesive tape to the locations shown in the illustration.
HINT:
As shown in the illustration, line up and secure the reference tape of the wire harness to the tip of the roof headlining assembly.
4. INSTALL NO. 2 ROOF SILENCER PAD (w/o Sliding Roof)
(a) Align the markings on the roof headlining assembly with the 2 No. 2 roof silencer pads and install the silencer pad using hot-melt glue or double-sided tape as shown in the illustration.
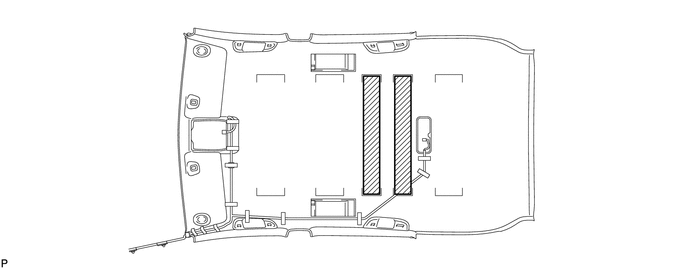
5. INSTALL NO. 3 ROOF SILENCER PAD (w/o Sliding Roof)
(a) Align the markings on the roof headlining assembly with the 3 No. 3 roof silencer pads and install the silencer pad using hot-melt glue or double-sided tape as shown in the illustration.
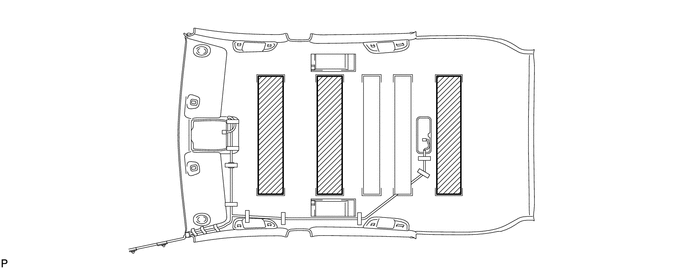
6. INSTALL FRONT SIDE RAIL SPACER LH (w/o Sliding Roof)
(a) Align the markings on the roof headlining assembly with the roof side rail spacer LH and install the spacer using hot-melt glue as shown in the illustration.
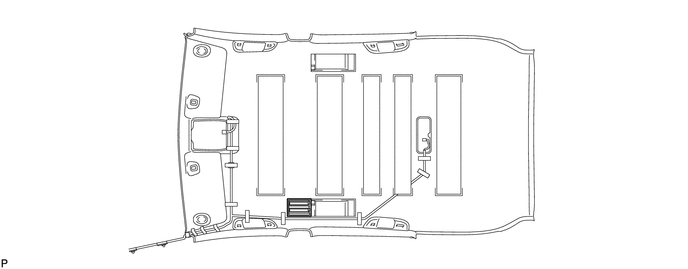
7. INSTALL FRONT SIDE RAIL SPACER RH (w/o Sliding Roof)
HINT:
Use the same procedure for the RH side and the LH side.
8. INSTALL VANITY LIGHT ASSEMBLY
(a) Install the vanity light assembly (See page  ).
HINT:
Use the same procedure for the RH side and the LH side.
9. INSTALL NO. 2 ANTENNA CORD SUB-ASSEMBLY (w/o Sliding Roof)
10. INSTALL NO. 2 ANTENNA CORD SUB-ASSEMBLY (w/ Sliding Roof)
Test yourself
A quick Toyota Venza quiz: every answer comes with an explanation and a link to the manual page.