Fuel supply system - Petrol engines
Assembly overview - fuel tank, vehicles with fuel tank leak detection
In this manual: Fuel supply system - Petrol engines
~1min read
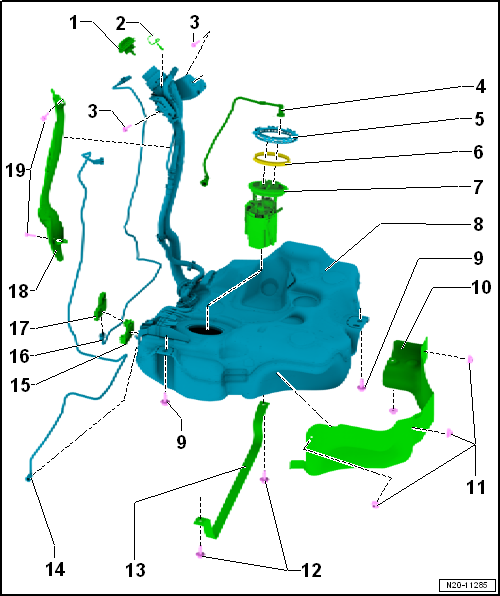
| 1 - | Cap |
Screw in until engages audibly
Secured to tank flap unit by means of retaining strap.
| 2 - | Earth connection |
For fuel filler neck
| 3 - | Bolt |
Renew after removing
8 N·m + 90°
| 4 - | Fuel supply line |
Clipped onto fuel tank
Do not kink
To pull off, press release button on connection.
Plug-in connectors must engage »audibly« when joined.
Ensure plug-in connector is secured properly by pulling it.
Disconnect plug-in connectors → Chapter
| 5 - | Locking ring |
110 N·m
| 6 - | Seal |
Renew.
Install dry.
| 7 - | Fuel delivery unit |
Assembly overview → Chapter.
Removing and installing → Chapter.
With fuel gauge sender -G-.
Removing and installing fuel gauge sender -G- → Chapter.
With fuel system pressurisation pump -G6-.
Checking fuel system pressurisation pump -G6- → Chapter.
| 8 - | Fuel tank |
Removing and installing → Chapter.
| 9 - | Bolt |
Renew after removing
20 N·m + 90°
| 10 - | Heat shield |
For fuel tank
| 11 - | Panel nut |
For heat shield.
| 12 - | Bolt |
Renew after removing
20 N·m + 90°
| 13 - | Securing strap |
Ensure proper seating.
Mark direction of travel when removing.
| 14 - | Breather line |
To activated charcoal filter solenoid valve 1 -N80-
| 15 - | Bracket |
For control unit for fuel tank leak detection -J909-.
| 16 - | Connecting cable |
For control unit for fuel tank leak detection -J909-.
| 17 - | Control unit for fuel tank leak detection -J909- |
| 18 - | Protective plate |
| 19 - | Rivets |
For securing protective plate
Test yourself
A quick Volkswagen Golf quiz: every answer comes with an explanation and a link to the manual page.
Was this page helpful?