Lamps and Switches in Roof Trim Panel
Front Interior and Reading Lamps
General Information
The following components are integrated in the front interior and reading lamps:
- Front Interior Lamp -W1-
- Front Passenger Reading Lamp -W13-
- Driver Reading Lamp -W19-
- Depending on the vehicle equipment level, the Sunroof Switch -E8-
- Depending on the vehicle equipment level and the model year, the interior monitoring sensor with the vehicle inclination sensor
Front Interior and Reading Lamp, Removing and Installing, Vehicles with Panorama Sunroof.
Front Passenger Reading Lamp -W13- and Driver Reading Lamp -W19-, Replacing.Front Interior and Reading Lamp, Removing and Installing, Vehicles without Panorama Sunroof
Special tools and workshop equipment required
- Trim Removal Wedge -3409-
Note
When removing and installing components in visible area (switches, covers, trim, etc.), cover by taping the areas at which a prying tool (Trim Removal Wedge -3409-, screwdriver) will be positioned using commercially available adhesive tape.
Removing
- Deactivate the anti-theft alarm system.
- Switch off the ignition and all electrical consumers and remove the ignition key.
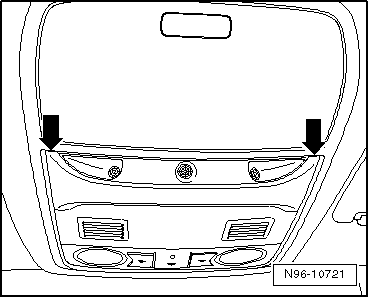
- Pry off the trim using Trim Removal Wedge -3409--arrows-.
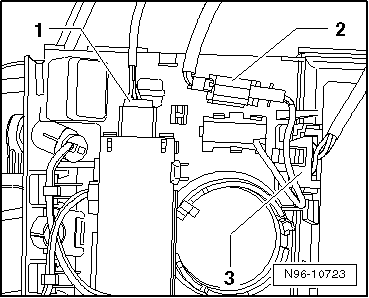
- Remove both screws -1- and pull the interior lamp out of the roof.

- Disconnect the connectors -1-, -2- and -3- depending on the vehicle equipment level.
- Remove the front interior and reading lamp.
Installing
Install in reverse order of removal.
Front Interior and Reading Lamp, Removing and Installing, Vehicles with Panorama Sunroof
Special tools and workshop equipment required
- Trim Removal Wedge -3409-
Note
When removing and installing components in visible area (switches, covers, trim, etc.), cover by taping the areas at which a prying tool (Trim Removal Wedge -3409-, screwdriver) will be positioned using commercially available adhesive tape.
Removing
- Switch off the ignition and all electrical consumers and remove the ignition key.
- Pry off the trim -1- using the Trim Removal Wedge -3409--arrows-.

- Remove both screws -arrows- and pull the interior lamp out of the roof.

- Depending on the vehicle equipment level, disconnect all the connectors -arrows-.
- Remove the front interior and reading lamp.

Installing
Install in reverse order of removal.
Front Passenger Reading Lamp -W13- and Driver Reading Lamp -W19-, Replacing
Special tools and workshop equipment required
- Trim Removal Wedge -3409-
Note
When removing and installing components in visible area (switches, covers, trim, etc.), cover by taping the areas at which a prying tool (Trim Removal Wedge -3409-, screwdriver) will be positioned using commercially available adhesive tape.
Removing
- Remove the front interior and reading lamp:
Vehicles without Panorama Sunroof.
Vehicles with Panorama Sunroof.
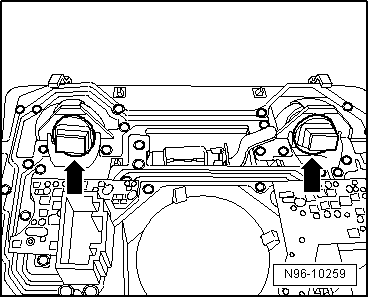
- Rotate the lamp socket -arrows- of the malfunctioning reading lamp 90º to the left.
- Remove the socket with the bulb from the reading lamp.
- Carefully pull the glass base bulb straight out of the bulb socket.
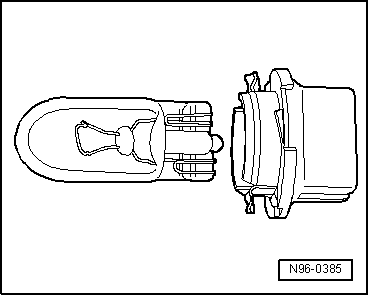
Reading lamp bulb: glass base bulb 12V, 5W
Installing
Install in reverse order of removal.
Window Shade and Sunroof Button -E437-
Window Shade and Sunroof Button -E437-, Removing and Installing
The Window Shade and Sunroof Button -E437- is installed in the front interior and reading lamp.
Removing
- Remove the front interior and reading lamp.
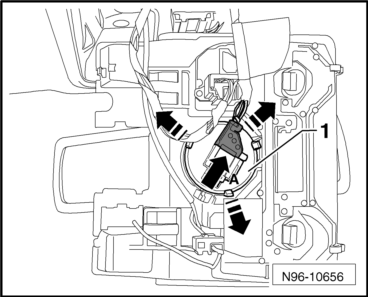
- Disconnect the connector -arrow A-.
- Open the tabs -arrows- and remove the button -1- from the frame.
Installing
Install in reverse order of removal.
Rear Interior and Reading Lamps
General Information
The following components are integrated in the rear interior and reading lamps:
- Rear Interior Lamp -W43-
- Left Rear Reading Lamp -W11-
- Right Rear Reading Lamp -W12-
Note
Interior and reading lamps and the switches for the interior and reading lamps are integrated with each other and cannot be serviced or replaced separately. In the event of malfunction, the entire assembly must be replaced.
Rear Interior and Reading Lamp, Removing and Installing
Special tools and workshop equipment required
- Trim Removal Wedge -3409-
Note
When removing and installing components in visible area (switches, covers, trim, etc.), cover by taping the areas at which a prying tool (Trim Removal Wedge -3409-, screwdriver) will be positioned using commercially available adhesive tape.
Removing
- Switch off the ignition and all electrical consumers and remove the ignition key.
- Release the tabs -arrows- using the Rear Window Wiper Motor -V12- or a suitable screwdriver and remove the interior and reading lamp from the roof trim panel. Pay attention to the wires still connected.
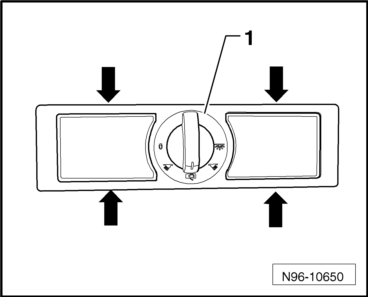
- Disconnect the connector -arrow- and remove the interior- and reading lamp.

Installing
Install in reverse order of removal.
Rear Interior and Reading Lamp Bulbs, Replacing
Note
Changing a bulb in the rear interior and reading light is the same for both bulbs.
Removing
- Remove the rear interior and reading lamp.
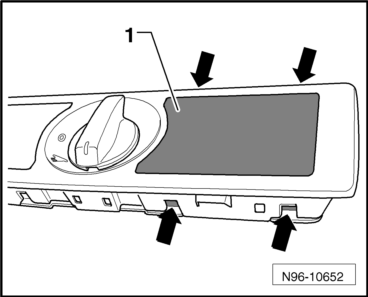
- Release the four tabs -arrows- and remove the diffusion lens -1- straight upward from the interior and reading lamp.
- Remove the bulb -1- from the socket.
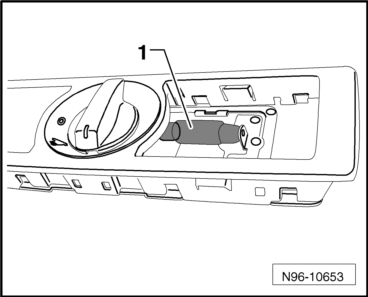
Rear interior and reading lamp bulbs: tubular bulb 12V, 5W
Installing
Install in reverse order of removal.
Right Interior Lamp -W17-
Right Interior Lamp -W17-, Removing and Installing
Special tools and workshop equipment required
- Trim Removal Wedge -3409-
Note
When removing and installing components in visible area (switches, covers, trim, etc.), cover by taping the areas at which a prying tool (Trim Removal Wedge -3409-, screwdriver) will be positioned using commercially available adhesive tape.
Removing
- Switch off the ignition and all electrical consumers and remove the ignition key.
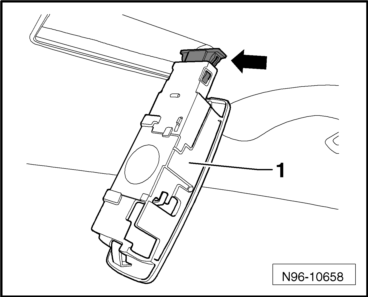
- Remove the Right Interior Lamp -W17--1- from the roof trim panel using Trim Removal Wedge -3409- or a screwdriver. Pay attention to the wires still connected.

- Disconnect the connector -arrow- and remove the Right Interior Lamp -W17--1-.
Installing
Install in reverse order of removal.
Right Interior Lamp -W17- Bulb, Replacing
Removing
- Remove the Right Interior Lamp -W17-.
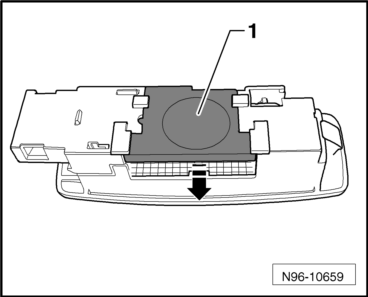
- Slide the cover -1- off of the Right Interior Lamp -W17- in the direction of -arrow-.
- Remove the tubular bulb -1- from the Right Interior Lamp -W17-.
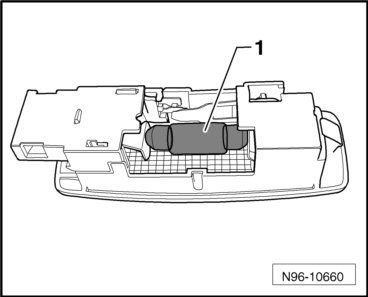
Right Interior Lamp -W17- bulb: tubular bulb 12V, 5W
Installing
Install in reverse order of removal.
Illuminated Vanity Mirror Bulb
Illuminated Vanity Mirror Bulb, Removing and Installing
Special tools and workshop equipment required
- Trim Removal Wedge -3409-
The lamps for the Front Passenger Vanity Mirror Lamp -W14- and Driver Vanity Mirror Lamp -W20- are installed inside the roof trim panel behind the sun visors.
Note
- When removing and installing components in visible area (switches, covers, trim, etc.), cover by taping the areas at which a prying tool (Trim Removal Wedge -3409-, screwdriver) will be positioned using commercially available adhesive tape.
- Removal and installation for both lights is performed in the same way and is only described for one light.
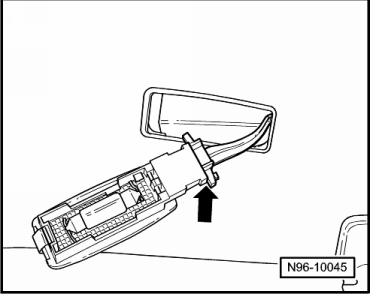
- Switch off the ignition and all electrical consumers and remove the ignition key.
- Remove the lamp from the roof trim panel using Trim Removal Wedge -3409- or a screwdriver.
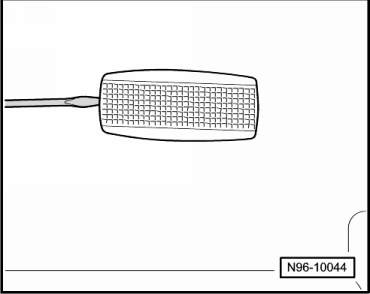
- Disconnect the connector -arrow-.
- Remove the lamp.
Installing
Install in reverse order of removal.
Illuminated Vanity Mirror Bulb, Replacing
The lamps for the Front Passenger Vanity Mirror Lamp -W14- and Driver Vanity Mirror Lamp -W20- are installed inside the roof trim panel behind the sun visors.
Note
- When removing and installing components in visible area (switches, covers, trim, etc.), cover by taping the areas at which a prying tool (Trim Removal Wedge -3409-, screwdriver) will be positioned using commercially available adhesive tape.
- Removal and installation for both lights is performed in the same way and is only described for one light.
Removing
- Remove the vanity mirror lamp bulb.
- Press the contact plate -1- in the direction of -arrow- and remove the tubular bulb -2- from the lamp.
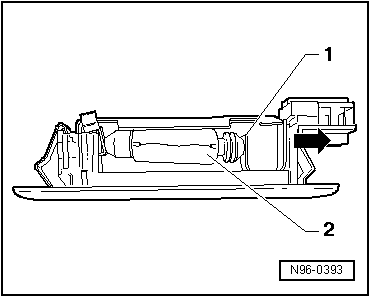
Illuminated vanity mirror bulb: tubular bulb 12V, 5W
Installing
Install in reverse order of removal.
Test yourself
A quick Volkswagen Tiguan quiz: every answer comes with an explanation and a link to the manual page.