Rear Door Window
Tools
Special tools and workshop equipment required
- Torque Wrench 1331 5-50Nm -VAG1331-
- Torque Wrench 1783 - 2-10Nm -VAG1783-
- Window Strip Roller -T10314-
- Trim Removal Wedge -3409-
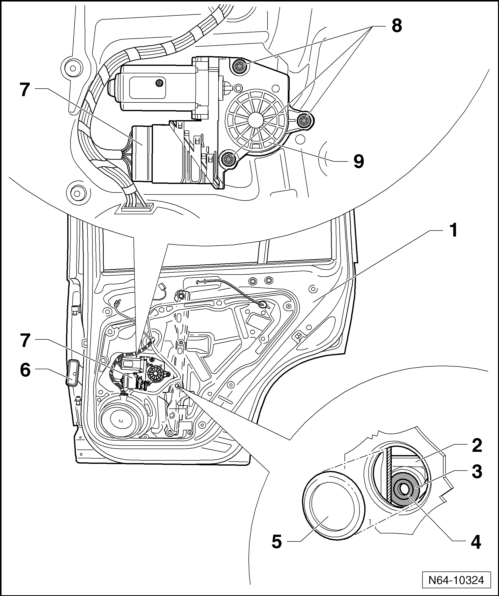
Overview
Note
The illustration shows the right side. The left side is identical.
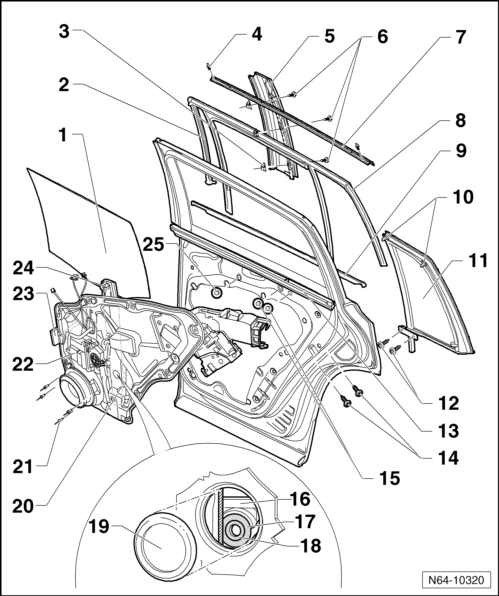
- Door Window
- Removing and installing
- Adhesive Tape
- On the window guide -8-, taped with the trim -5-
- Spring Nut
- Quantity: 3
- Clip
- For attaching the trim strip in the window guide.
- Quantity: 2
- Trim
- Removing.
- Screw
- 2 N·m
- Quantity: 3
- Trim Strip
- Placed into window guide.
- Removing.
- Window Guide
- Inserted on flange.
- Removing and installing.
- Version with and without trim strip.
- Outer Window Shaft Seal
- Inserted on flange.
- Version with and without trim strip.
- Removing.
- Centering Pin
- Fixed Door Window
- Bolt
- 8 N·m
- Quantity: 2
- Inner Window Shaft Seal
- Inserted on flange.
- Bolt
- 20 N·m
- For door lock.
- Quantity: 2
- Cap
- For the fixed door window bolts
- Clamping Brackets
- Expanding Pin
- Door window retainer
- Spreader Plug
- Door window retainer
- Cap
- Subframe
- Rivet
- Quantity: 3
- For the speaker
- Window Regulator Motor
- Connector
- Window Regulator
- Cap
Door Window, Removing and Installing
Note
The following describes removing and installing the right rear door window. Removing and installing the left rear door window is identical.
Window Shaft Seal, Removing
Note
The window shaft seal must not be bent when removing.
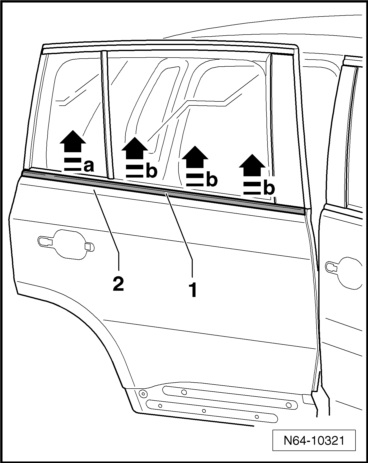
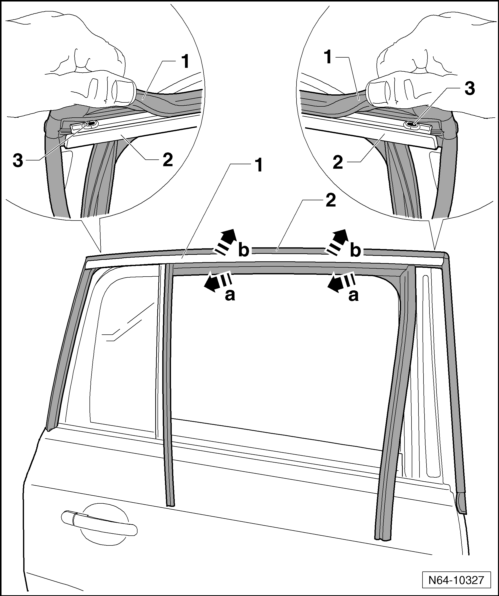
- Begin at the rear area -arrow a- and carefully lift the window shaft seal -1-.
- Remove the window shaft seal -1- evenly -b arrows- from the door flange -2-.
Window Shaft Seal, Installing
- With uniform pressure being applied from above, press the window shaft seal onto the door flange by hand.
Trim, Removing
Note
- The window guide seal -2- is attached to the trim -1- with two-sided adhesive tape.
- If the adhesive tape is damaged, then a new window guide must be installed.
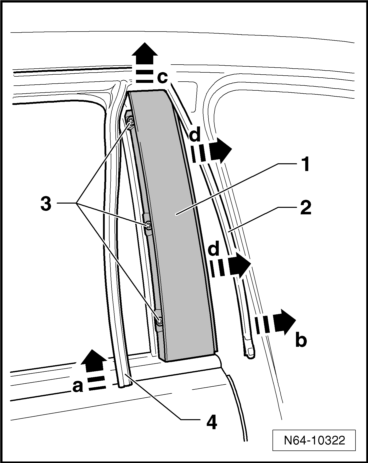
- Remove the window guide -4- from the mount -arrow a-.
- Pull off seal of window guide -2- carefully from the trim panel -arrow b-.
- Remove the screws -3- and pull the trim -1- under the window shaft strip upward -arrows c-.
- Pull the trim -1- in the direction of the B-pillar -arrows d-.
Trim, Installing
Note
Inspect the spring clamps -5-, the seal -3- and the adhesive tape -4- for damage and completeness. Replace parts if necessary.
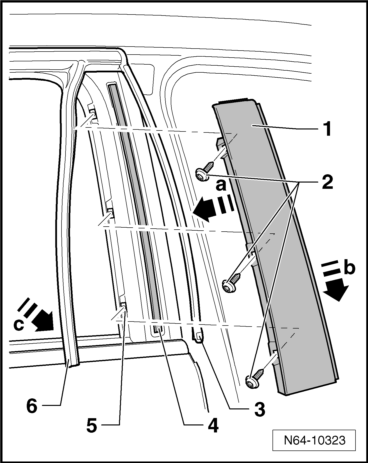
- Slide the trim -1- in -arrow a- on to the window frame.
- Press the trim downward -arrow b- behind the window shaft seal.
- Tighten the screws -2- (tightening specification: 2 N·m).
- Place the window guide -6- into the bracket -arrow c-.
- Coat the existing adhesive tape with Rubber Seal Adhesive - D 002 100-.
- Press the window guide seal -3- evenly on to trim.
Door Window, Removing
- The window shaft seal is removed.
- The time is removed.
- Remove the rear door trim panel.
- Pry the caps -5- out.
- Lower door window until spreader pin -4- and spreader plug -3- are accessible in window regulator cut-out.
Note
If the work step is not possible due to a malfunction via the electrical window regulator, then the window regulator -9- can be disconnected -8-, in order to push the window down.
- Install a 5 mm bolt (approximately. 70 mm long) into the spreader pin -4- and pull bolt out of spreader plug -2-.
- Screw a 8 mm bolt (approximately. 80 mm long) into spreader plug -3-.
Note
- When screwing the bolt into spreader plug, do not use excessive force on the plug otherwise it may fall inside into the door.
- Pull the spreader plug -3- out of the window guide -2- and out of door window.
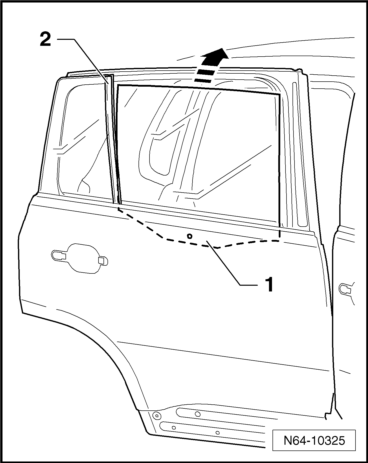
- Pull door window -1- upward -arrow- at an angle toward vehicle exterior out of window recess and window frame -2-.
Door Window, Installing
Note
- For reasons of clarity, the subframe is not depicted in the illustration.
- Spreader plug and spreader pin must always be replaced when performing assembly work on door window.
- Before inserting spreader plug -2- and spreader pin -1-, check window -3- for damage.

- Center the spreader plug -2- and insert it with the window -3- removed.
- Press spreader pin -1- flush into spreader plug -2-.
- Guide door window -3- into door and insert door window into slot of window regulator guide -4-.
- Using a light pressure from above -arrow-, engage window -3- into window regulator -4-.
- Continue by performing the steps used in removal in reverse order.
A function test must be performed before door trim is installed.
Window Regulator Motor, Removing and Installing
Note
The following describes removing and installing the right window regulator motor. Removing and installing the left window regulator motor is identical.
Removing
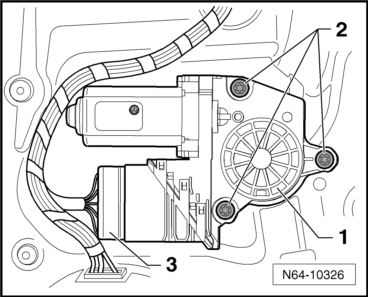
Remove the door trim panel.
- Fix window using adhesive tape so that it does not slip down.
- Remove the three screws -2-.
- Disconnect the connector -3-.
- Remove window regulator motor with control module -1- from subframe.
Installing
- Place window regulator motor on and pull door window lightly up and down so that splines are located better between motor and cable drum.
Tightening specification for window regulator motor screws: 3,5 N·m
Note
Close the doors to perform the adaptation procedures.
- Drive window regulator twice upward and downward to stop. By doing this, window regulator motor is normed and ready for operation and activates pinch protection.
- Continue by performing the steps used in removal in reverse order.
Window Guide, Removing and Installing
Window Guide, Removing
Note
- The window guide seal -2- is attached to the trim -1- with two-sided adhesive tape.
- If the adhesive tape is damaged, then a new window guide must be installed.
For Window Guides with Trim Strip
- Push window guide -1- in upper front and rear area slightly to side.
- Remove both clips -3-.
All Window Guides
- Fold seal of window guide -1- from inside from window frame.
- Pull window guide in upper area evenly from door flange -arrow a-.
- Carefully loosen the window guide adhesive strip from the trim.
- Pull window guide diagonally upward -b arrows- out of door.
Installing
Install in reverse order of removal.
- Coat the existing adhesive tape with Rubber Seal Adhesive - D 002 100-.
A function test must be performed before door trim is installed.
Note
While installing window guide, make sure it is seated evenly (wind noise).
Window Guide Trim Strip, Removing and Installing
Removing
- Remove the trim.
- Push window guide -2- in upper front and rear area slightly to side.
- Remove both clips -3-.
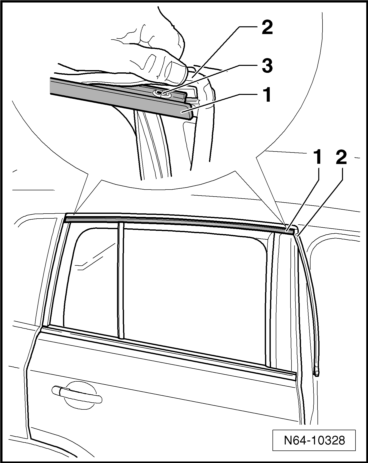
- Guide the Trim Removal Wedge -3409--3- in carefully between the trim strip -1- and the window guide -2-.
- Slide the Trim Removal Wedge -3409- forward evenly between the trim strip -1- and window guide -2-.
Installing
- Spray a soap and water solution on the window guide.
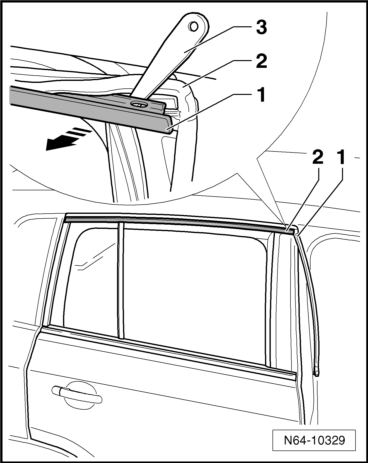
- Press the trim strip -1- by hand evenly -arrow- into the window guide -2-.
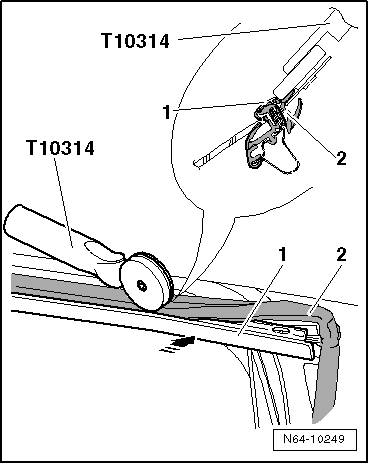
- Then press the window guide correctly into the trim strip mount using the Window Strip Roller -T10314-.
Installation is performed in reverse order of the removal.
Fixed Door Window, Removing and Installing
Removing
- Remove the door trim panel.
- Remove the window guide.
- Remove the trim.
Window recess seal.
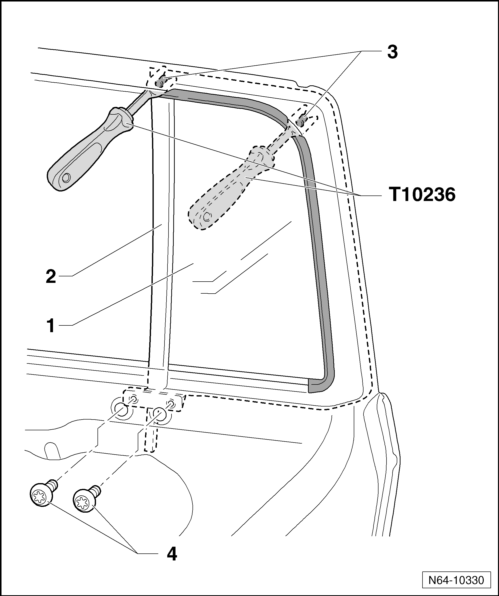
- Remove the bolt -4-.
- Remove the clips using the Window Release Tool - T10236-.
- Remove the door window glass -1- together with the brace -2-.
Installing
Note
Inspect the clips for damage and replace the fixed door window if necessary.
- Place the door window glass in the installation position.
- Press the glass onto the door until the clips audibly latch.
- Tighten the bolts (tightening specification: 8 N·m).
Special Tools
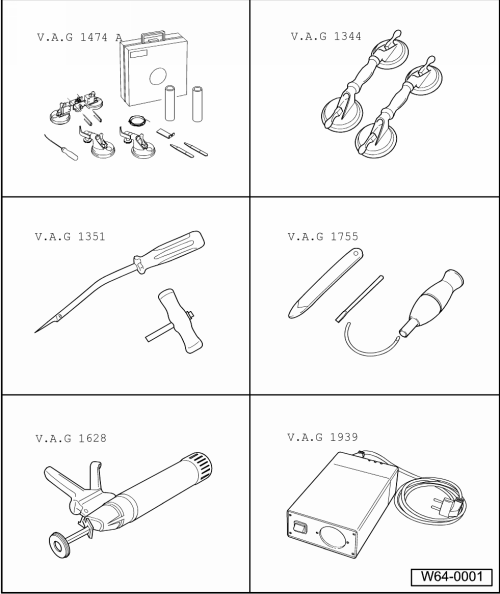
Special tools and workshop equipment required
- Flush Bonded Window Kit -VAG1474A-
- Double Suction Lifter -VAG1344-
- Bonded Window Tool Kit -VAG1351-
- Window Removing Kit -VAG1755-
- Cartridge Gun -VAG1628-
- Grindstone Holder -VAG1939-
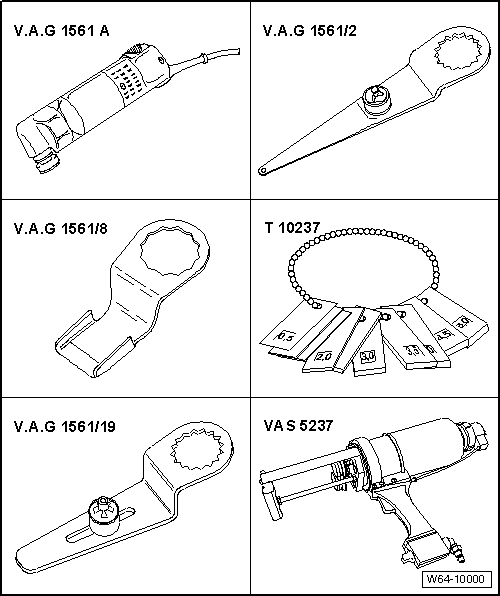
- Window Cutter -VAG1561A-
- Window Cutter - Saw Blade -VAG1561/2-
- Window Cutter - Saw Blade -VAG1561/8-
- Gauge - Gap Adjustment -3371-
- Window Cutter - Saw Blade -VAG1561/19-
- Double Cartridge Gun -VAS5237-
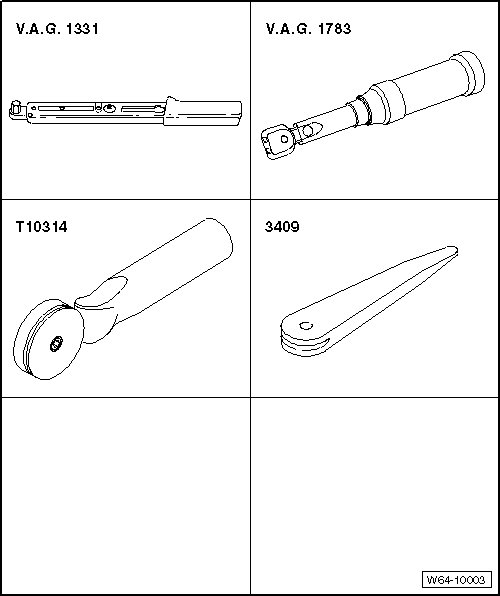
- Torque Wrench 1331 5-50Nm -VAG1331-
- Torque Wrench 1783 - 2-10Nm -VAG1783-
- Roller -T10314-
- Trim Removal Wedge -3409-
Test yourself
A quick Volkswagen Tiguan quiz: every answer comes with an explanation and a link to the manual page.