Body exterior
Roof Railing
In this manual: Body exterior
7steps
~42min
2/5difficulty
Done 0 of 7
Tools
Special tools and workshop equipment required
- Torque Wrench 1331 5-50Nm -VAG1331-
Overview - Roof Railing
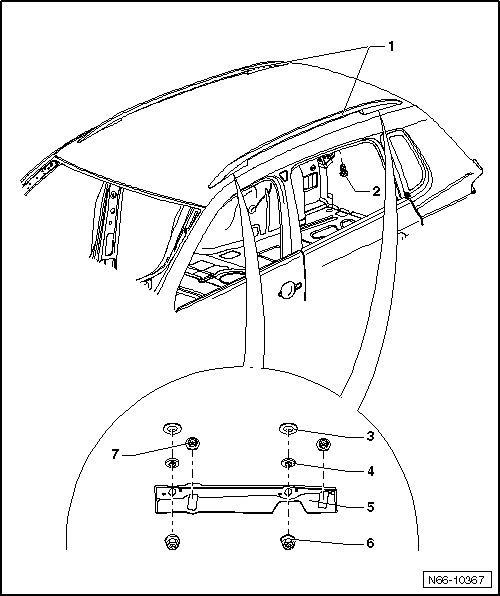
- Roof Railing
- Removing.
- Installing.
- Bolt
- Upper Conical Washer
- Upper Conical Washer
- Bracket
- Removing and installing
- New Bracket, Installing
- Hex Nut
- Tightening specification: 10 N·m.
- Roof railing threaded connection
- Quantity: 4 on each side
- Bolt
- Tightening specification: 10 N·m.
- Bracket threaded connection
- quantity: 2 per bracket
Roof Railing, Removing and Installing
Removing
Note
- If the roof railing is only removed on one side, it is sufficient to lower the headliner on this side.
- If the roof railing is removed on both sides, the headliner must be completely removed.
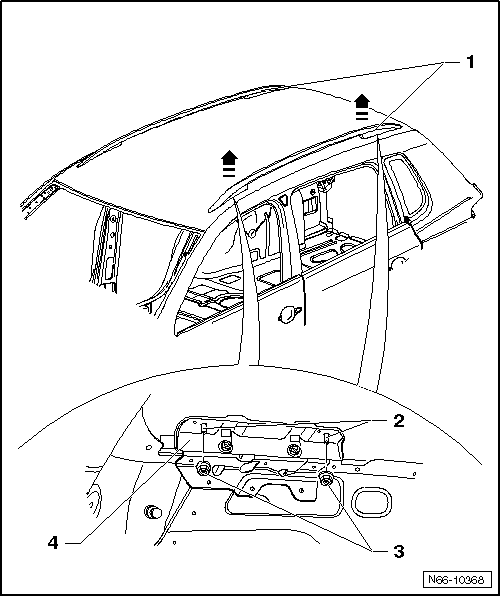
- Loosen the headliner on one side until it can be lowered.
The headliner must not be damaged when lowering it and performing the following steps.
- Remove the nuts -3- from the roof railing threaded bolts -2-.
- Guide the roof railing -1- with threaded pins upward out of the brackets -3- and evenly lift -arrows- the roof railing from the roof.
When removing the roof railing, the brackets -4- remain in the vehicle.
Installing

All brackets -4- are installed.
- Evenly place the roof railing -1- on the roof. Do this beginning with front threaded pins -2-.
- Mount the nuts -3- (tightening specification: 10 N·m).
Roof Rail Bracket, Removing and Installing
Bracket, Removing
Note
- If the bracket is to be re-installed, make sure the conical washers remain in tolerance compensations in their places.
- Always use a lower and upper conical washer.
- The conical washers must not be interchanged.
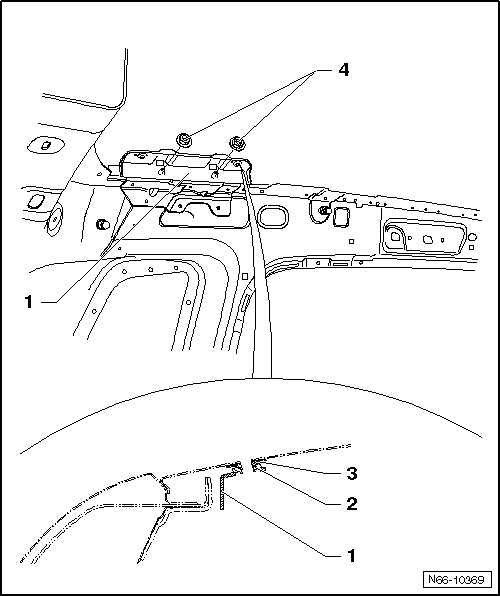
- Remove the headliner.
- Remove the roof rail.
- Remove the nuts -4-.
- Remove the bracket -1- together with tolerance compensations -2 and 3-.
If the bracket is to be reinstalled, secure the tolerance compensations with commercially available adhesive tape.
Bracket, Installing
Note
Do not interchange the conical washers -3 and 4-.
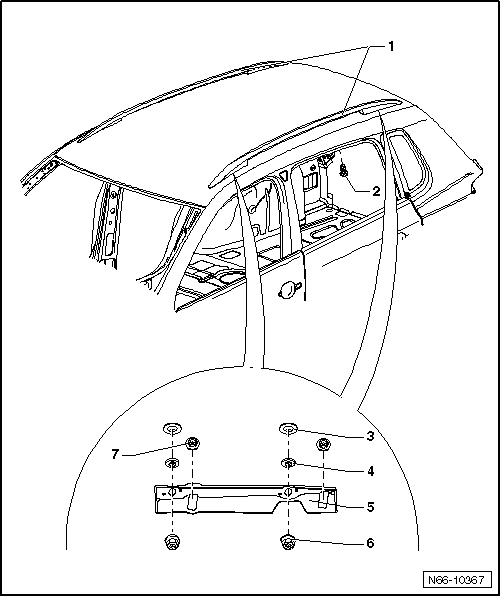
If you have secure the conical washers with adhesive tape, remove tape before installation.
- Make sure the conical washers -3 and 4- fit properly.
- Place the roof railing -1- on the roof, then guide the bracket -5- over the threaded pins until the conical washers -3 and 4- are centered.
- Tighten the nuts -6- until the bracket comes in contact with the roof.
- Tighten the nuts -7- (tightening specification: 10 N·m).
- Now tighten the nuts -6- (tightening specification: 10 N·m).
- If dents appear around the base of the roof railing, readjust the bracket.
New Bracket, Installing
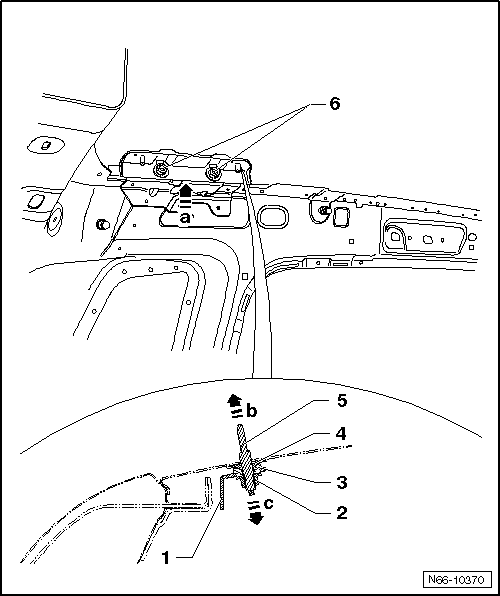
- Install the new bracket -1- until the securing pins -5- in the roof engage -arrow a-.
- Tighten the nuts -6- (tightening specification: 10 N·m).
- Remove the securing pin -5- upward -arrow b- and remove the securing cap -2- downward -arrow c-.
- If dents appear around the base of the roof railing, readjust the bracket.
Test yourself
A quick Volkswagen Tiguan quiz: every answer comes with an explanation and a link to the manual page.
Was this page helpful?