Driveshaft, Removing and Installing from Rear Final Drive
Special tools and workshop equipment required
- Counterhold - Kit - Multiple Use -T10172-
- Counterhold - Kit - Adapter 5 -T10172/5- (M8 Bolts)
- Counterhold - Kit - Adapter 6 -T10172/6- (M10 Bolts)
- High Temperature Grease -G 000 633-
- Pay attention to the notes. Refer to → Chapter "Overview - Driveshaft Bolted on Transmission Side, Audi A4 and A5".
- A two-column shop hoist should be used when working on the driveshaft.
Driveshaft, Removing from Rear Final Drive
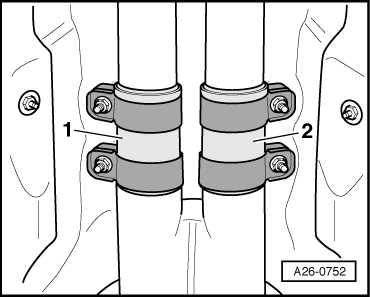
- Disconnect the exhaust system at the clamping sleeves -1 and 2-.
- Tie the front exhaust pipe(s) to the underbody.
 Note
- Do not bend the flex joint in the front exhaust pipe more than 10º or it will be damaged. Tie up the front exhaust pipes on the body and to the side.
- A second technician is needed to help remove the rear section of the exhaust system.
- Remove the rear section of the exhaust system.
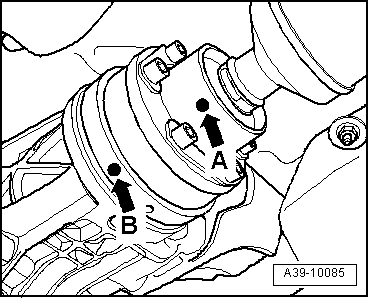
- Check whether there is a color marking on the driveshaft and at flange/driveshaft on the rear final drive -arrow A- and -arrow B-.
- If one of these markings is no longer visible (for example -arrow A- on the driveshaft), then make a mark for the missing colored dot in color.
- The mark on the driveshaft -arrow A- and on the rear final drive -arrow B- are on one line.
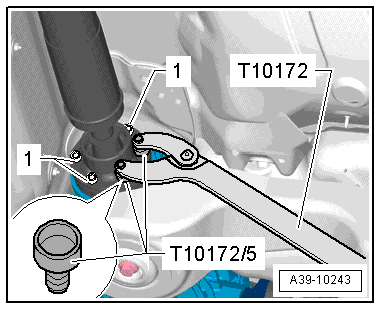
Rear Final Drive 0BF
- Remove the bolts -1- (quantity: 6) from the rear CV joint.
- Counterhold with Counterhold - Kit - Multiple Use -T10172- and Counterhold - Kit - Adapter 5 -T10172/5-.
- Remove the driveshaft from the rear final drive and move it to the side of the subframe.
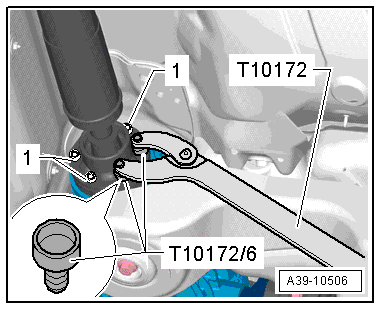
Rear Final Drive 0BE
- Remove the bolts -1- (quantity: 6) from the rear CV joint.
- Counterhold with Counterhold - Kit - Multiple Use -T10172- and Counterhold - Kit - Adapter 6 -T10172/6-.
- Remove the driveshaft from the rear final drive and move it to the side of the subframe.
Install the Driveshaft on the Rear Final Drive
Install in reverse order of removal. Pay attention to the following:
- Remove the old, dry High Temperature Grease from the CV joint and the driveshaft flange. Insert the same quantity of High Temperature Grease -G 000 633-.
- The threads in the flange shaft on the rear final drive must be cleaned of locking fluid residue. They can be cleaned with a thread tap. If the threads are not clean, the bolts will break off when they are being installed.
- After removing the driveshaft from the rear final drive, do not install the additional balance washer (thicker washer) that may be between the backing plate and the bolt.
- Always replace the bolts for driveshaft (self-locking bolts).
- Check the driveshaft seal on the rear final drive flange for damage (bent, rubber layer worn off) and replace if damaged. Replace the damaged seal.
- Position the driveshaft on the rear final drive while paying attention to the installation position:
- The dots on the driveshaft -arrow A- and on the rear final drive -arrow B- must line up.
- Maximum difference between the markings: 30º.
- Insert and tighten the new bolts -1- for the driveshaft. Follow the tightening sequence. Refer to → Fig. "Tightening Specification and Sequence - Driveshaft on the Rear Final Drive 0BE and 0BF".
- Install the rear section of the exhaust system.