Removing the Flat Tire and Installing the Spare Tire
Take off the wheel cover or center cap, if the vehicle has one, to reach the wheel bolts.
1. Do a safety check before proceeding. See If a Tire Goes Flat for more information.
2. Turn the wheel wrench counterclockwise to loosen and remove the wheel nut caps.
Do not try to remove plastic caps from the cover or center cap.
3. Pull the cover or center cap away from the wheel. Store the wheel cover in the cargo area until you have the flat tire repaired or replaced.
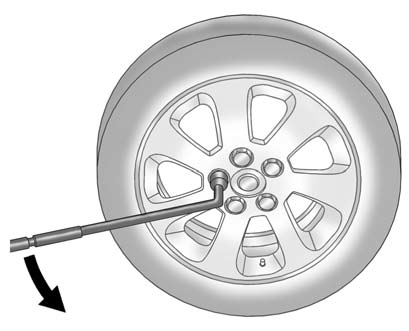
4. Turn the wheel wrench counterclockwise to loosen all the wheel nuts, but do not remove them yet.
5. Place the jack near the flat tire.
Notice: Make sure that the jack lift head is in the correct position or you may damage your vehicle.
The repairs would not be covered by your warranty.
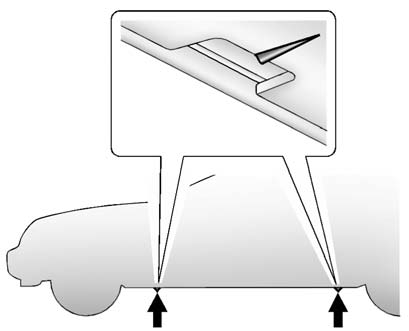
6. Position the jack lift head at the jack location nearest the flat tire.
The jacking location is indicated by a V-shaped notch in the plastic molding. The jack must not be used in any other position.
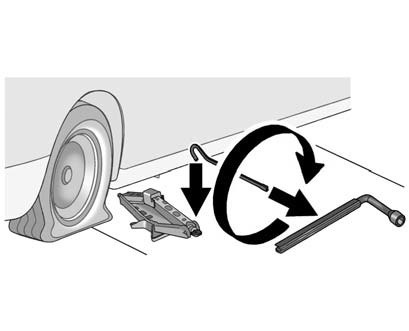
7. Insert the hooked end of the extension handle through the jack and the flat end through the wheel wrench.
8. Turn the extension with the wheel wrench clockwise to raise the jack lift head until the jack just fits under the vehicle.
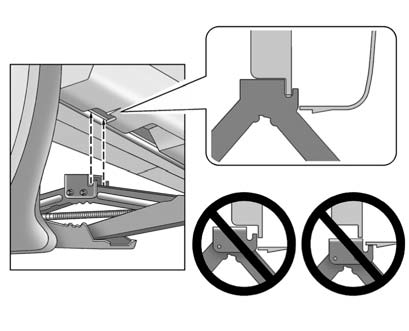
9. Raise the vehicle by turning the wheel wrench clockwise until the slots in the jack head fit into the metal flange located behind the triangle on the plastic moulding.
Notice: Using a jack to raise the vehicle without positioning it correctly could damage your vehicle. When raising your vehicle on a jack, be sure to position it correctly under the frame and avoid contact with the plastic molding.
10. Put the compact spare tire near you.
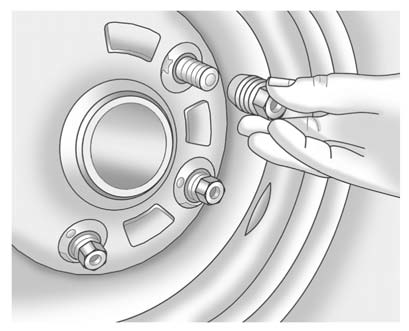
Remove all of the wheel nuts.
11. Remove the flat tire.
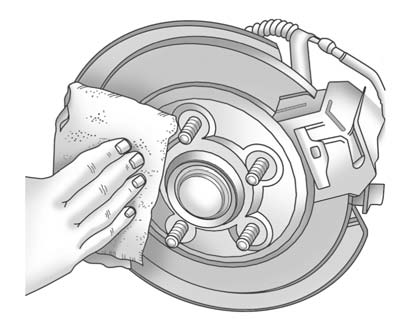
12. Remove any rust or dirt from the wheel bolts, mounting surfaces, and spare wheel.
13. Place the compact spare tire on the wheel-mounting surface.
14. Reinstall the wheel nuts.
Tighten each nut by hand until the wheel is held against the hub.
15. Lower the vehicle by turning the jack handle counterclockwise.
Notice: Improperly tightened wheel nuts can lead to brake pulsation and rotor damage.
To avoid expensive brake repairs, evenly tighten the wheel nuts in the proper sequence and to the proper torque specification.
See Capacities and Specifications for the wheel nut torque specification.
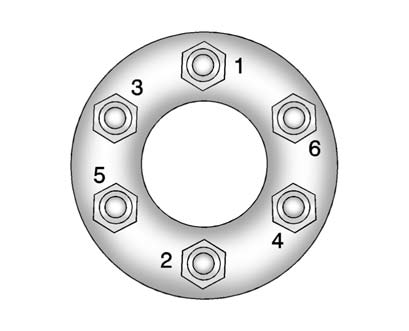
16. Tighten the wheel nuts firmly in a crisscross sequence, as shown.
17. Lower the jack all the way and remove the jack from under the vehicle.
18. Tighten the wheel nuts firmly with the wheel wrench.
When reinstalling the wheel cover or center cap on the full-size tire, tighten all five plastic caps hand snug with the aid of the wheel wrench and tighten them with the wheel wrench an additional one—quarter of a turn.
Notice: Wheel covers will not fit on the vehicle's compact spare.
If you try to put a wheel cover on the compact spare, the cover or the spare could be damaged.
Test yourself
A quick Cadillac SRX quiz: every answer comes with an explanation and a link to the manual page.