Body and Paint
General Procedures - Pyrotechnic Device Disposal
In this manual: Body and Paint
80steps
~480min
5/5difficulty
Done 0 of 80
Disposal
Disposal of Undeployed and Non-Functioning Pyrotechnic Devices
- REFER TO: Pyrotechnic Device Handling Precautions (100-00 General Information, Description and Operation).
- Disarm the SRS
Refer to: Supplemental Restraint System (SRS) Disarming (501-20B Supplemental Restraint System, General Procedures). - Remove the undeployed/non-functioning device. Refer to the appropriate procedure in this section or in the Seatbelt System section.
- When installing a new airbag or inflatable seatbelt inflator, record the required information and return the non-functioning airbag to Ford Motor Company.
Disposal of Deployed Devices and Pyrotechnic Devices That Have Been Deployed
- Disable the SRS.
Refer to: Supplemental Restraint System (SRS) Disabling (501-20B Supplemental Restraint System, General Procedures). - Remove the deployed device. Refer to the appropriate procedure in this section or in the Seatbelt System section.
- Determine if the vehicle is equipped with dual-stage driver or passenger airbags.
Refer to: Supplemental Restraint System (SRS) Airbag and Seatbelt Pretensioner – Component Location (501-20B Supplemental Restraint System, Description and Operation). - Refer to: Disposal of Deployable Devices and Pyrotechnic Devices Requiring Manual Deployment in this procedure.
- Seal the deployed airbag modules in the packaging of the new airbag module(s) or a suitable polyethylene bag and dispose of the deployed device.
- If required, dispose of in accordance with local regulations for contaminated waste.
- If there are no local regulations for contaminated waste, dispose of the deployed device in the same manner as any other part subject to disposal.
Disposal of Deployable Devices and Pyrotechnic Devices Requiring Manual Deployment
- To determine the deployable devices, the vehicle is equipped with:
Refer to: Supplemental Restraint System (SRS) Airbag and Seatbelt Pretensioner – Component Location (501-20B Supplemental Restraint System, Description and Operation). - A vehicle equipped with any of the following deployable devices requires manual deployment of the devices before disposal of the vehicle or component. For more information, refer to the appropriate part of this procedure.
- Driver Airbag
- Inflatable seatbelts
- Knee airbag
- Passenger Airbag
- Seat-mounted side airbag
- Sun Visor®
- Side curtain airbag
- To determine the pyrotechnic devices, the vehicle is equipped with:
Refer to: Supplemental Restraint System (SRS) Airbag and Seatbelt Pretensioner – Component Location (501-20B Supplemental Restraint System, Description and Operation). - A vehicle equipped with any of the following pyrotechnic devices requires manual deployment of the devices before disposal of the vehicle or component. For more information, refer to the appropriate part of this procedure.
- Inflatable seatbelts
- Seatbelt buckle pretensioners
- Seatbelt retractor pretensioners
- Seatbelt anchor pretensioners
- Adaptive load-limiting retractors
- Collapsible steering column
- To determine if the vehicle is equipped with dual-stage driver or passenger airbags:
Refer to: Supplemental Restraint System (SRS) Airbag and Seatbelt Pretensioner – Component Location (501-20B Supplemental Restraint System, Description and Operation). - If the dual-stage driver or passenger airbag has deployed as a result of a collision, the airbag requires manual deployment to make sure both stages and the active canister vent valve are deployed before scrapping the vehicle or disposing of the airbag. Refer to Driver, Passenger, Knee and Side Airbags – Remote Deployment in this procedure.
Driver, Passenger, Knee and Side Airbags - Deployment Using Scrap Tool
- Obtain 1 tire and wheel assembly and 4 additional tires (without wheels) of the same size.
- With the tire and wheel assembly facing down, stack the tires on top of each other.
- Securely tie all the tires together.
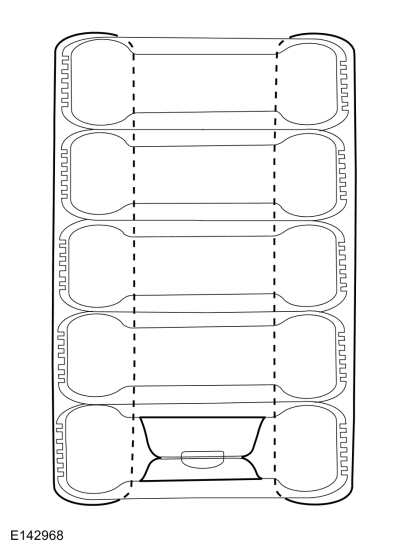
- Disarm the SRS
Refer to: Supplemental Restraint System (SRS) Disarming (501-20B Supplemental Restraint System, General Procedures). - Remove the airbag. Refer to the appropriate procedure in this section.
- If the airbag does not have a pigtail harness:
- For vehicles being scrapped, cut each airbag wire next to the electrical connector that connects to the vehicle wiring harness.
- For vehicles not being scrapped, obtain the appropriate pigtail harness kit. REFER TO the wiring diagrams manual.
- Remove the insulation (if equipped) and strip the insulation from the ends of the cut wires.
- For airbags with multiple loops, twist the wires from each loop together, then repeat for the remaining wires from each loop.
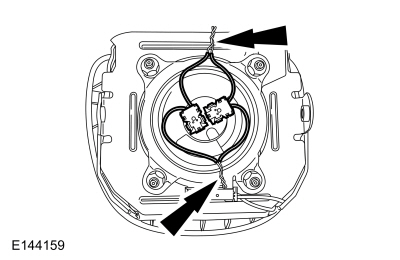
- Make a jumper harness to deploy the airbag module by obtaining 2 wires (minimum 20 gauge) at least 9.14 m (30 ft) long.
- On one end of the jumper harness, connect the wires together.
- Using the end of the jumper harness where the wires are not connected, connect each wire of the jumper harness to each airbag wire, or to the twisted wires if there are multiple loops. Use tape or other insulating material to make sure the wires do not contact each other.
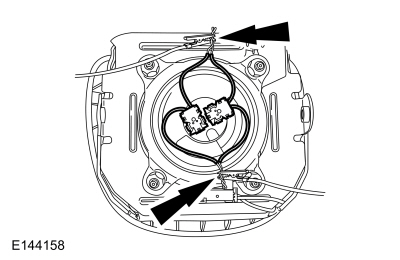
- For driver airbags, with the tire and wheel assembly at the bottom of the vertical stack, carefully place the driver airbag, with the trim cover facing up, on the wheel.
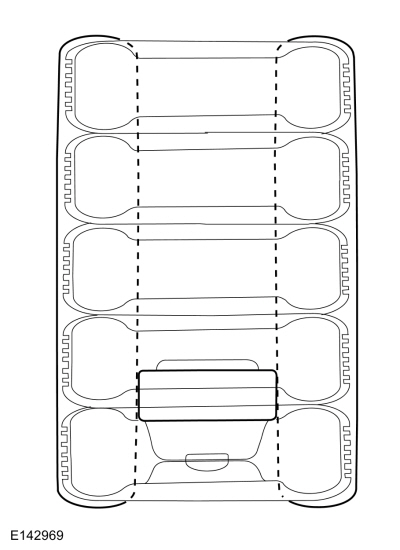
- For passenger, knee, and side airbags, lay the tire stack on its side.
- Place the airbag in the center tire so that there are 2 tires below the tire containing the airbag and 2 tires (including the tire and wheel assembly) above the tire containing the airbag.
- Stand the tire stack upright so that the wheel is on top.
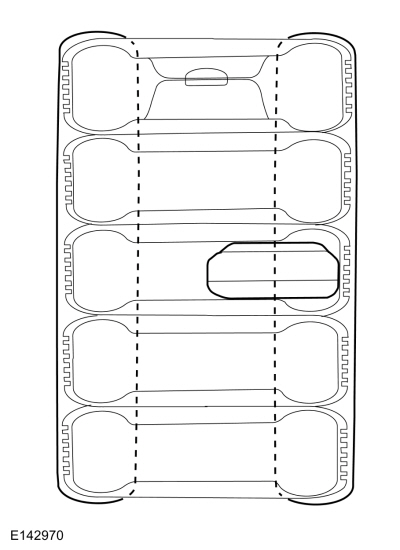
- Stay at least 9.14 m (30 ft) away from the airbag.
- From the end of the jumper harness that is not connected to the airbag, separate the 2 jumper harness wires from each other.
- Deploy the airbag by touching the ends of the 2 jumper harness wires to the terminals of the 12-volt battery.
- To allow cooling, wait at least 10 minutes before approaching the deployed airbag.
- Dispose of the deployed airbag in the same way as any other part to be scrapped.
Seat Belt Anchor, Buckle, Retractor, and Inflatable Seat Belt Pretensioners, Adaptive Load Limiting Retractors, and Inflatable Seat Belts - Remote Deployment
- Obtain 1 tire and wheel assembly and 4 additional tires (without wheels) of the same size.
- With the tire and wheel assembly facing down, stack the tires on top of each other.
- Securely tie all the tires together.
- Disable the SRS.
Refer to: Supplemental Restraint System (SRS) Disabling (501-20B Supplemental Restraint System, General Procedures). - Remove the seat belt anchor, buckle, pretensioner, or inflator. Refer to the appropriate procedure in the seat belt system section.
- If the seat belt anchor, buckle, pretensioner, or inflator does not have a pigtail harness, cut each wire next to the electrical connector that connects to the vehicle wiring harness.
- When deploying a seat belt buckle pretensioner, install a nut and bolt of sufficient length and the same diameter as those used to secure it to the seat.
- Remove the insulation (if equipped) and strip the insulation from the ends of the cut wires.
- Make a jumper harness to deploy the seat belt anchor, buckle, retractor, or inflator by obtaining 2 wires (minimum 20 gauge) at least 9.14 m (30 ft) long.
- On one end of the jumper harness, connect the wires together.
- Using the end of the jumper harness where the wires are not connected, connect each jumper harness wire to each seat belt anchor, buckle, retractor, or inflator wire. Use tape or other insulating material to make sure the wires do not contact each other.
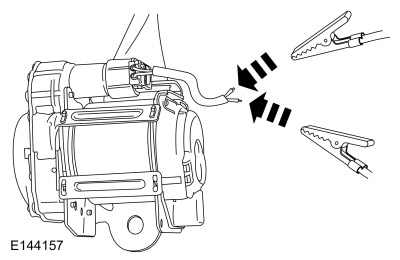
- Lay the tire stack on its side.
- Place the seat belt anchor, buckle, pretensioner, or inflator inside the center tire, making sure there are 2 tires below the tire containing the component and 2 tires (including the tire and wheel assembly) above the tire containing the component.
- Stand the tire stack upright so that the wheel is on top.
- Stay at least 9.14 m (30 ft) away from the seat belt anchor, buckle, pretensioner, or inflator.
- From the end of the jumper harness that is not connected to the seat belt anchor, buckle, retractor, or inflator, separate the 2 jumper harness wires from each other.
- Deploy the seat belt anchor, buckle, pretensioner, or inflator by touching the ends of the 2 jumper harness wires to the terminals of the 12-volt battery.
- To allow cooling, wait at least 10 minutes before approaching the deployed seat belt anchor, buckle, pretensioner, or inflator.
- Dispose of the deployed seat belt anchor, buckle, retractor, or inflator in the same way as any other part to be scrapped.
Seat Belt Anchor, Buckle and Retractor Pretensioners and Adaptive Load Limiting Retractors - Vehicle Deployment
- Disarm the SRS
Refer to: Supplemental Restraint System (SRS) Disarming (501-20B Supplemental Restraint System, General Procedures). - Access the seat belt anchor, buckle or pretensioner electrical connectors. Refer to the appropriate procedure in the seat belt system section.
- Cut each of the seat belt anchor, buckle or pretensioner wires, leaving at least 101.6 mm (4 in) for working.
- Remove the insulation (if equipped) and strip the insulation from the ends of the cut wires.
- Make a jumper harness to deploy the seat belt anchor, buckle or retractor, using 2 wires (minimum 20 gauge) at least 9.14 m (30 ft) long.
- On one end of the jumper harness, connect the wires together.
- Using the end of the connecting harness where the wires are not connected to each other, connect each wire of the jumper harness to each wire of the seat belt anchor, buckle or pretensioner. Use electrical tape or other insulating material to make sure the wires do not touch each other.
- Stay at least 9.14 m (30 ft) away from the seat belt anchor, buckle or pretensioner.
- Stay at least 9.14 m (30 ft) away from the seat belt anchor, buckle, pretensioner, or inflator.
- From the end of the connecting harness that is not connected to the seat belt anchor, buckle or pretensioner, disconnect the 2 wires of the jumper harness from each other.
- Deploy the seat belt anchor, buckle or pretensioner by touching the ends of the 2 wires of the jumper harness to the terminals of a 12-volt battery.
- Allow at least 10 minutes for cooling before approaching the deployed seat belt anchor, buckle or pretensioner.
- Dispose of the deployed seat belt anchor, buckle or retractor in the same way as any other part to be scrapped.
Safety Canopy® and Side Curtain Airbags - Vehicle Deployment
- Disarm the SRS
Refer to: Supplemental Restraint System (SRS) Disarming (501-20B Supplemental Restraint System, General Procedures). - Access the Safety Canopy®/side curtain airbag electrical connectors. For more information, refer to the appropriate procedure in this section.
- Cut each Safety Canopy®/side curtain airbag wire, leaving at least 101.6 mm (4 inches) for working room.
- Remove the insulation (if equipped) and strip the insulation from the ends of the cut wires.
- For Safety Canopy®/side curtain airbags with multiple loops, twist the wires from each loop together, then repeat for the remaining wires from each loop.
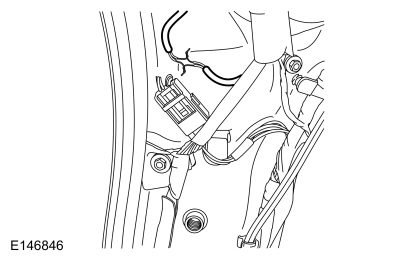
- Make a jumper harness to deploy the Safety Canopy®/side curtain airbags, using 2 wires (minimum 20 gauge) at least 9.14 m (30 ft) long.
- On one end of the jumper harness, connect the wires together.
- Using the end of the connecting harness where the wires are not connected to each other, connect each wire of the jumper harness to each wire of the Safety Canopy®/side curtain airbag, or to the twisted-together wires if multiple loops. Use tape or other insulating material to make sure the wires do not touch each other.
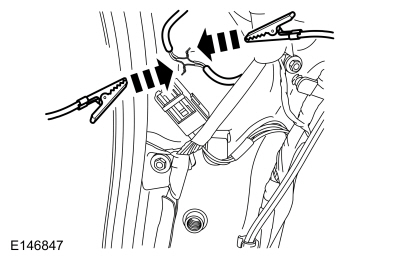
- From the end of the connecting harness that is not connected to the Safety Canopy®/side curtain airbag, disconnect the 2 wires of the jumper harness from each other.
- Deploy the Safety Canopy®/side curtain airbag by touching the ends of the 2 wires of the jumper harness to the terminals of a 12-volt battery.
- Allow at least 10 minutes for cooling before approaching the deployed Safety Canopy®/side curtain airbag.
- Dispose of the deployed Safety Canopy®/side curtain airbag in the same way as any other part to be scrapped.
Collapsible Steering Column - Vehicle Deployment
- Disarm the SRS
Refer to: Supplemental Restraint System (SRS) Disarming (501-20B Supplemental Restraint System, General Procedures). - Access the collapsible steering column electrical connector.
- Cut each of the collapsible steering column wires, leaving at least 101.6 mm (4 in) for working.
- Remove the insulation (if equipped) and strip the insulation from the ends of the cut wires.
- Make a jumper harness to deploy the collapsible steering column, using 2 wires (minimum 20 gauge) at least 9.14 m (30 ft) long.
- On one end of the jumper harness, connect the wires together.
- Using the end of the connecting harness where the wires are not connected to each other, connect each wire of the jumper harness to each wire of the collapsible steering column. Use electrical tape or other insulating material to make sure the wires do not touch each other.
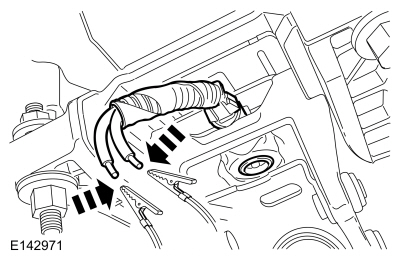
- Stay at least 9.14 m (30 ft) away from the collapsible steering column.
- From the end of the connecting harness that is not connected to the collapsible steering column, disconnect the 2 wires of the jumper harness from each other.
- Deploy the collapsible steering column by touching the ends of the 2 wires of the jumper harness to the terminals of a 12-volt battery.
- Allow at least 10 minutes for cooling before approaching the deployed steering column.
- Dispose of the deployed collapsible steering column in the same way as any other part to be scrapped.
Test yourself
A quick Ford Explorer quiz: every answer comes with an explanation and a link to the manual page.
Was this page helpful?