Body
Door Trim Panel - Front
In this manual: Body
7steps
~42min
2/5difficulty
Done 0 of 7
NOTE: 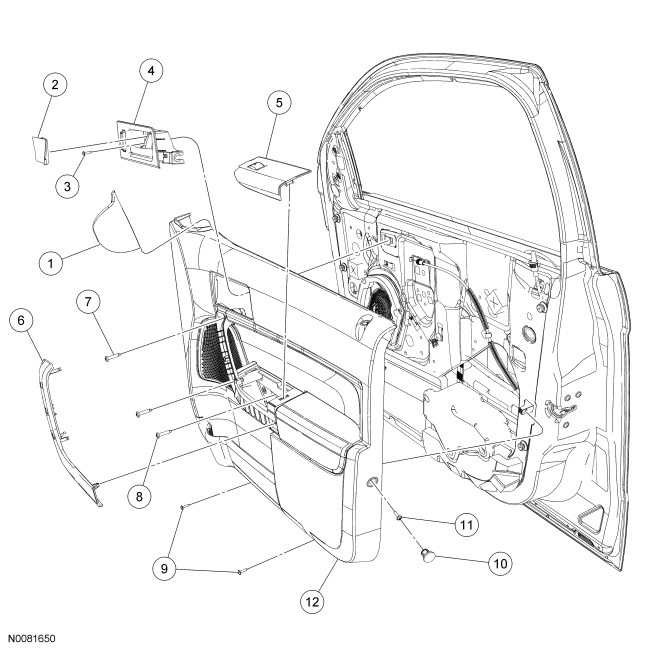
All vehicles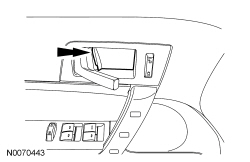
 Power windows
RH side shown, LH side similar.
NOTE:Four door shown, 2 door similar.
| Item | Part Number | Description |
|---|---|---|
| 1 | 17K709 | Front door sail panel |
| 2 | 22620 RH/ 22621 LH | Front door inside handle finish panel |
| 3 | N805651 | Front door inside handle bolt |
| 4 | 22600 RH/ 22601 LH | Front door inside handle |
| 5 | 23712 RH/ 23713 LH | Front window control switch panel |
| 6 | 22670 RH/ 22671 LH | Front door pull handle screw cover |
| 7 | W505584 | Front door pull handle screw (2 required) |
| 8 | N805651 | Front door trim panel middle screw (power windows only) |
| 9 | W708412 | Front door trim panel screws (2 required — 4 door) (3 required — 2 door) |
| 10 | — | Front door trim panel side screw cover |
| 11 | W708412 | Front door trim panel side screw |
| 12 | 23942 RH/ 23943 LH | Front door trim panel |
All vehicles
- Remove the front door sail panel.
- If equipped, disconnect the electrical connector.
- NOTE: LH front door trim panel shown, RH front door trim panel similar.
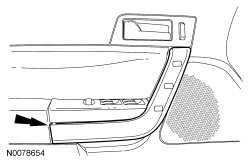
Remove the front door inside handle finish panel.
- Pull the front door inside handle outward.
- Using a suitable tool, pull the front door inside handle finish panel outward at the location shown.
- Remove the front door inside handle bolt.
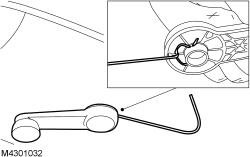
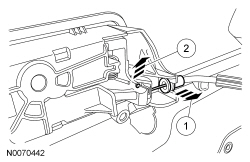
- NOTE: Use a suitable tool to remove the clip.
Remove the window regulator handle.
Power windows
- NOTE: LH front door trim panel shown, RH front door trim panel similar.
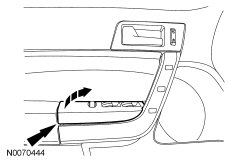
Remove the front window control switch panel.
- Lift upward at the rear of the front window control switch panel.
- Disconnect the electrical connector.
- Remove the middle door trim panel screw.
- NOTICE: Pull the front door pull handle screw cover at the rear of the front door pull handle screw cover. Otherwise, damage to the front door pull handle screw cover may occur. NOTE:
LH front door trim panel shown, RH front door trim panel similar.
Remove the front door pull handle screw cover.- Pull the rear of the front door pull handle screw cover away from the door.
- Remove the 2 front door pull handle screws.
- To install, tighten to 3 N·m.
- Remove the 3 front door trim panel screws.
- Remove the 2 front door trim panel screws.
- Lift the front door trim panel side screw cover and remove the front door trim panel side screw.
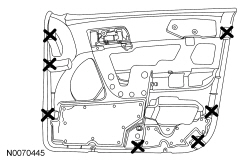
- NOTE: To help with the removal of the front door trim panel, the location of the front door trim panel retaining clips on the backside of the front door trim panel are shown. NOTE:
LH front door trim panel shown, RH front door trim panel similar.
Remove the front door trim panel.- Pull the front door trim panel away from the door to release the front door trim panel retaining clips.
- Lift the front door trim panel upward over the door lock knob.
- If equipped, remove the wire harness from the front door trim panel.
- If equipped, disconnect the door lock electrical connector.
- NOTE: LH front door trim panel shown, RH front door trim panel similar.
Remove the front door handle cable from the front door trim panel.
- Pull the front door handle cable from the front door inside handle cable retainer.
- Lift the front door handle cable upward from the front door inside handle.
- To install, reverse the removal procedure.
- To install, make sure to align the trim panel retaining clips to the retaining clip holes in the body.
Test yourself
A quick Ford Focus quiz: every answer comes with an explanation and a link to the manual page.
Was this page helpful?