Body and Paint
Body Closures
In this manual: Body and Paint
23steps
~138min
4/5difficulty
Done 0 of 23
SPECIFICATIONS
Torque Specifications
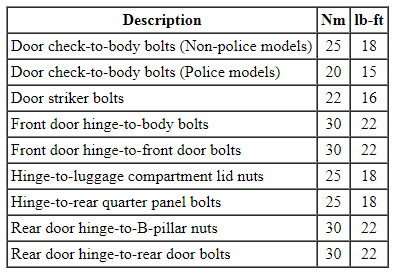
GENERAL PROCEDURES
Door Adjustment - Front
- Loosen the front door hinge-to-front door bolts until the front door is able to move slightly.
- Align the front door.
- Align the front door body angles to the rear door.
- Be sure that the front door is flush to the body.
- Tighten the front door hinge-to-front door bolts.
- Tighten to 30 N·m.
- Loosen the front door striker bolts until the striker is able to move slightly.
- Align the front door striker to the front door.
- Tighten the striker bolts.
- Tighten to 22 N·m.
Door Adjustment - Rear
- Loosen the rear door hinge-to-rear door bolts until the rear door is able to move slightly.
- Align the rear door.
- Align the rear door body angles to the rear quarter panel.
- Be sure that the rear door is flush to the body.
- Tighten the rear door hinge-to-rear door bolts.
- Tighten to 30 N·m.
- Loosen the rear door striker bolts until the striker is able to move slightly.
- Align the rear door striker to the rear door.
- Tighten the striker bolts.
- Tighten to 22 N·m.
- Adjust the front door. For additional information, refer to Door Adjustment - Front in this section.
REMOVAL AND INSTALLATION
Door
NOTE: Front door shown, rear door similar.
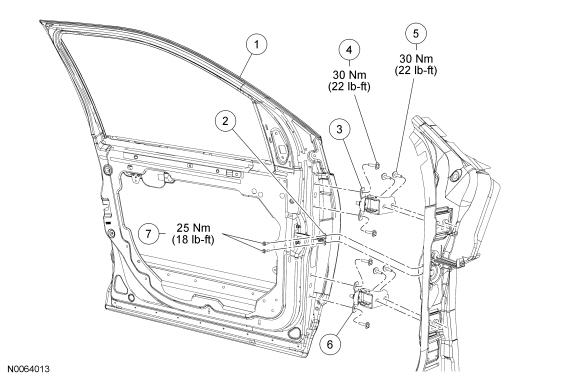
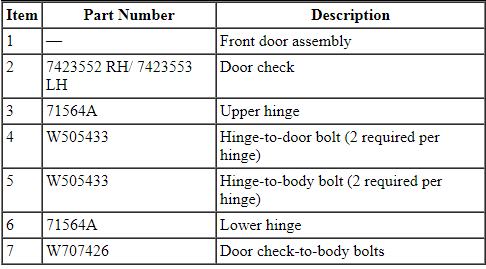
Removal and Installation
- Disconnect the front door electrical connector at the A-pillar.
- NOTE: On police vehicles an extra strap will be present.
Remove the door check bolts.
- To install, tighten to 25 N·m. (Non-police models)
- To install, tighten to 20 N·m. (Police models)
- NOTICE: To minimize the possibility of cross threading, hand start all fasteners during installation.
NOTICE: To avoid damaging the door, this step requires an assistant.
With a wax pencil, mark the position of each hinge and remove the hinge-to-door bolts.- To install, tighten to 30 N·m.
- Remove the front door.
- NOTE: If installing a new door, transfer parts as necessary.
To install, reverse the removal procedure.
- Verify door adjustment. For additional information, refer Door Adjustment - Front or Door Adjustment - Rear in this section.
Luggage Compartment Lid
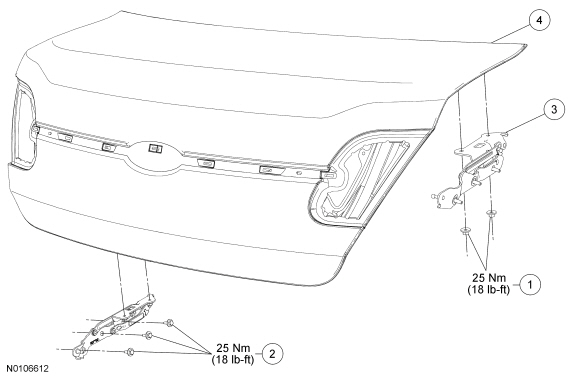
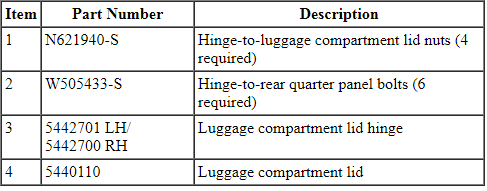
Removal and Installation
- Open the luggage compartment lid.
- Disconnect the electrical connectors.
- With the help of an assistant, remove the hinge-to-luggage compartment lid nuts.
- To install, tighten to 25 N·m.
- With the help of an assistant, remove the luggage compartment lid.
- To install, reverse the removal procedure.
Test yourself
A quick Ford Taurus quiz: every answer comes with an explanation and a link to the manual page.
Was this page helpful?