Exterior Trim and Ornamentation
SPECIFICATIONS
Torque Specifications
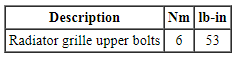
REMOVAL AND INSTALLATION
Applique - Luggage Compartment Lid
Removal and Installation
NOTE: Removal steps in this procedure may contain installation details.
- To install, tighten to 5 N·m.
- If equipped.
- To install, tighten to 5 N·m.
- To install, reverse the removal procedure.
Radiator Grille
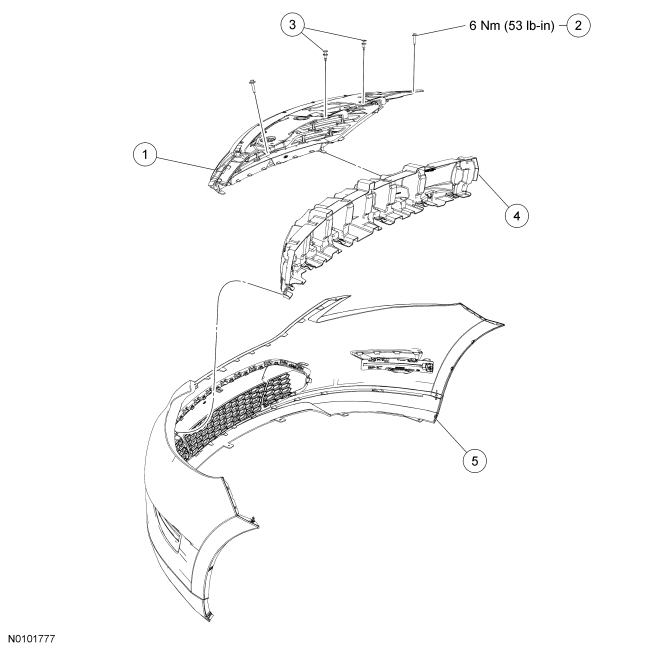
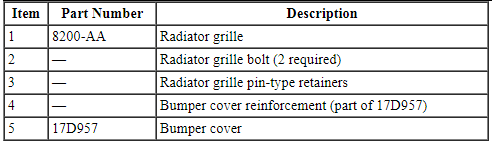
Removal and Installation
- Remove the front bumper cover. For additional information, refer to Section 501-19.
- Release the push-clip retainers and remove the bumper cover reinforcement.
- Release the retaining clips on the bumper cover and remove the radiator grille.
- To install, reverse the removal procedure.
Exterior Trim - Exploded View
Upper Trim
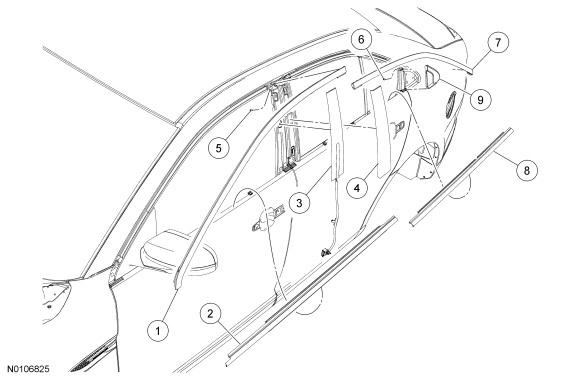
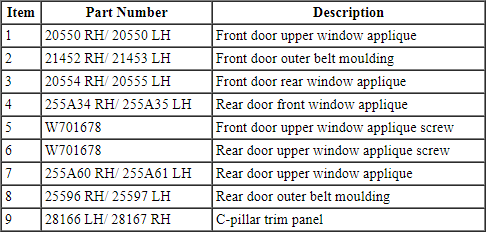
Lower Trim
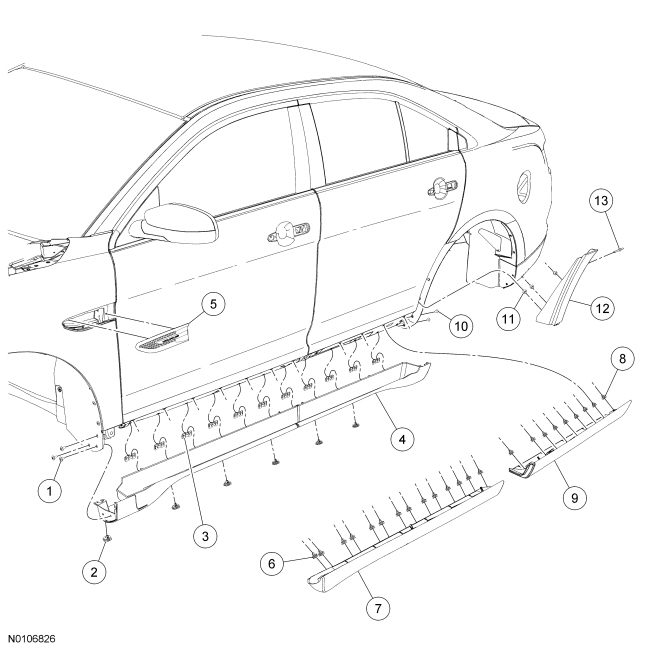
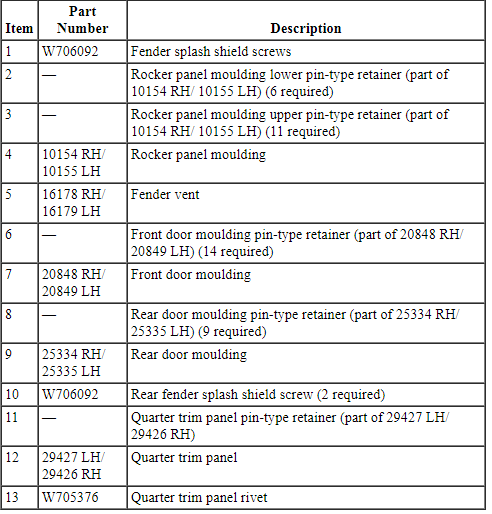
- For additional information, refer to the procedures in this section.
Fender Vent
Removal and Installation
- Remove the front fender splash shield. For additional information, refer to Section 501-02.
- Release the fender vent retaining clips through the front fender inner wheel well opening and remove the fender vent.
- To install, reverse the removal procedure.
Door Moulding - Front
Removal and Installation
NOTE: The front door moulding is a one-time use only part. If the front door moulding is removed, a new front door moulding must be installed.
- Release the front door retaining clips.
- Start at the rear lower portion of the front door moulding, moving forward along the front door.
- Remove the front door moulding.
- To install, reverse the removal procedure.
Door Moulding - Rear
Removal and Installation
NOTE: The rear door moulding is a one-time use only part. If the rear door moulding is removed, a new rear door moulding must be installed.
- Pull outward to release the rear door moulding retaining clips.
- Start at the rear lower portion of the rear door moulding, moving forward along the rear door.
- Remove the rear door moulding.
- To install, reverse the removal procedure.
Quarter Panel Moulding
Removal and Installation
- Remove the rocker panel moulding. For additional information, refer to Rocker Panel Moulding in this section.
- Remove the 2 fender splash shield pin-type retainers.
- Reposition the fender splash shield to gain access to the quarter trim panel rivet.
- Remove the quarter trim panel rivet.
- Pull outward on the rear quarter trim panel moulding to release the clips and remove the rear quarter trim panel moulding.
- To install, reverse the removal procedure.
Roof Ditch Moulding
Removal and Installation
- NOTE: Push down on the outboard side of the moulding, while pulling up on the inboard side.
Remove the roof moulding.
- Inspect the roof moulding retainer hooks for correct orientation.
- NOTE: The mounting hooks should have a 90-degree angle.
If necessary, adjust the retainer hooks using standard hand tools.
- NOTICE: Make sure the roof moulding is correctly aligned before snapping it into place or damage to the vehicle may occur.
NOTE: The windshield moulding must sit over the roof moulding.
Install the roof moulding by snapping it onto the retainer hooks.
Rocker Panel Moulding
Removal and Installation
NOTE: The rocker panel moulding is a one-time use only part. If the rocker panel is removed, a new rocker panel must be installed.
- Open the front and rear door.
- Remove the 3 front fender splash shield pin-type retainers.
- Remove the 2 rear fender splash shield pin-type retainers.
- Release the lower rocker panel moulding retainers from the body, starting from the front of the vehicle moving rearward.
- Release the upper rocker panel moulding retainers from the body, starting from the front of the vehicle moving rearward.
- Remove the rocker panel moulding.
- To install, reverse the removal procedure.
Spoiler - Rear
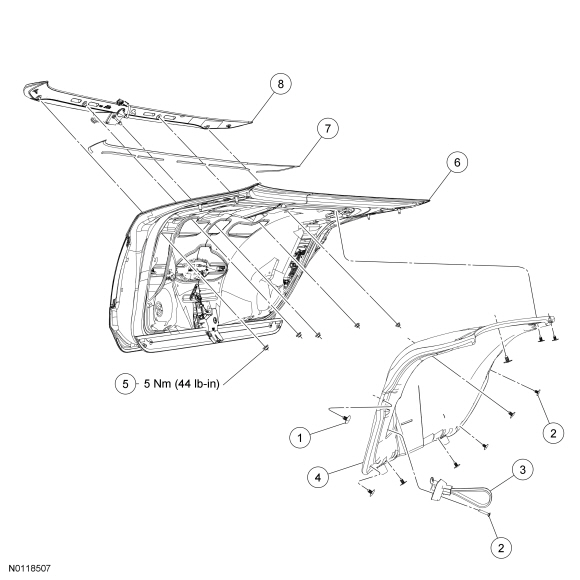
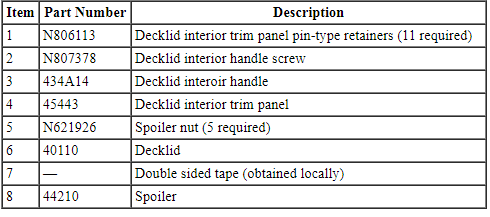
Removal
- Remove the 11 push pins and the decklid interior trim cover..
- If equipped, disconnect the rear view camera electrical connector and disconnect the 2 pin type wire harness retainers from the rear decklid.
- Remove the 5 rear spoiler nuts.
- NOTE: The rear spoiler is held on by double-sided tape.
Using a non-metal fishing line or equivalent, cut the double-sided tape.
Installation
- Clean the rear spoiler mounting surfaces.
- Apply double-sided tape to the rear spoiler as shown.
- Install the rear spoiler.
- Press the spoiler into place and apply 13.6 kg (30 lbs) of pressure along the entire length of the spoiler for 30 seconds in order to secure the adhesive.
- Install the 5 rear spoiler nuts.
- Tighten to 5 N·m.
- If equipped, connect the rear view camera electrical connector and connect the 2 pin type wire harness retainers to the rear decklid.
- Install the decklid interior trim cover and install the11 push pin retainers.
Test yourself
A quick Ford Taurus quiz: every answer comes with an explanation and a link to the manual page.